Introduction
In this post, you will learn what is burpsuite and how does it work and also you will learn all the commands in burpsuite and I am sure if you read this post completely you will be familiar with the tool and also below is the video format of the post, check it out
Video:
What is Burpsuite ❓
Burpsuite is a web application penetration testing tool. It is one of my favourites tools and I really like this tool because of the features got.
If you ask someone who doesn’t very often use Burpsuite they will probably say that this tool is just a web vulnerability scanner or probably they will say a web application penetration tool.
But according to me and those who very often use this tool, knows very well what all the tool can do !!!
The tool can ultimately do man in the middle attacks, manipulation, Intercepting HTTP requests and much more…
Hey, wait a min, If you have any doubt comment down below and I will help you out.
Moreover, I can definitely say this tool is a collective of web application tools. Man it has got lot’s of features and I am sure by end of this post, You will be familiar with the tool.
Advertisement
Also Read: Number manipulation in python
Who developed the Burpsuite tool
The tool is developed by the port swigger community and above you could probably see some of them who are working in port swigger and made this awesome tool. You could also see gov officer.
Then think about how popular the port swinger company is, I think even this company has worked for the US gov. Or maybe the gov is using this tool.
I am not kidding this tool has got a lot of features in it.
When I say the tool has got a lot of features then you must be thinking does it cost to buy this tool. Yes and no
There is a free version available and even in the free version, you can do many activities like the man in middle attacks. Then it got the professional version and even I have a subscription for the professional version.
It is really very comfortable working with the professional, Let’s talk about the difference between the free and professional at the end of the post.
And then finally port swigger has got the enterprise edition, There is not much difference between professional and enterprise. The only difference is the professional can’t do web application scanning, but the enterprise can do vulnerability scanning.
Below are the possible links I got for you guys, All these links are related to the burp suite.
Features available in the burpsuite
- Configure Outbound SOCKS Proxy
- Intercepting HTTP/HTTP Traffic
- Configuring Intercept
- Configuring the Target Scope
- Searching for a specific term
- Using the Spider
- Using the Repeater
- The Intruder
- Passive Scanning
- Active Scanning
- Utilizing Sequencer
- Decoder
- Comparer
- Using the Third-Party Extension
- Exporting the Results
- Saving the Burp Session
Advertisement
And much more if I have missed any features my apologies.
Installing Burpsuite tool
To install the tool without any error follow the below steps carefully, first and foremost check the tool is already available in your system. Because in most of the Debian machines the burp suite is pre-installed.
Click on the link above and it will redirect to this page.
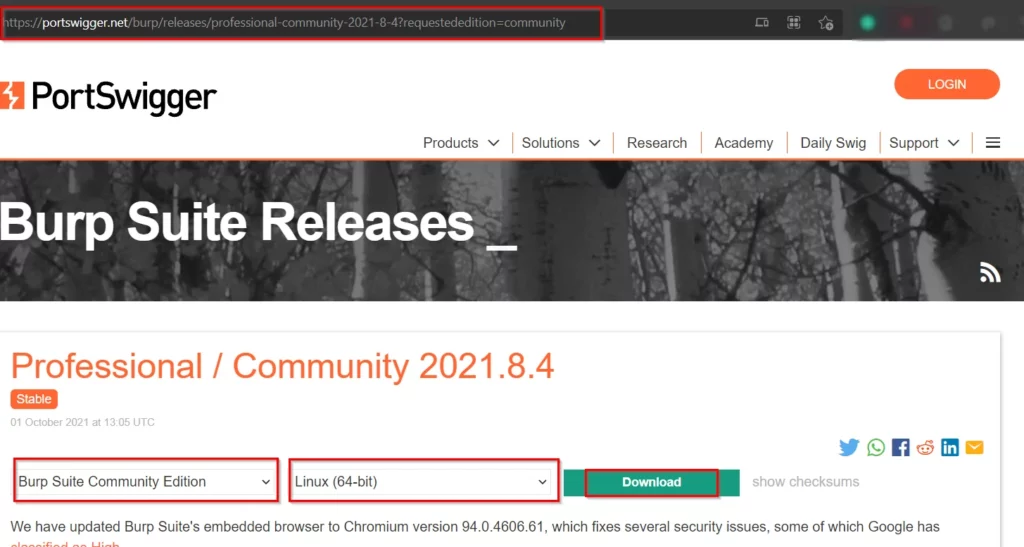
Click the version you need and choose the OS and then click download.
Now, the tool must be downloaded. Check your downloads folder.
Once downloaded follow the steps.
Linux
dpkg -i <File name>
Go to application and now you could find burp suite
Windows
Install > agree > install > install stuffs > finished
Once you completed go to the application and search for the tool and mostly you will find it.
Interface of burpsuite
Just go to the application menu and start the burpsuite. Once started you will see this interface????????
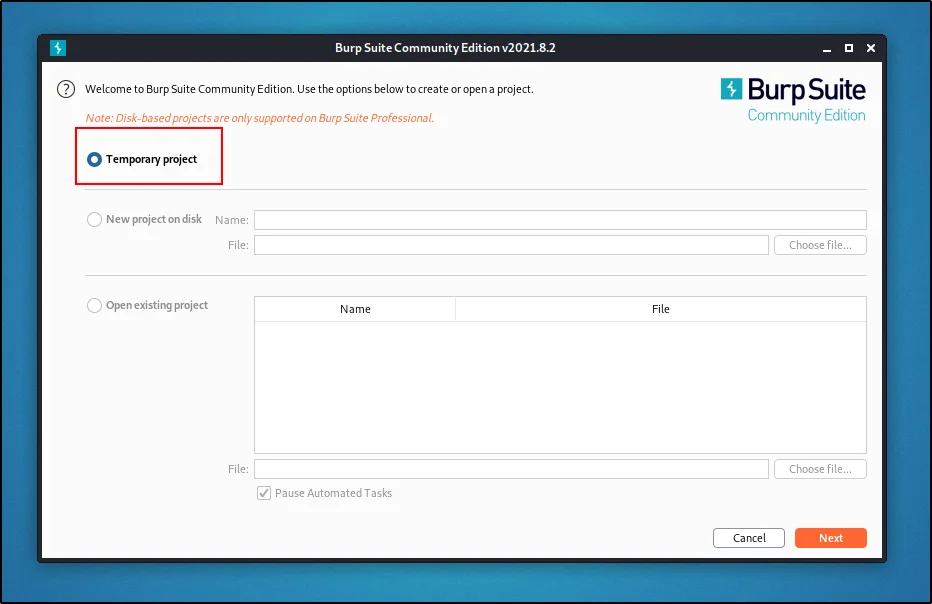
We will just start with the temporary project, remember these.
temporary: The project you have done will be deleted once you close.
New project: This option creates a separate file whatever work you do will be saved in that file
Open existing project: Opens saved project
Now, click next and let’s continue…
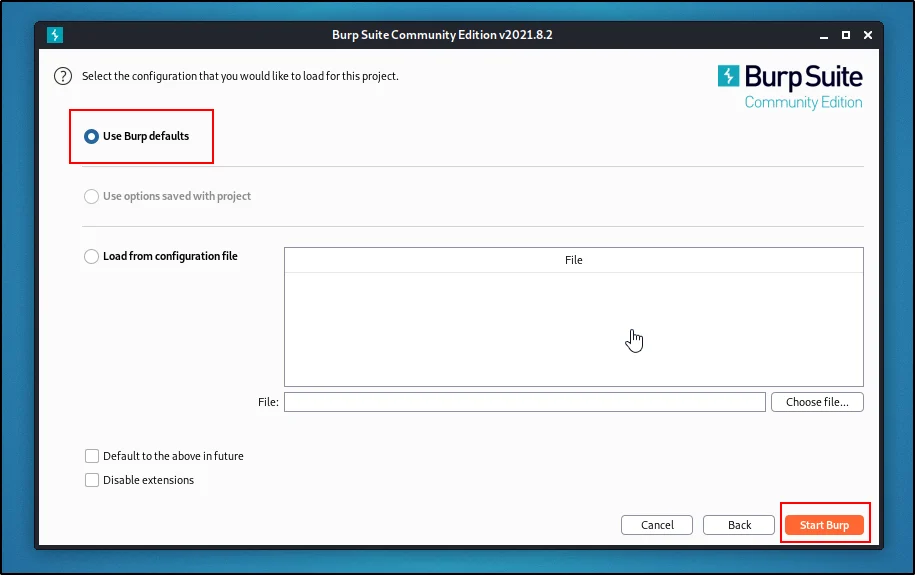
Let’s move with the burp suite default setting and I will talk about the other settings later.
Give start burp, now we are in.
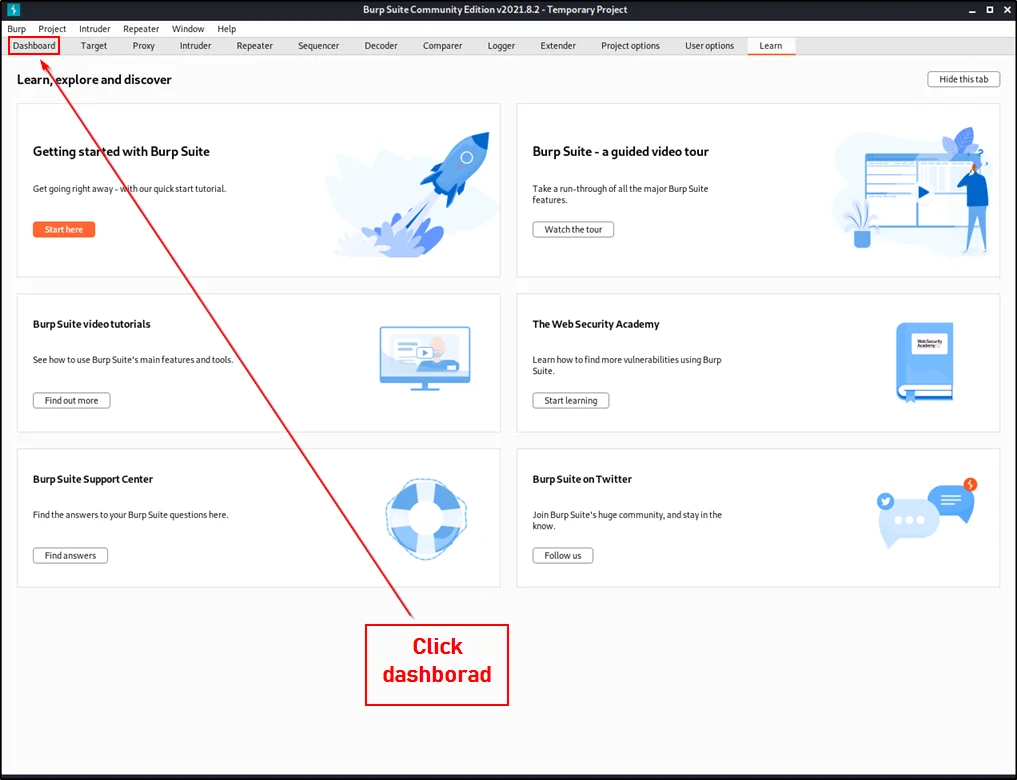
Once you click dashboard, from now on let’s talk about the terminals and the interfaces.
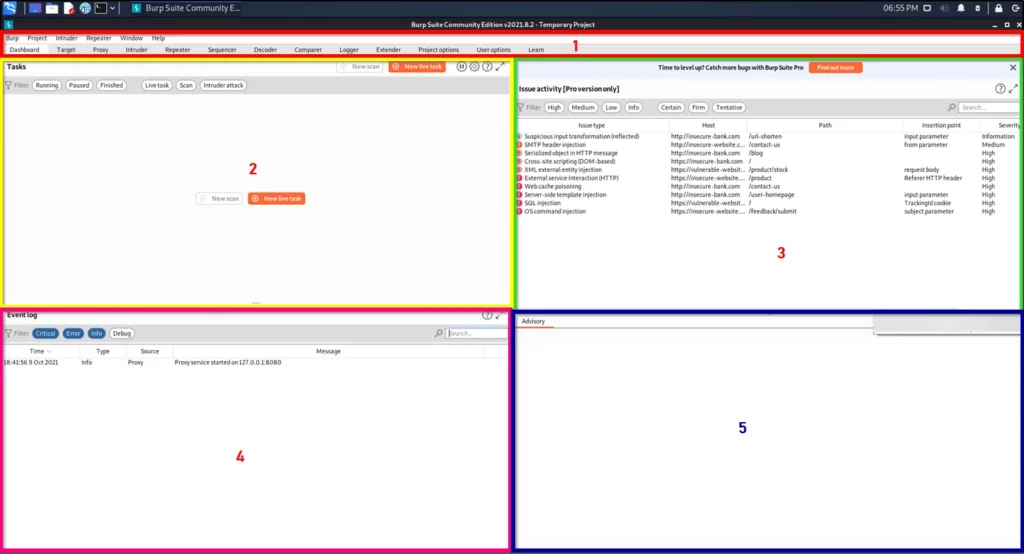
- You could see lot of menus over there and don’t worry I will be explaining all of them, read or watch the video I made.
- Could see all the task and once click on a specific task, you get a little bit information.
- You could see the isuues on the target and it will available only in pro version.
- In this place you could see all the logs.
- In this box, you could probably see only advisory, This is the place where you can see the short information about the target, like dns, http request and so on…
Advertisement
Setting up proxy in burpsuite
In this topic let’s see how to set proxy on burpsuite.
Why we need to set up proxy in burpsuite ❓
The answer is really very simple, we need to set up your own proxy so, that the target request will go through your network. So, You can also call this method a man in the middle attack.
We can set proxy in two ways;
- Using browser settings
- Installing foxy proxy or any other proxy plugins
Setting burpsuite proxy using browser settings
Just follow my steps
- Open your browser
- Go preference
- Move all the way down, click on network settings option
- Now, choose manual proxy configuration
- Enter the local host address as 127.0.0.1 and port as 8080
Have any doubt watch the burpsuite videos I made, or below is the screenshot.
- Remember port 8080 is proxy port
Setting up proxy using foxy proxy
To set up foxy proxy, click on the below link and add the foxy proxy extension
FoxyProxy Standard – Chrome Web Store (google.com)
Once the extension is added, Click on the extension

Now, click options.

Once clicked options, now click add.

Now, fill the details as I do.
- Title: Whatever you want, I am keeping as burp
- Proxy Type: HTTP
- Proxy IP address: 127.0.0.1
- Port: 8080
- Username: Optional
- Password: Optional
Once, you have filled the details just give save.
Now, again click on foxy proxy extension and click on the title you added.

Uploading Port swigger CA cert
Firstly make sure that burpsuite is running and the go to this site
http://burpsuite

Click on CA certificate on the top right corner and once you click your cert will be downloaded.

Now, to upload the go to your browser preference and select privacy and security and clcik view certificate.
preference > privacy and security > view cert
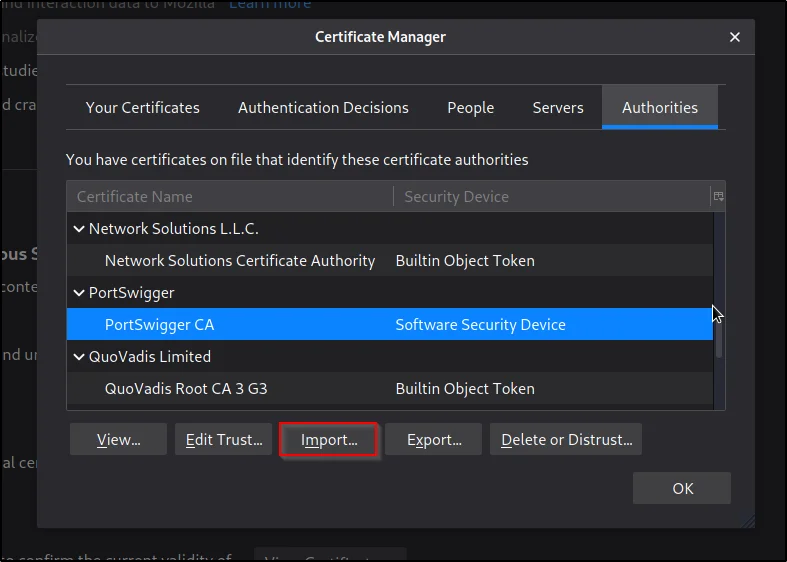
Now give import and select the certificate you downloaded. And click ok
Congratulation, We have successfully uploaded cert.
Advertisement
Intercepting HTTP and HTTPS request
To intercept HTTP and HTTPS, just open your browser and enter the target domain name and now you will see the target loads for years.
This means you are manually accessing it so, you should forward it.
To forward the request go to the proxy menu and select intercept and forward the request.

In the above image, you could see forward, drop, intercept is on, action, open browser
- Forward: This option will forward the request and you can see the request in the below box.
- Drop: Drops the request.
- Intercept is on: Make sure the intercept is on.
- Action: The action options will interact with the requests.
- Open browser: This option will open the default burp browser.
Manipulating using Repeater
After doing an intercepting, if you have found a useful request then just do a right-click and click repeater to manipulate.
Manipulating is nothing but manipulating or changing any values in the website.
So, In this example, I have intercepted http://techyrick.com/login and doing a right-click and sending the request to the repeater tab.
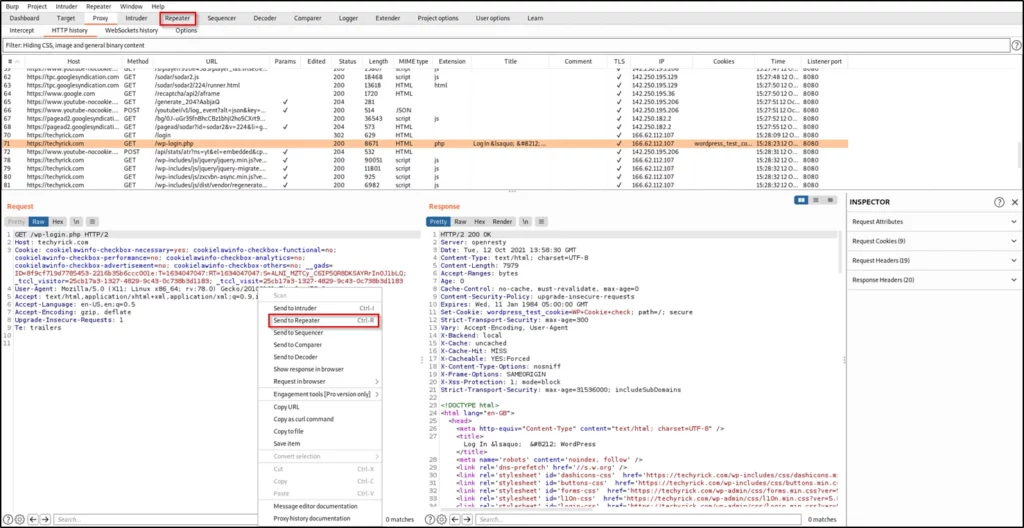
Now, Click the repeater tab.
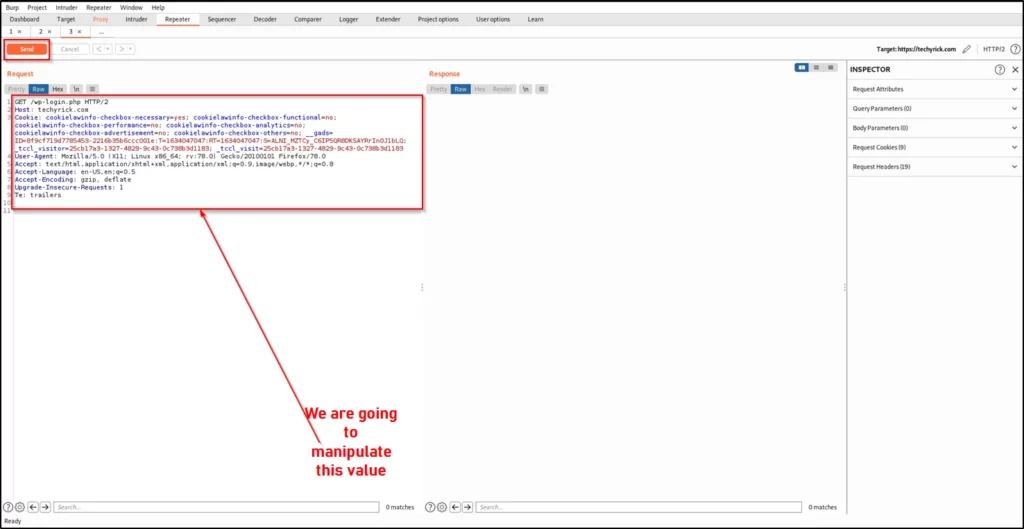
You could find any useful code like the username or the password line, If you found then just enter any values and click on the send but to see the response and once it is giving 200 redirect, which is ok then successfully you can manipulate.

On the left side, you could see the result we have sent from the proxy, and now on the right side, you can see the response for the request.
You can change any values and see how the response is and this is what the repeater tab is used for.
Password cracking using Intruder
If you can find the login page of the target the just do a right-click and send the request to the intruder.
Once you sent it to the intruder you can see something like this

You can see the target IP address or the domain name on the host, and also you can see the port on which you are going to do the attack.
On the top right corner, you can see a small button called start to attack.
Before that let’s configure our attack.
In burp suite there are four different ways to do password cracking they are;
- Sniper
- Battering ram
- Pitchfork
- Cluster bomb
Sniper: Can use only one possible password and username.
Battering ram: Uses multiple possible usernames and passwords on the target.
Pitchfork: Pitchfork is slightly different from battering ram, the 1st username you enter will correlate with the 1st password you enter.
But the username and the second password will not match.
And you can enter how many passwords and usernames you want, or you can just add the list of usernames and possible passwords.
Cluster Bomb: Spraying passwords from different parameters is called a cluster bomb password brute-forcing.
Sniper
To do a sniper password attack, make sure you selected sniper attack in the payloads.

Now, on the top right corner you can see start attack, If I give start
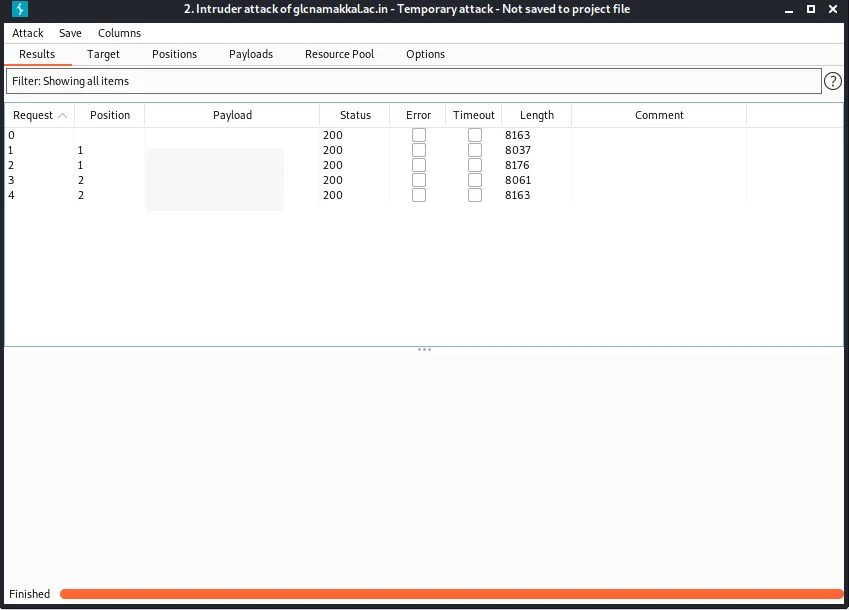
If there are any changes in the status then there must be something really going on…
Pitchfork
Now, to do a pitchfork password attack, then let’s make some changes in the payloads like this one.
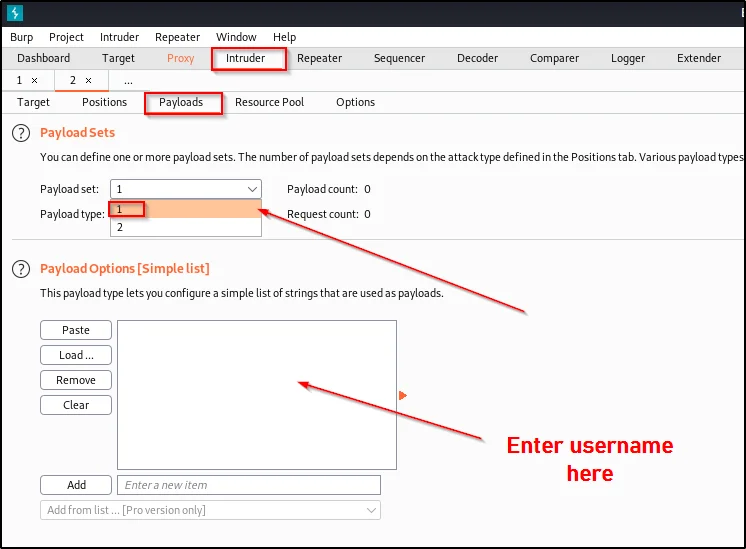
And make sure the attack type you select is pitchfork and move to the payloads tab and enter the usernames and password list.
Now, select payload set 2 and on the payload options list add the passwords.
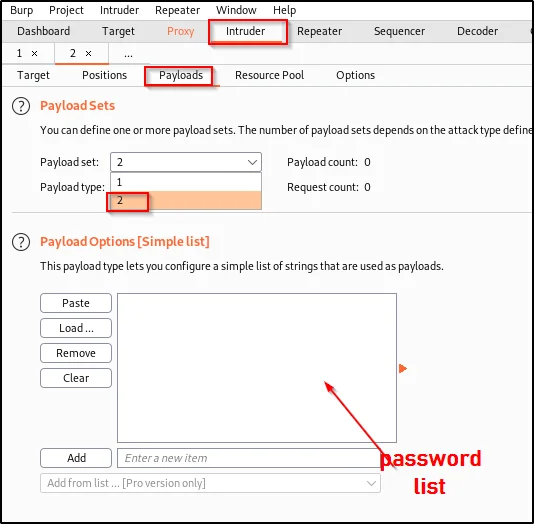
You can also load a set of usernames and passwords, by using the load option. And let me show you how does this pitchfork password attack work.
The username 1 will match with password 1 and does an attack and this continues and then username 2 password 2…
Now, you can just click on start attack to do a password spraying on the target.
For the battering ram and cluster bomb attack type watch the YT video I made on burpsuite.
Encoding and decoding using decoder
I don’t know why port swigger was kept as a decoder, but in reality, this is the decoder can encode also.
Encoding a Value
You may see a plain box and in that, I am going to enter my name called moulik, Once you enter the value on the right side you can see an option called encode as.
Just click on it and now you can encode in whatever values you want.

Decoding a value
To decode any value, on the right side you can see the decode option just click on it and do as we did for encoding.

Extender for extra tools
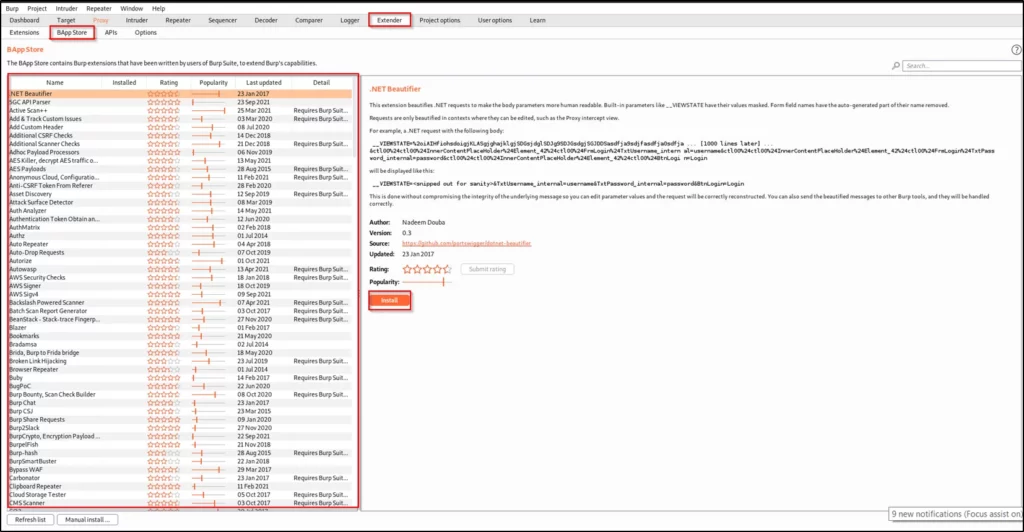
In burpsuite you can also add extra options, by just going to the extender and click on the BApp store and you can find the tool you want and it is really very simple to install too.
Conclusion
The burpsuite tool is more of like a web application information gathering tool and I really liked the tool and just go and work with it and make sure you watch the video I made on burpsuite for deeper information.
Advertisement
Also Read: Unix-privesc-check full tutorial for beginners
Also Read: Searchsploit full tutorial for beginners
